VoIP push
notifications
Add VoIP push notification support for your SIP Server and softphone
Contents
Enable VoIP push notifications
Important configuration settings
Advanced configuration options
VoIP push notification messages
About
Push notification is a method to send message to your application or to notify its user without actually opening the app. Push notifications in the context of VoIP means that VoIP softphones no longer have to maintain a persistent connection to the SIP server (run in background) in order to be able to receive incoming calls or messages. This has several benefits, the most important of which is conserving battery life of mobile devices.
All softphones provided by Mizutech that are designed for mobile devices has support push notifications: Android softphone, iOS softphone, Web phone.
Mizutech also provides ready to use server side solution for push notifications specifically designed with VoIP in mind. This solution offers the possibility for our customers to easily integrate and take advantage of push notifications in their third party VoIP softphones, without the need of purchasing softphones or VoIP server from Mizutech.
The MPUSH gateway have been built specifically to handle voip push notifications for third party SIP servers and SIP networks. If you are not using the Mizutech SIP server and wish to enable push notification for your softphones, we recommend the use of the MPUSH voip push notification gateway, which is compatible with any SIP server (including Asterisk, Cisco, Voipswitch and others) and it is capable to deliver push notifications to your custom SIP applications.
All server side solutions from Mizutech include support for push notifications including the SIP SBC, the WebRTC-SIP gateway and the SIP Softswitch. This means that you don’t need a separate MPSUH gateway if you are using any other of our server side software.
In this document, we will describe how to integrate push notifications into your app (any browser/web, Android or iOS app) to be used via the Mizu Push Gateway with any SIP server (for example your Asterisk based IP-PBX) or directly with Mizu VoIP server. For Android and Web we will be using Google’s FCM (Firebase Cloud Messaging). For iOS the preferable solution is Apple’s PushKit APNS notifications, but FCM can also be used with the limitation that notifications will be received only if the softphone is already “running in background”, meaning that it was not killed by the user. Google GCM is not supported anymore as it was deprecated by Google and replaced with Firebase.
Bellow we will present a step-by-step guide and prerequisites for adding this notification mechanism for Android/iOS softphones and browser webphones.
How it works?
The main purpose of the push
notifications is to be able to wake-up your closed or sleeping SIP client when
new call or chat message is received.
It might be used also for other events such as call cancel and custom messages.
This functionality can be enabled in your softswitch itself (if you are using the Mizu VoIP server) or by using the Mizu Push gateway as a proxy, gateway or SBC between your SIP client applications and your SIP server (all SIP servers is supported such as Asterisk, Cisco and many others).
If you are using the gateway, then a typical simplified message flow will look like this:
SIP Client -> [REGISTER] -> Push Gateway -> [REGISTER] -> SIP server
SIP Client <- [INVITE] <- Push Gateway <- [INVITE] <- SIP server <- [INVITE] <- Other extension or inbound call from a trunk
Where:
SIP client: is any Android, iOS or web-based application
Push Gateway: is any Mizutech gateway (MPUSH, MRTC or SBC)
SIP server: is your existing IP-PBX or Softswitch such as Asterisk
The server uses Apple APNs or the Google FCM to send the push notifications to iOS, Android or Web clients.
Below we will refer to the push notification service as “server” regardless if it is implemented in the SIP server or as a separate gateway/SBC.
This is how it works, step-by-step:
1. Server must be configured with your FCM API key and/or apple APNS TLS certificate
2. SIP client apps must have FCM or PushKit integrated which means the followings:
· app subscribe to Apple Push Notification Service (APNS) or Google FCM
· app will receive a device token from the above cloud service and will send this token in a special SIP header (X-MPUSH or RFC 8599) with SIP REGSITER requests as described here
· at this point the app is capable to receive push notifications
· app must implement handlers for the received notifications (just wake-up for calls or display chat messages)
· detailed integration instructions can be found here
3. The server will remember all such clients including their package name (will store in tb_users.fcm field)
By default the server will keep these clients registered even if they don’t refresh their registration (regardless their expires timeout)
4. The user can close its app at this point or the device can go to power saving sleep state
5. New call or chat arrives to the server
6. Server determines whether the destination number is a SIP client with push notification enabled (it will know which applications are “push enabled” because those apps have been sent the X-MPUSH SIP header or Contact tags in an earlier registration). If the target is not a push client then the call/chat is routed as usually, thus it is capable to decide automatically when push notification is needed or not. If the target is a push enabled client, then the followings steps will be applied
7. Server will send a notification to the applications which is delivered with the push notification cloud services (Firebase or PushKit APN).
· For the Apple APNS the push is sent either using the new HTTPS/2 protocol (default) or the old legacy binary protocol over TLS
· For Google Firebase FCM the push is sent with HTTPS requests
8. The application will receive the notification.
· If it is a chat, then normally just displays it to the user as a notification (user can launch the app by tapping on the notification)
· If it is a call, then wake up (and register at startup) and handle the incoming call as normally
9. When calls are routed to push enabled apps, the server will do it a bit differently than for normal calls:
· It will resend the INVITE more times to allow the app enough time to wake-up and register (it might send the INVITE up to 15 times)
· It will wait more time for the answer to allow the app enough time to wake-up and register (up to 40 seconds)
· It will watch for incoming register from the app and will modify its target route set at runtime to include the newly registered app
· Note that call fork is also fully supported (same user registered from multiple devices)
10. In some circumstances the server can automatically remove the push binding to prevent sending unnecessary/invalid push notifications requests. This might happen when push notification is rejected by FCM/APNS or when the app doesn’t respond to push or when the app doesn’t respond for incoming SIP requests (such as calls) upon push or if the app can’t register (such as because wrong username/password). The push binding is automatically recreated next time when the client register with push request in the signaling.
Call flow with the MPUSH gateway:
Let's suppose that A is the caller party and B is the called party (username/extension/phone number).
o The A can come from any other app registered via the gateway or from your SIP server (maybe from a standard SIP phone or a PSTN call from an external trunk). It can be also your app with push support.
o The B party must have been registered via the MPUSH gateway before the call arrives! This is your app with push notification support.
(If the call is coming from your SIP server then the call will not even arrive to the gateway if the B party is not a user on the gateway)
·
If the B
user is not registered via the gateway, then the gateway can't do anything with
the call except to route it to your SIP server (because it doesn't know the
address of the B user)
·
If the B
user is registered normally (without using X-MPUSH or RFC 8599) then the call
will be routed as normally directly to user B address, without any push notification
· If the B user is registered with push (using X-MPUSH or RFC 8599) then a push notification is sent to the B device and the call is routed to B (this case is what you wish to achieve using the MPUSH gateway)
o If the B device is already actively registered, then the call is routed normally (the push notification actually is not needed in this case)
o If the B device is sleeping or the app is closed, then the push notification will wake up to app, the app send a register at startup and the call will be routed to the address from where the register where received.
The information flow looks like this if you are using the Mizu Push Gateway (MPUSH or SBC) with you SIP server or softswitch:

Softswitch vs Gateway
Push notifications are built into all Mizutech software.
If you are using the Mizu VoIP server (softswitch) or the Windows IP-PBX, you already have everything in place for voip push notifications.
If you wish to add push notification support to your existing SIP server (be it a softswitch, proxy or IP-PBX), you can use the voip push notification gateway (known as MPUSH) which will act as a SIP proxy between your SIP server and your SIP clients.
Above the standard SIP proxy functionality, the MPUSH gateways performs the following main tasks:
· Store push notification related details about your softphones from the REGISTER sessions. This includes the client push token and optionally the client credentials as MD5 hash string
· Send a push notification (via Google or Apple cloud service) on incoming call or text message to the target device
· Might send the incoming INVITE or MESSAGE SIP signaling more times and for a longer period then specified in the SIP standards to make sure that your client has enough time to wake-up (upon the previously sent push notification) and be able to process the incoming request
All of these are done transparently with no changes required in your server configuration and the same module can be activated in our WebRTC gateway and SIP SBC (so you don’t need a separate MPSUH gateway if you are using our MRTC gateway software or SBC).
With other words, there are two ways to enable push notifications:
· Direct: in case if your SIP server has support for push notifications (such as the mizu VoIP server)
· Via gateway: the SIP client must register via a push enabled proxy or gateway (such as the MPUSH gateway)
Usage
You will need to perform the following steps to add VoIP push notification capability for your SIP client apps:
1. Install and configure your mizu server/gateway
a. Install mizu server or gateway (you can download the VoIP PUSH specific gateway from here)
b. Basic configuration (can be set in the “Configuration wizard” or in the global “Configurations” form)
c. Enable push notifications in your server/gateway (for MPUSH it is enabled by default, you just need to set your FCM package name and key in the Configurations and/or upload your Apple PushKit certificate)
Note: the FCM key and/or the Apple VoIP certificate might be configured later when you reach there at point 3 below
2. Test basic gateway/SBC functionality: configure any SIP endpoint (IP phone or softphone such as X-Lite or MizuPhone)
a. SIP server/domain: the MPUSH gateway or your push server address
b. SIP Username/password: any valid account/extension on your SIP server
c. The softphone should be able to connect/register and capable to make and receive call
3. Integrate push with your application(s)
a. Add push notification support to your application (the related SIP signaling required changes are described here).
This point is where some work have to be done by you to add a few lines of code into your app(s).
Your app will have to request for a push token and send it with the REGISTER requests in an X-MPUSH header or as defined in RFC 8599.
4. Test push notification functionality
a. Check if your app register sends the push details with the REGISTER requests (X-MPUSH header or pn-* tags in the Contact header)
b. Close your app and make a call to it: the app should receive the push notification, it should wake-up then it should receive the incoming SIP INVITE and process the call as usually (ringing and capable to answer)
Server
You can use the Mizu Server side software to add push notification capabilities for any softphone (including your own third party softphones).
In case if you are using the Mizu Softswitch, then no special configuration is required as it already has push notification support by default.
In case if you are using a third party SIP server (your own server such as Asterisk, 3CX, Cisco or any others), you can use our MPUSH gateway to add push notification support for your infrastructure which will act as a gateway/proxy between your app and your SIP sever. You can implement push notification support for your SIP network using any of the followings:
· MPUSH gateway (this is a SIP proxy with the specific purpose to handle push notifications)
· VoIP server (running as an SBC as described here)
· SIP SBC (activating push notifications in our SBC can be done with a single configuration change)
·
WebRTC-SIP gateway (use this if you need also WebRTC
support)
Both of the popular push notification service providers are supported: Google FCM and Apple APNS.
Follow these steps to configure push notification in Mizutech servers or gateways:
All the most
important settings can be configured from the “Configuration Wizard”.
Some more advanced settings can be set from the “Configuration” form or by
changing users (“Users and devices form” and routing (“Routing” form) settings,
although these are rarely required.
Gateway configuration
In short:
Just follow the configuration wizard to have a fully working push gateway.
Take attention for the followings:
· Network page: configure the server/gateway listener IP and ports correctly after your needs
· SIP server page: configure the address of your SIP server correctly
· Push page: configure FCM keys and/or Apple pushkit certificate correctly
For FCM/PushKit details read here and here.
A detailed documentation can be found here.
Details:
Once the gateway have been installed, the Admin client will automatically start the configuration wizard or you can launch it at any time from the “Config” menu. Go through the settings and set to the appropriate values. The most important thing to be set correctly is that gateway listening address and your SIP server address (you can also add more SIP server later in the routing).
You can follow our SBC guide for general server configuration including for MPUSH gateway configuration.
The main difference between a softswitch and MPUSH gateway are the followings:
· Gateways are running as a SIP proxy, thus their configuration is much more simple. Usually you need to set-up once at the beginning and it will keep running with no maintenance needed
· Gateways don’t need any active management. You will continue to manage your users, routing, billing like you did it before: on your softswitch
· Users and devices are only a virtual concept on the gateway. Accounts are created on the fly (on first request from the user) and deleted automatically (if not used for some time) and used only for internally with no user credentials or details stored on the gateway (only the SIP username and the push notification token will be stored)
· Authentications are performed transparently. When the client is connected, then the auth requests are forwarded transparently to the client. When the client is closed or sleeping then the gateway can continue to send REGISTER requests using the last known and stored MD5 checksum for the authentications, thus no clean passwords needs to be stored on the gateway
· Modules such as billing are missing on a gateway (your SIP server will remain responsible for this)
· Users to user (IP to IP) sessions (calls, chat, presence and others) can be handled entirely by the gateway between the users registered via the gateway. This will free up your server resources. You can also disabled user to user routing if you wish, thus everything will go through your server
· Some modules can be kept enabled to extend your SIP server features. For example if your SIP server is not good at RTP routing or NAT handling, then you can use the gateway as an SBC to do this task for you. Or you can exploit other gateway features like conference and text messaging
Once the gateway have been installed and configured, review the push notification related settings here.
Enable VoIP push notifications
To setup push notifications in your Mizu Server or Gateway, all you need to do is to enable and configure push notifications from the Configuration Wizard.
The Configuration Wizard is launched automatically when you first start the MManage admin client or you can launch it anytime later form Config menu from MManage -> Configuration Wizard.
In the Configuration Wizard:
· Make sure that the “PUSH” checkbox is checked on the “Roles and features” page (this step is not required for the MPUSH gateway as PUSH module is enabled by default)
· Then configure push notifications after your needs on the “Push” page.
The configuration wizard actually will just set a few global config settings:
· It will set the pushnotification config option to 1,2 or 3.
· Then if you configure Google FCM then will set the fcm_app (your app package name) and fcm_key (FCM key).
· If you configure Apple APNS PushKit then it will ask for your certificate file which can be obtained as described here.
You can set or change these also manually anytime later from the “Configurations” form. The meaning of these parameters and other possible settings are described below.
You can enable both FCM and PushKit/APNS at the same time and you can also configure multiple apps (described below).
Important configuration settings
The followings can be set also automatically by the VoIP server from the Config Wizard as described above, but worth to double check:
Set the following global config options (MManage -> Configurations form) to enable push notifications in your server or gateway:
· pushnotification: 2
· pushnotification_chat: 2
Note: some of the settings might appear in the Configurations form only after you set the pushnotification to 2 and restart the service (Control menu -> Restart) or otherwise you can insert the records manually.
In case if you are using FCM (Google Firebase):
· pushnotification_fcm: 1
· fcm_app: your app package name
· fcm_key: the FCM API key
In case if you have multiple applications, then you can configure them by fcm_app1/fcm_key1, fcm_app2/fcm_key2 ... fcm_appX/fcm_keyX global config options where X is a number from 1 to 1000.
In case if you are using PushKit (Apple/iOS APNS):
· pushnotification_pushkit: 1
· Copy the VoIP push certificate into the server app folder as file name pushkit.p12/ pushkit.pem or renamed to pushkit.PACKAGENAME.p12 or pushkit.PACKAGENAME.pem.
(This certificate can be downloaded from Apple as described here. Replace PACKAGENAME with your app Bundle ID)
In case if you have multiple iOS apps, save the certificate for each of them in your app folder as pushkit.PACKAGENAME.pem.
Advanced configuration options
Here we are listing all push notification related settings. Most of them has optimal default values (even if you don’t see their value in the configuration form). Change these only if you fully understand its meaning and the change is required for your specific use-case, otherwise leave them with their default values!
· pushnotification: enable/disable push notifications. -1: auto (if FCM keys or pushkit certs are found), 0: no, 1: yes, 2: always (even on high server load), 3=all endpoints. Default is -1.
· pushnotification_chat: pushnotification also for chat. -1: auto guess, 0=no,1=yes on low load,2,yes,3=always (even on high load). Default is -1/1.
· pushnotification_cancel: pushnotification also for cancel. 0=no,1=yes on low load,2,yes,3=always (even on high server load). Default is 0. Not recommended because cancel can be received in signaling and otherwise it would wake to app unnecessarily.
· pushnotification_fcm: enable/disable FCM -1=auto (check if fcm_app/fcm_key exists), 0=disable,1=enable
· pushnotification_pushkit: enable/disable PushKit 0=disable,1=enable,2=also for android. Default is 0 (set explicitly to 1 if you wish to enable pushkit)
· pushnotification_websocket: enable/disable push subscribe from websocket connections (WebRTC clients). -1=auto, 0=disable, 1=enable
· pushnotification_inviteretry: how much/long we try to send the INVITE. Default is 3 (which means 3x more times than the default SIP standards).
· pushnotification_clientmaxoffline: days after the server will consider the client as permanently offline and will not send push notifications anymore if no any message received from the client for these numbers of days. Default is 30.
· pushnotification_disableunreg: disable unregistration from softphones with push notification support. 0: enable unregister, 1: disable unregister, 2: convert unregister to register. Default is 2.
· pushnotification_regrefresh: instead of keeping the upper server registrations, send push notification to wake up the app also to refresh its register binding: -1 auto (default; yes if no X-PIID SIP header is sent from your app), 0: no, 1: yes, 2: remove also push binding on register timeout
· pushnotification_persists: will launch client reg endpoint on mserver startup. -1: auto (on servers with few users), 0: no, other: ep statusdate number of days. Default is -1.
· pushnotification_keepupperreg: keep upper server registrations and don’t unregister. 0: no, 1: keep register auto, 2: keep register always. Default is 1.
· pushnotification_removeon_regfail: remove push binding if upper server registrations fails (this is applied for gateways only). 0: no, 1: yes. Default is 1.
· pushnotification_removeon_subscallfail: remove binding bind on subsequent call failure. 0: no, 1: yes. Default is -1 which means 0 for gateways and 1 for servers.
· pushnotification_removeon_pushfail: remove push binding if fails to send push notification. 0: no, 1: yes. Default is 1.
· pushnotification_removeon_noanswer: remove push binding if endpoint doesn’t respond for requests. 0: no, 1: yes. Default is -1 which means 0 for gateways and 1 for servers.
· pushnotification_removeon_reject: remove push binding if caller user is rejected for any reason such as banned. 0: no, 1: yes. Default is 1.
· pushnotification_upperexpire: upper server expire interval. -1 means no change. others: specify. Default is 3600 which means one hour (you might change it to 86400 if your server has support for one day expire).
· rebuildregclients: specify the interval in seconds to verify upper registrations and relaunch if needed. Default is 3600 (one hour)
· pushnotification_ttl: time to live for the push notifications. 0: now or never, 1+: other value in seconds. Default is 0.
· pushnotification_teamid: remote teamid from packagename (first part of the pushkit apns pn-param): -1: auto, 0: no, 1: yes. Default is -1.
· pushnotification_teamidstr: the team id string is usually “.voip”. If yours differs, you can set it with this setting
· pushnotification_apnspushtype: the apns-push-type is set the “voip” for calls and “alert” for other notifications by default. In case if you wish to force something different, then you can set it with this setting
· pushnotification_topic: specify the apns-topic to be set (otherwise calculated automatically from packagename/teamid/pushtype). usually it is "voip". possible values: "voip", "alert", "null" (to don't send any apns-topic) or any other string which match your certificate
· fcm_serverurl: the FCM cloud service URL. Default is: https://fcm.googleapis.com/fcm/send
· pushkit_serverurl_legacy: the Apple PushKit cloud service URL for the legacy binary protocol. Default is: gateway.push.apple.com:2195 (For testing/development you might set to: gateway.sandbox.push.apple.com:2195)
· pushkit_serverurl_http2: the Apple PushKit cloud service URL for the new HTTP/2 protocol. Default is: api.push.apple.com (For testing/development you might set to: api.development.push.apple.com)
· pushkit_port: internal udp listen port in the pushkit process. Default is: 61111
· pushkit_localport: internal udp bind port in the mserver toward pushkit. Default is: 61110
· pushkit_protocol: PushKit/Apple APNS protocol. -1: auto, 0: binary protocol 0, 1: binary protocol 1, 2: HTTP/2. Default is -1 which means binary 1 until November 2020 and HTTP/2 after.
· pushkit_sslcertpassword: pushkit voip certificate password if required (for example if you supply a password protected pkcs12 certificate)
· prefermd5xauth: Set to 1 if the server should prefer to answer the auth request itself from the X-PIID received from client (if any). Set to 0 if the server should prefer to forward the auth requests to the client
· fcm_app: default FCM app package name
· fcm_key: default FCM server API key
· fcm_app1: additional FCM app package name
· fcm_key1: additional FCM server API key
· fcm_app2: additional FCM app package name
· fcm_key2: additional FCM server API key
· ...
· fcm_appX: additional FCM app package name
· fcm_keyX: additional FCM server API key
Note: some of the above options might appear only after you have set the pushnotification config to 1, 2 or 3 and restart the service (or reload the settings). You can also insert them manually with the + (plus sign) button on the Configurations form.
VoIP push notification messages
The message sent by the Mizutech server or gateway can be configured by rewriting the following text files: fcmmessage.txt, pushkitmessage.txt (This file can be found in the server app folder which is located by default at C:\Program Files (x86)\MPUSH\ or open the folder from MManage -> File menu -> Folders -> Server App directory)
The default message format is already optimized for VoIP (minimum delay, compatible with all platforms). Change it only if necessary for your specific use case.
The following keywords are replaced automatically at runtime:
· PACKAGE: your app package as received from X-MPUSH or pn-param in a previous REGISTER
· TOKEN: target user token as received from X-MPUSH or pn-prid in a previous REGISTER
· TO: called user name (callee)
· TYPE: 0=call,1=chat,2=cancel,3=custom message,4=refresh register binding
· FROM: caller/sender full name
· FROMUSERNAME: caller/sender username (caller id)
· FROMDISPLAYNAME: caller/sender displayname
· CALLID: SIP Call-ID of the incoming call or message
· APRIORITY: apn message priority number. 10 means immediately
· PRIORITY: message priority. Default is “high”
· TTLNUM: time to live (def to 0 for immediate delivery)
· PUSHTYPE: message type. Default value is “voip”
· SOUND: notification sound file to be played (you might instead play a sound from your app if required)
· MSG: chat message text/body
· MESSAGE: notification text (for call it looks like: Incoming VoIP call from FROM)
· TITLE: message title (for calls it looks like: Call from FROMUSERNAME)
· BODY: message body (for calls it looks like Incoming VoIP call from FROM)
For FCM the
message is defined in the fcmmessage.txt file which can be found in the
app folder and you can edit it after your needs.
The possibilities are described here and here.
The default message looks like this:
{
"message":
{
"to" : "TO",
"token" : "TOKEN",
"priority" : "high",
"content_available" : true,
"time_to_live" : TTLNUM,
"data" :
{
"ntype" : TYPE,
"nfromusername" : "FROMUSERNAME",
"nfrom" : "FROM",
"nmsg" : "MSG",
"ncallid": "CALLID",
"ntousr": "TOUSERNAME"
},
"android" :
{
"priority" : "high",
"ttl" : "TTLNUMs"
},
"webpush" :
{
"headers" :
{
"TTL" : "TTLNUM",
"Urgency": "PRIORITY"
}
},
"apns" :
{
"headers" :
{
"apns-priority" : APRIORITY,
"apns-expiration" : TTLNUM,
"apns-push-type" : "PUSHTYPE",
"apns-topic": "PACKAGE.voip"
},
"payload" :
{
"aps" :
{
"alert" :
{
"title" : "TITLE",
"body" : "BODY"
},
"content-available" : 1,
"sound" : "SOUND"
}
}
},
"aps" :
{
"content-available" : 1,
"sound" : "SOUND",
"alert" :
{
"title" : "TITLE",
"body" : "BODY"
}
}
}
}
For Apple
APNS/PushKit the message is defined in the pushkitmessage.txt file which
can be found in the app folder.
The possibilities are described here, here and here.
The default message looks like this:
{
"headers" :
{
"apns-priority" : "10",
"apns-expiration" : TTLNUM,
"apns-push-type" : "PUSHTYPE",
"apns-topic": "PACKAGE.voip"
},
"aps" :
{
"alert" :
{
"title" : "TITLE",
"body" : "BODY"
},
"content-available" : 1,
"sound" : "SOUND",
"badge" : 1
},
"data" :
{
"ntype" : TYPE,
"nfromusername" : "FROMUSERNAME",
"nfrom" : "FROM",
"nmsg" : "MSG",
"ncallid": "CALLID",
"ntousr": "TOUSERNAME"
}
}
Usually for applications only the data section is important as you can extract all the important details from there and process it after your needs (launch the application or display notification).
Monitoring
For general
monitoring, check the Dashboard, Analyze, CDR, Registrar and Logs forms in the
MManage admin client.
For example you can list the upper server registrations (toward your server)
from the Registrar form “Upper Succ” option.
Important push notification issues and events can be listed on the “Logs” form.
Statistics about push notifications can be obtained from Console menu -> Push Stats (or with the “pushstat” command sent from the “Server Console” form).
Push activated users can be quickly listed by right clicking to “Users and devices” node and select the List -> “Users with Push” popup item or from inside the “Users and devices” form right click on the “Enduser” node and select the List -> “Push enabled” popup item.
Detailed logs can be found at File menu -> Folders -> Server Logs Directory (search for Call-ID or username in the last *log.dat file and in puskit.log).
See the SBC documentation for more details abut basic usage.
In case if push notifications doesn’t work as expected, see the FAQ for troubleshooting. Contact Mizutech support if needed.
Client
This chapter is about adding VoIP notification support for your application(s).
Once your server/gateway is running with push notification enabled, you need to prepare your SIP client to send its token to the server/gateway with REGISTER and to handle the incoming push notifications.
In this chapter we present the usual configurations and required changes for all the important platforms. You can jump to the section relevant to your app and follow the step-by-step instructions.
Generic Instructions
You will need to implement the followings in your app(s) step-by-step:
1. Configure Google Firebase or iOS pushkit (or other provider)
2. Use your OS API to get a push token (Google Firebase/FCM registration token or Apple APNS pushkit device token or other such as generic webpush)
3. Configure the server/gateway according to your application settings and push notification provider as discussed above:
a. if you are using FCM then set the fcm_key and fcm_app global config options
b. if you are using PushKit then copy the certificate to the server app directory as pushkit.p12 as pushkit.APPID.p12.
c. you can use both Google FCM and Apple PushKit (for example if you have both an Android and iOS app)
4. If you are using the gateway or SBC then you need to configure your SIP client to use the gateway as the SIP proxy (not your SIP server)
5. Send the token to the MPUSH gateway/SBC or server with the SIP REGISTER requests with the X-MPUSH header or as described in RFC 8599.
6. Handle the incoming APNS or FCM (or other) push notifications which will come before calls/messages (and will wake-up your app if not running)
a. on call: wake-up the application and process the incoming call (SIP INVITE) as normally (alert the user)
b. on IM: wake-up the application and process the incoming chat (SIP MESSAGE) as normally (display the chat message)
These are discussed in the below chapters in details with exact description for each major OS/platform.
Android
Follow these steps to add Firebase (FCM) push notifications to your Android application. This can be a native Android app developed in Android Studio, Eclipse or other IDE or applications created by Xamarin or React Native using any SIP stack.
In case if you are using the Mizu Android SIP library then jump here.
In short
· Create a Firebase project and add its json config file to your project. Also add your server key and package name to the Mizu server global config (fcm_key and fcm_app)
· Implement Firebase as described here, here and here (Firebase registration and handling the push notifications)
· SIP signaling changes: implement RFC 8599 or send the X-MPUSH and X-PIID SIP headers with the REGISTER requests in the SIP signaling
Prerequisites
· A device running Android 4.0 (Ice Cream Sandwich) or newer, and Google Play services 11.8.0 or higher
· The latest version of Android Studio (You can also use other IDE such as Eclipse, however this guide is guide is for Android Studio)
Online resources
· Add FCM support to Android project
· Tutorial
Create a Firebase project
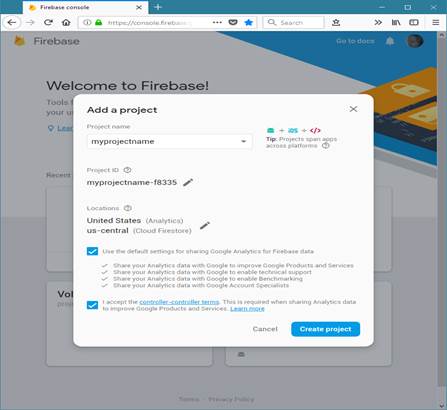
To add Firebase to your app you'll need a Firebase project and a Firebase configuration file for your app.
1. Create a Firebase project in the Firebase console, if you don't already have one. If you already have an existing Google project associated with your mobile app, click Import Google Project. Otherwise, click Add project.
2.
Click Add
Firebase to your Android app and follow the setup steps.
If you're importing an
existing Google project, this may happen automatically and you can just download the config file.
3. When prompted, enter your app's package name. It is important to enter the package name your app is using; this can only be set when you add an app to your Firebase project.
4. At the end, you'll download a google-services.json file. You can download this file again at any time.
5. If you haven't done so already, copy this into your project's module folder, typically app.
Configure Firebase for your app
To integrate the Firebase libraries into one of your own Android softphone project, you need to add Firebase to your Android project. This can be done in the following way:
First, add rules to your root-level build.gradle file, to include the google-services plugin and the Google's Maven repository:
buildscript {
repositories {
jcenter()
google()
}
dependencies {
classpath
'com.google.gms:google-services:3.0.0'
}
}
allprojects {
repositories {
jcenter()
google()
}
}
Then, in your module Gradle file (usually the app/build.gradle), add firebase messaging to dependencies and the apply plugin line at the bottom of the file to enable the Gradle plugin:
//...dependencies {
compile 'com.google.firebase:firebase-messaging:10.0.1'
}
apply plugin: 'com.google.gms.google-services'
Also, be sure to set minSdkVersion 9 or higher in the app's build.gradle to support FCM.
Manifest configuration
Add the following Services to your Android Manifest:
A service that extends FirebaseMessagingService. This provides the functionality to receive notifications.
<service

    android:name=".MyFirebaseMessagingService">

    <intent-filter>

        <action android:name="com.google.firebase.MESSAGING_EVENT"/>

    </intent-filter>

</service>
A service that extends FirebaseInstanceIdService to handle the creation, rotation, and updating of registration tokens.
<service

    android:name=".MyFirebaseInstanceIDService">

    <intent-filter>

        <action android:name="com.google.firebase.INSTANCE_ID_EVENT"/>

    </intent-filter>

</service>
Get the device registration token
On initial startup of your softphone, the FCM SDK generates a registration token for the client app instance. This token will be used later by the FCM server to send notifications to a specific device. To retrieve the current token, call FirebaseInstanceId.getInstance().getToken(). This method returns null if the token has not yet been generated.
Below is the implementation of MyFirebaseInstanceIDService used for receiving the token updates:
import com.google.firebase.iid.FirebaseInstanceId;

import com.google.firebase.iid.FirebaseInstanceIdService;


public class MyFirebaseInstanceIDService extends FirebaseInstanceIdService

{

    @Override

    public void onTokenRefresh()

    {

        // Get updated token and store it

        String updatedToken = FirebaseInstanceId.getInstance().getToken();

    }


}
Note: the token might change at device reboots. You might cache the old one, but try to request at very startup and update it if changed. It might be possible that you receive the token with a big delay (handle it asynchronously and make sure to don’t set your variable with an empty token).
Configure the server or gateway
You need to set the following global config options (from the “Configurations” form):· pushnotification_fcm: set to 1
· fcm_key: your FCM server key
· fcm_app: your app package name
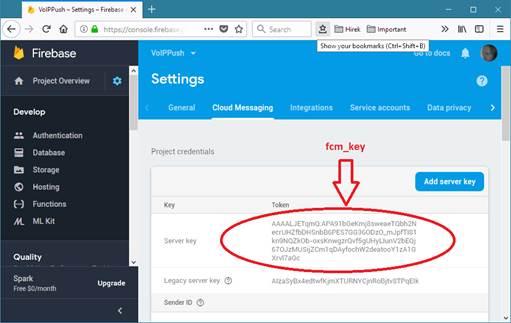
The FCM server key must be loaded from firebase console -> Project settings (gear icon in the top left near the “Project Overview”) -> Cloud Messaging page -> Cloud Messaging API (Legacy) section -> Server key.

(So it is NOT the “Web API Key” from the General page and NOT they “Key pair” and NOT the old “Legacy server key” …this latter might not be displayed anymore on the website).
If you have more then one Android applications, then you can add multiple fcm_key/fcm_app combinations appending a number after the keys like fcm_key1/fcm_app1 for your first app and fcm_key2/fcm_app2 for the second app (up to 1000).
More details about the server configuration can be found here.
Register to server or gateway
You will need to send your app package name and token to the server with SIP REGISTER requests. For this you can implement RFC 8599 or send the X-MPUSH (with the provider set to “a”) and X-PIID SIP headers with the REGISTER requests in the SIP signaling.
All the details are described in the SIP Signaling chapter.
Receive and handle notifications
On incoming notification your app might do the followings:
· On text message (chat): just display it as a notification (user can tap on it to launch your app and see more details)
· On call: just wake-up the app (once your app is started, it will auto-register and it will receive the incoming INVITE thus it can handle the incoming call as normally)
· You can also handle other events if you have some specific needs (call cancel and custom messages)
We are using the Java language for the below example code. You can follow the same logic with other language such as Kotlin.
To receive notifications we need to implement MyFirebaseMessagingService. Below is an example of that:
import com.google.firebase.messaging.FirebaseMessagingService;

import com.google.firebase.messaging.RemoteMessage;

import java.util.Map;


public class MyFirebaseMessagingService extends FirebaseMessagingService

{

    @Override

    public void onMessageReceived(RemoteMessage remoteMessage)

    {

        if (remoteMessage != null && remoteMessage.getData().size() > 0)

        {
                 // ex: {nfrom=1002, ntype=0}

            Map<String, String> data = remoteMessage.getData();

            if (data != null)

            {

                Log.v(LOG_TAG, " FCM onMessageReceived message: " + data.toString());
                String ntype = data.get("ntype"); // ntype: 0=call, 1=message

                String nfrom = data.get("nfrom");

                String nmsg = data.get("nmsg");


                if (ntype == null) ntype = "0";

                if (nfrom == null) nfrom = "";

                if (nmsg == null) nmsg = "";
                 ProcessNotification(ntype, nfrom, nmsg);


} }}
public void ProcessNotification(String ntype, String nfrom, String nmsg)
{
// display notification to user or wake up your application
}
}
Important note: In Android you have the option to “wake” up your app, more exactly to start it and bring it to foreground, you don’t have to necessarily display a notification to the user. This can be achieved by sending an Intent to your application’s main Activity. Example code:
Intent intentWake = new Intent(this, MainActivity.class);

intentWake.setFlags(Intent.FLAG_ACTIVITY_NEW_TASK);

startActivity(intentWake);
iOS with PushKit
Follow these steps to add PushKit APNS notifications to your iOS softphone:
In short
· Get a VoIP push notification certificate and configure it into your app. Also copy the certificate files into the Mizu server app folder.
· Implement PushKit in your project (registration and handling the push notifications)
· SIP signaling changes: implement RFC 8599 or send the X-MPUSH and X-PIID SIP headers with the REGISTER requests in the SIP signaling
Online resources
· Tutorial1, tutorial2, tutorial3
Prerequisites
· An iOS device for testing (notifications cannot be tested on simulator)
· Preferably the latest version of Xcode
· Apple developer account
· For development, you should change the pushkit_serverurl to the sandbox APNS (the pushkit_serverurl_http2 config to api.development.push.apple.com)
Create an App ID
Follow these steps in case if you don’t have an app id / bundle id yet:
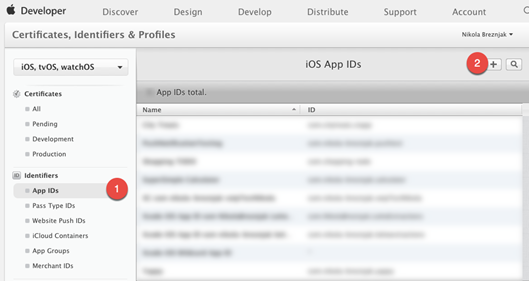
Login to your developer account and go to Certificates, Identifiers & Profiles.
Create an App ID if you don’t already have one. If already have one, then edit it and make sure to enable Push Notification services within you App ID. Follow the below steps to create an App ID.
Go to Identifiers->App
IDs and then click on the + button.

Two important
things to fill out here are App ID Description and so-called Bundle
ID (this will most
likely be something like com.yourdomain.yourappname):

Make sure to enable Push Notification services for this App ID.
VoIP push certificate
You will need a VoIP push certificate which will be used by the server to be able to connect to apple push cloud service (APNS). Follow the below steps to generate and set the certificate:
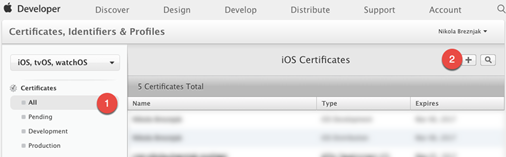
Login to your with your developer account and go to Certificates, Identifiers & Profiles.
To generate a VoIP push certificate you first need to click on the All button in the Certificates section on the left-hand side. Then, click the + button:
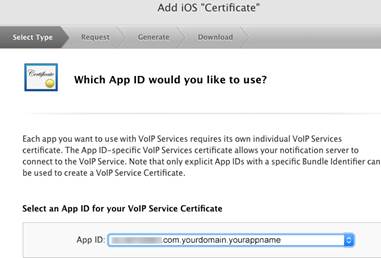
On the next page you need to select the VoIP Services Certificate:

Then select the App ID for which you’re creating this VoIP certificate:
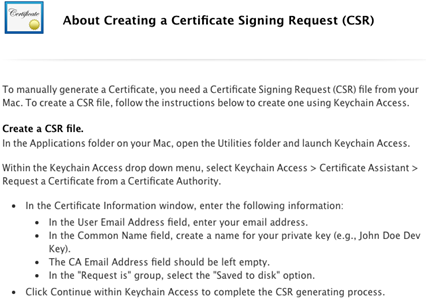
Next, you’ll be presented with instructions on how to create a so-called CSR (Certificate Signing Request) file:
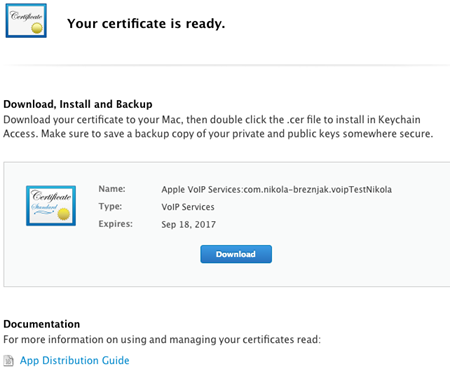
Once you create that file, you’ll select it for upload on the next screen. If everything goes well you’ll be given the certificate which you have to download:
Download certificate from Apple developer page -> voip_services.cer.
After you download the certificate, open it up, and this should open the Keychain Access application, and you should see the certificate under the My Certificates section:
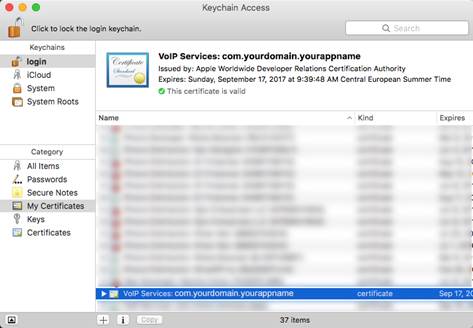
Expand the new certificate in Keychain Access, you should see the private key with either your name or your company name. Select both items by using the “Select” key on your keyboard, right click (or cmd-click if you use a single button mouse), choose “Export 2 items”.
Then save the p12 file with name “pushkit.p12″ to your Desktop – now you will be prompted to enter a password to protect it, you can either click Enter to skip the password or enter a password you desire.
Copy the certificate to your gateway
or server app folder as described here.
Old notes (skip this section):
These might be required for versions before 2020 June. New versions can use also pkcs12 certificate as is so you can just copy the pushkit.p12 certificate to the app folder as-is just make sure to set also the pushkit_sslcertpassword global config if your file is password protected.
Expand the certificate in Keychain Access, you should see the private key with either your name or your company name. Select both items by using the “Select” key on your keyboard, right click (or cmd-click if you use a single button mouse), choose “Export 2 items”.
Then save the p12 file with name “pushkit.p12″ to your Desktop – now you will be prompted to enter a password to protect it, you can either click Enter to skip the password or enter a password you desire.
Now the important part: open “Terminal” on your Mac, and run the following commands:
cd
cd Desktop
openssl pkcs12 -in pushkit.p12 -out pushkit.YOURPACKAGENAME.pem
-nodes –clcerts
Details step-by-step instructions:
1. Download certificate from Apple developer page -> voip_services.cer
2. Expand the certificate in Keychain Access, you should see the private key with either your name or your company name. Select both items by using the “Select” key on your keyboard, right click (or cmd-click if you use a single button mouse), choose “Export 2 items”.
3. Then save the p12 file with name “pushkit.p12″ to your Desktop – now you will be prompted to enter a password to protect it, you can either click Enter to skip the password or enter a password you desire.
4. Open “Terminal” on your Mac, and run the following commands:
5.
cd
cd Desktop
openssl pkcs12 -in pushkit.p12 -out pushkit.YOURPACKAGENAME.pem
-nodes –clcerts
openssl x509 -in voip_services.cer -inform der -out pushkitcertPACKAGENAME.pem
6. Install the certificate and export it from Mac Keychain as Certificates.p12 (Exporting without a passphrase did not work for me in the gateway, so that might be required)
7. Run the following from terminal:
openssl pkcs12 -nocerts -out pushkitkeyPACKAGENAME.pem -in Certificates.p12
8. Copy those 2 files to the gateway folder: copy the certificate file in the mizu server or gateway app folder renamed to pushkit.YOURPACKAGENAME.pem (replace the YOURPACKAGENAME string with your App Bundle ID such as com.yourdomain.yourappname)
9. In MManage > Configurations set pushkit_sslcertpassword to the passphrase used in step 6.
10. Once you copied the new certificate, you have to restart the gateway or reload with the “pushkitrst” command (to be send from the “Server console” form).
Uploading the .pem file to server:
Copy the certificate file in the mizu server or gateway app folder.
Make sure that the file name is pushkit.YOURPACKAGENAME.pem. (Replace the YOURPACKAGENAME string with your App ID such as com.yourdomain.yourappname)
Note:
Once the pushkit process starts, it will generate a pushkitcert.YOURPACKAGENAME.pem
and pushkitkey.YOURPACKAGENAME.pem files from pushkit.YOURPACKAGENAME.pem
file and will rename the original file to *.old. Later if you need to replace
your certificate, you just need to upload the pushkit.YOURPACKAGENAME.pem file
again.
If you apply this to a running service then you have to restart the service (restart the “mserver” NT service or from MManage -> Control -> Restart Server) or reload with the “pushkitrst” command (to be send from the “Server Console” form).
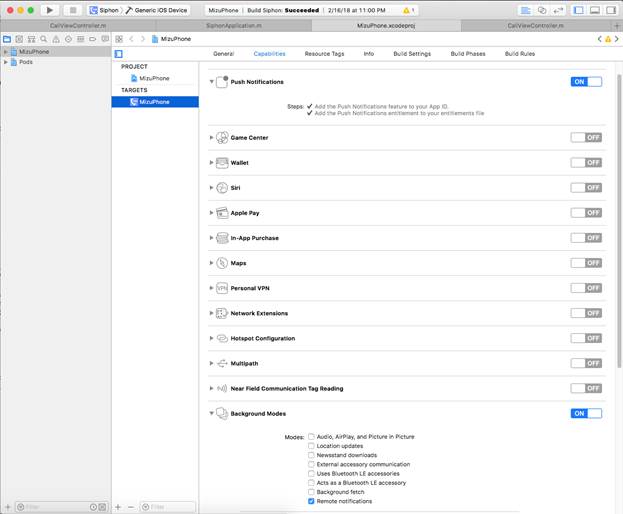
Set the app capabilities
To use the VoIP push in the app, you must set the background capabilities to your app in Xcode
For this we need to turn ON Push Notifications and the Background Modes for our app and check few of the checkboxes:
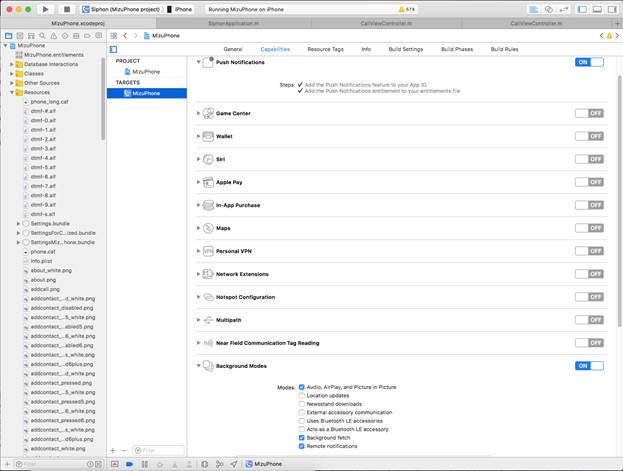
Make sure you select the following options:
- Audio, Airplay, and Picture in Picture
- Voice over IP
- Background fetch
- Remote notifications
“Voice over IP” background mode was removed in Xcode 9 from user interface, it must be added manually in the application’s Info.plist file.
Add PushKit.framework in General-> Linked Frameworks and Libraries.
Configure the server or gateway
Configure the followings on your gateway or server:· Set the pushnotification_pushkit global config to 1 (from the “Configurations” form)
· Copy the pem or p12 certificate file to the mizu server or gateway app folder. One of the followings:
o The pem file renamed as pushkit.pem (if you have only one app/one domain) or pushkit.YOURPACKAGENAME.pem (replace the YOURPACKAGENAME string with your App ID such as com.yourdomain.yourappname).
The file must contain both the certificate and the key in PEM format.
o The p12 file renamed to pushkit.p12 (if you have only one app/one domain) or pushkit.YOURPACKAGENAME.p12 (replace the YOURPACKAGENAME string with your App ID such as com.yourdomain.yourappname).
If the p12 file is password protected, then set its password (passphrase) as the pushkit_sslcertpassword global config value or create a separate pushkit.YOURPACKAGENAME.pwd text file for all your apps with the keystore password if you have multiple apps.
· Reset the pushkit module from Control menu -> Reset -> PUSH.
(or restart the “mserver” NT service from Control menu -> Restart server or send the “reload” and “pushkitrst” commands from the “Server console” form)
Note:
· Once the pushkit process starts, it will generate a pushkitcert.YOURPACKAGENAME.pem and pushkitkey.YOURPACKAGENAME.pem files from pushkit.YOURPACKAGENAME.pem file and will delete it. Later if you need to replace your certificate, you just need to upload the pushkit.YOURPACKAGENAME.pem file again.
· New versions (since 2020 June) also accepts the certificate in crt, p12 or pfx file and will auto convert as needed. Also the new version is capable to extract the package name from the cert file. This means that you might just copy the original file as pushkit.p12 file and the push module will take care of the rest.
· Do not mismatch sandbox/development and production environments as device tokens are not cross valid.
It is important to realize that development/sandbox device tokens are not valid via production APNS service and inverse.
In case if you are using development/sandbox environment then you should configure the pushkit_serverurl_legacy to gateway.sandbox.push.apple.com:2195 and/or the pushkit_serverurl_http2 to api.development.push.apple.com (or just set the ‘d:’ prefix for the X-MPUSH SIP header value from your app)
In case if you configure for production then you should configure the pushkit_serverurl_legacy to gateway.push.apple.com:2195 and/or the pushkit_serverurl_http2 to api.push.apple.com (or just set the ‘p:’ prefix for the X-MPUSH SIP header value from your app)
More details about the server configuration can be found here.
Register to the server or gateway
You will need to send your app package name and token to the server with SIP REGISTER requests. For this you can implement RFC 8599 or send the X-MPUSH (with the provider set to “i”) and X-PIID SIP headers with the REGISTER requests in the SIP signaling.
All the details are described in the SIP Signaling chapter.
Example register request using the X-MPUSH header:
REGISTER sip:gw.mydomain.com SIP/2.0
Via: SIP/2.0/TCP 192.168.1.101:14501;alias;branch=z9hG4bK.edThn;rport
From: <sip:1111@gw.mydomain.com>;tag=tUgBfpF8h
To: sip:1111@gw.mydomain.com
CSeq: 2 REGISTER
Call-ID: enutmuwaynqib
Max-Forwards: 70
Contact: <sip:1111@192.168.1.101:14501>
Authorization: Digest realm="sip.mydomain.com", nonce="WvDOe1rwzc2EDrmrsjELzwQLYnJ7tD3H", username="1111", uri="sip:gw.mydomain.com", response="1336341b517678240fb092e0cf1159a7"
Expires: 3600
X-MPUSH: i:com.mycompany.myapp:c-10-ap_Kt0:BPC91bG7STqrzueY3dRAtPhxpST4cjrd_cqQquRLkHi3eY4g
X-PIID: 14d4f932e3897a39d6a17c13b526db
X-Sy.Uppersrv: sip.mydomain.com
User-Agent: MyCoolApp
Content-Length: 0
Adding the code
The below code is Objective-C. For Swift you will need something similar (actually more simple/easier).
Import PushKit in your app delegate:
#import <PushKit/PushKit.h>
Add delegate in order to implement its functions:
@interface MyApplication : UIApplication <PKPushRegistryDelegate>
Add the following code to didFinishLaunchingWithOptions to request permission from user for displaying notifications:
if (floor(NSFoundationVersionNumber) <= NSFoundationVersionNumber_iOS_9_x_Max) {
UIUserNotificationType allNotificationTypes =
(UIUserNotificationTypeSound | UIUserNotificationTypeAlert | UIUserNotificationTypeBadge);
UIUserNotificationSettings *settings =
[UIUserNotificationSettings settingsForTypes:allNotificationTypes categories:nil];
[self registerUserNotificationSettings:settings];
} else {
// iOS 10 or later
#if defined(__IPHONE_10_0) && __IPHONE_OS_VERSION_MAX_ALLOWED >= __IPHONE_10_0
[UNUserNotificationCenter currentNotificationCenter].delegate = self;
UNAuthorizationOptions authOptions =
UNAuthorizationOptionAlert
| UNAuthorizationOptionSound
| UNAuthorizationOptionBadge;
[[UNUserNotificationCenter currentNotificationCenter] requestAuthorizationWithOptions:authOptions completionHandler:^(BOOL granted, NSError * _Nullable error) {
}];
#endif
}
Also in didFinishLaunchingWithOptions register for PushKit notifications:
pushRegistry = [[PKPushRegistry alloc] initWithQueue:dispatch_get_main_queue()];
pushRegistry.delegate = self;
pushRegistry.desiredPushTypes = [NSSet setWithObject:PKPushTypeVoIP];
Implement required delegate functions. First implement didUpdatePushCredentials to receive token:
// receive and update token
- (void)pushRegistry:(PKPushRegistry *)registry didUpdatePushCredentials:(PKPushCredentials *)credentials forType:(NSString *)type
{
if(!credentials.token || [credentials.token length] < 1) {
NSLog(@"PushKit voip token NULL");
return;
}
// convert token to NSString
const char *data = [credentials.token bytes];
NSMutableString *token = [NSMutableString string];
for (NSUInteger i = 0; i < [credentials.token length]; i++) {
[token appendFormat:@"%02.2hhX", data[i]];
}
NSString *pushKitToken = [token copy];
pushKitToken = [[[pushKitToken
stringByReplacingOccurrencesOfString: @"<" withString: @""]
stringByReplacingOccurrencesOfString: @">" withString: @""]
stringByReplacingOccurrencesOfString: @" " withString: @""];
NSLog(@"PushKit received token: %@", pushKitToken);
}
Then implement didReceiveIncomingPushWithPayload. Here we receive and parse the notification.
Important note: Once you receive a notification, you will be responsible for presenting it to the user.
The PushKit notification that you will receive has the following JSON format by default:
{
"headers" :
{
"apns-priority" : "10",
"apns-expiration" : TTL
},
"aps" :
{
"alert" :
{
"title" : "TITLE",
"body" : "BODY"
},
"content-available" : 1,
"sound" : "SOUND"
},
"data" :
{
"ntype" : TYPE,
"nfrom" : "FROM",
"nmsg" : "MSG"
}
}
See the pushkitmessage.txt in your server or gateway app folder for the exact JSON format.
- (void)pushRegistry:(PKPushRegistry *)registry didReceiveIncomingPushWithPayload:(PKPushPayload *)payload forType:(NSString *)type
{
if (payload && [payload dictionaryPayload])
{
NSLog(@"PushKit didReceiveIncomingPushWithPayload");
NSDictionary *msg = [payload dictionaryPayload];
NSString *nfrom = @""; // other party number
NSString *ntype = @""; // can be “0” for calls, “1” for chat messages, “2” for cancel, “3” for custom message, “4” to request re-register
NSString *nmsg = @""; // will contain the first part of the chat message
NSString *title = @""; // Title of the notification
NSString *body = @""; // Body of the notification, for example: “Incoming VoIP call from: 1234556”
NSString *sound = @"";
// parse notification
NSDictionary *aps = msg[@"aps"];
NSDictionary *data = msg[@"data"];
if (aps && aps[@"sound"] && [aps[@"sound"] length] > 0) sound = aps[@"sound"];
if (aps && aps[@"alert"])
{
NSDictionary *alert = aps[@"alert"];
if (alert && alert[@"title"] && [alert[@"title"] length] > 0) title = alert[@"title"];
if (alert && alert[@"body"] && [alert[@"body"] length] > 0) body = alert[@"body"];
}
if (data && data[@"nfrom"] && [data[@"nfrom"] length] > 0) nfrom = data[@"nfrom"];
if (data && data[@"ntype"]) ntype = data[@"ntype"];
if (data && data[@"nmsg"] && [data[@"nmsg"] length] > 0) nmsg = data[@"nmsg"];
NSLog(@"PushKit notification received nfrom: %@; ntype: %@; nmsg: %@; title: %@; body: %@; sound: %@", nfrom, ntype, nmsg, title, body, sound);
[yourViewController PKNotifyUser:nfrom type:ntype msg:nmsg tit:title bdy:body snd:sound];
}
}
Add the below function to your ViewController to display a local notification for the user:
- (void)PKNotifyUser:(NSString *)nfrom type:(NSString *)ntype msg:(NSString *)nmsg tit:(NSString *)title bdy:(NSString *)body snd:(NSString *)sound
{
NSString *alertbody = nmsg;
if (!alertbody || [alertbody length] < 2)
{
if ([ntype isEqualToString(@"1")])
alertbody = [NSString stringWithFormat:@"Incoming message from: %@", nfrom];
else
[NSString stringWithFormat:@"Incoming call from: %@", nfrom];
}
// for iOS lower than 10
if (floor(NSFoundationVersionNumber) <= NSFoundationVersionNumber_iOS_9_x_Max)
{
UILocalNotification *localNotification = [[UILocalNotification alloc] init];
localNotification.alertBody = alertbody;
localNotification.soundName = UILocalNotificationDefaultSoundName;
[[UIApplication sharedApplication] presentLocalNotificationNow:localNotification];
}else
{
// iOS 10 or later
#if defined(__IPHONE_10_0) && __IPHONE_OS_VERSION_MAX_ALLOWED >= __IPHONE_10_0
UNMutableNotificationContent *content = [[UNMutableNotificationContent alloc] init];
content.title = @"";
content.body = alertbody;
content.sound = [UNNotificationSound defaultSound];
UNTimeIntervalNotificationTrigger *trigger = [UNTimeIntervalNotificationTrigger
triggerWithTimeInterval: 0.1f
repeats:NO];
UNNotificationRequest *request = [UNNotificationRequest requestWithIdentifier:@"FiveSecond"
content:content
trigger:trigger];
// schedule localNotification
UNUserNotificationCenter *center = [UNUserNotificationCenter currentNotificationCenter];
[center addNotificationRequest:request withCompletionHandler:^(NSError * _Nullable error) {
if (!error)
{
NSLog(@"PKNotifyUser UNUserNotificationCenter succeded");
}else
{
NSLog(@"ERROR, PKNotifyUser UNUserNotificationCenter failed");
}
}];
#endif
}
}
iOS with FCM
iOS apps usually integrates with PushKit for push notifications which is described in the above chapter.
However, some developers might choose to use FCM also for iOS apps which is described in this chapter.
As we mentioned earlier, FCM can also be used for delivering notifications to iOS applications, with the limitation that notifications will be received only if the application is already “running in background”, meaning that it was not killed by the user. Follow these steps to add FCM notifications to your iOS softphone:
In short
· Create a Firebase project and add its plist config file to your project. Also add your server key and package name to the Mizu server global config (fcm_key and fcm_app)
· Implement Firebase (Firebase registration and handling the push notifications)
· SIP signaling changes: implement RFC 8599 or send the X-MPUSH and X-PIID SIP headers with the REGISTER requests in the SIP signaling
Online resources
· Add FCM support to iOS project
Prerequisites
Before you begin, you need a few things set up in your environment:
· Xcode 8.0 or later
· Your Xcode softphone project must be targeting iOS 8 or above
· Swift projects must use Swift 3.0 or later
· The bundle identifier of your app
· CocoaPods 1.2.0 or later
For Cloud Messaging:
· A physical iOS device
· An Apple Push Notification Authentication Key for your Apple Developer account
· In Xcode, enable Push Notifications in App > Capabilities
Add Firebase to your softphone
To add Firebase to your softphone, you will need a Firebase project and a Firebase configuration file for your app, just like for Android.
1. Create a Firebase project in the Firebase console, if you don't already have one. If you already have an existing Google project associated with your mobile app, click Import Google Project. Otherwise, click Add project.
2. Click Add Firebase to your iOS app and follow the setup steps. If you're importing an existing Google project, this may happen automatically and you can just download the config file.
3.
When prompted, enter your app's
bundle ID. It's important to enter the bundle ID your app is using; this can
only be set when you add an app to your Firebase project. This will usually be
something like: com.yourdomain.yourappname
4.
At the end, you'll download a GoogleService-Info.plist
file. You can download this file again at any time.
- If you haven't done so already, add this file to your Xcode project root using the Add Files utility in Xcode (From the File menu, click Add Files). Make sure the file is included in your app's build target.
Add the SDK
You need to install the SDK. We recommend using CocoaPods to install the libraries. You can install CocoaPods by following the below. More details about CocoaPods installation can be found here. If you'd rather not use CocoaPods, you can integrate the SDK frameworks manually, but it’s more cumbersome this way. However, if you chose to do it manually, you can find instructions here.
1. Installing CocoPods: open the terminal in you Mac OS X and enter the following commands:
$ sudo gem install cocoapods 2.Create a Pod file in your project:
$ cd your-project directory

$ pod init
3. Add the pods that you want to install. You can include a Pod in your Podfile like this:
pod 'Firebase/Core'

pod 'Firebase/Messaging'
This will add the prerequisite libraries needed to get Firebase up and running in your iOS app.
4. Close Xcode, if it’s running. Install the pods and open the .xcworkspace file to see the project in Xcode.
$ pod install

$ open your-project.xcworkspace
After pod install has finished, it will create an .xcworkspace type file. From now on you must use this file to open your project, because you will have your own project and a Pods project attached to it. Never open your project using .xcodeproj because it can mess it up.
5. Download a GoogleService-Info.plist file from here and include it in your app
Configuring APNs with FCM
The Firebase Cloud Messaging APNs interface uses the Apple Push Notification service (APNs) to send messages up to 4KB in size to your iOS app, including when it is in the background.
To enable sending Push Notifications through APNs, you need:
- An Apple Push Notification Authentication Key for your Apple Developer account. Firebase Cloud Messaging uses this token to send Push Notifications to the application identified by the App ID.
- A provisioning profile for that App ID.
Create the authentication key
Below are the steps to follow to generate an authentication key for an App ID enabled for Push Notifications:
1. Login to your developer account and go to Certificates, Identifiers & Profiles, and under Keys, select All.
2. Click the Add button (+) in the upper-right corner.
3. Enter a description for the APNs Auth Key
4. Under Key Services, select the APNs checkbox, and click Continue.
5. Click Confirm and then Download. Save your key in a secure place. This is a one-time download, and the key cannot be retrieved later.
Create an APP ID
Login to your developer account and go to Certificates, Identifiers & Profiles.
Create an App ID if you don’t already have one. If already have one, then edit it and make sure to enable Push Notification services within you App ID. Follow the below steps to create an App ID.
Go to Identifiers->App
IDs and then click on the + button.
Two important
things to fill out here are App ID Description and so-called Bundle
ID (this will most
likely be something like com.yourdomain.yourappname):

Make sure to enable Push Notification services for this App ID.
Create the Provisioning Profile
To test your app while under development, you need a Provisioning Profile for development to authorize your devices to run an app that is not yet published on the App Store.
1. Navigate to the Apple Developer Member Center and sign in.
2. Navigate to Certificates, Identifiers and Profiles.
3. In the drop down menu on the top left corner, select iOS, tvOS, watchOS if it's not already selected, then navigate to Provisioning Profiles > All.
4. Click the + button to create a new Provisioning Profile.
5. Select iOS App Development as provisioning profile type, then click Continue.
6. In the drop down menu, select the App ID you want to use, then click Continue.
7. Select the iOS Development certificate of the App ID you have chosen in the previous step, then click Continue.
8. Select the iOS devices that you want to include in the Provisioning Profile, then click Continue. Make sure to select all the devices you want to use for your testing.
9. Input a name for this provisioning profile (e.g. Firebase Sample App Development Profile), then click Generate.
10. Click Download to save the Provisioning Profile to your Mac.
- Double-click the Provisioning Profile file to install it.
Upload your APNs authentication key
Upload your APNs authentication key, that we have generate earlier, to Firebase.
1. Inside your project in the Firebase console, select the gear icon, select Project Settings, and then select the Cloud Messaging tab.
2. In APNs authentication key under iOS app configuration, click the Upload button.
3. Browse to the location where you saved your key, select it, and click Open. Add the key ID for the key (available in Certificates, Identifiers & Profiles in the Apple Developer Member Center) and click Upload.
Initialize Firebase in your app
First make sure to turn ON Push Notifications and the Background Modes for our app in Xcode. You can find these settings by clicking on your project -> Targets -> Capabilities:
Make sure you select the following options:
- Remote notifications
The below code is ObjectC. Follow the same logic if you are using Swift or check the tutorials here and here.
You'll need to add Firebase initialization code to your application. Import the Firebase module and configure a shared instance as shown:
1. Import the Firebase module in your UIApplicationDelegate:
#import <Firebase/Firebase.h>
2. Configure a FirebaseApp shared instance, typically in your application's didFinishLaunchingWithOptions: method:
[FIRApp configure];
[FIRMessaging messaging].delegate = self;
Also add the following code to didFinishLaunchingWithOptions to request permission from user for displaying notifications:
if (floor(NSFoundationVersionNumber) <= NSFoundationVersionNumber_iOS_9_x_Max) {
UIUserNotificationType allNotificationTypes =
(UIUserNotificationTypeSound | UIUserNotificationTypeAlert | UIUserNotificationTypeBadge);
UIUserNotificationSettings *settings =
[UIUserNotificationSettings settingsForTypes:allNotificationTypes categories:nil];
[self registerUserNotificationSettings:settings];
} else {
// iOS 10 or later
#if defined(__IPHONE_10_0) && __IPHONE_OS_VERSION_MAX_ALLOWED >= __IPHONE_10_0
[UNUserNotificationCenter currentNotificationCenter].delegate = self;
UNAuthorizationOptions authOptions =
UNAuthorizationOptionAlert
| UNAuthorizationOptionSound
| UNAuthorizationOptionBadge;
[[UNUserNotificationCenter currentNotificationCenter] requestAuthorizationWithOptions:authOptions completionHandler:^(BOOL granted, NSError * _Nullable error) {
}];
#endif
}
Receive the current registration token
Registration tokens are delivered via the method didReceiveRegistrationToken. This method is called generally once per app start with an FCM token or if for some reason the token is changed.
To get the registration token, execute the below code:
NSString *fcmToken = [FIRMessaging messaging].FCMToken;
NSLog(@"Current FCM token is: %@", fcmToken);
To receive updates about token changes, implement didReceiveRegistrationToken as below:
- (void)messaging:(FIRMessaging *)messaging didReceiveRegistrationToken:(NSString *)fcmToken
{
if (fcmToken && [fcmToken length] > 0)
{
NSLog(@"New FCM token received: %@", fcmToken);
// send the new registration token to the FCM server as described in the following chapter
}
}
Configure the server or gateway
You need to set the following global config options (from the “Configurations” form):· fcm_key: your FCM server key
· fcm_app: your package name
More details about the server configuration can be found here.
Register to the server/gateway
You will need to send your app package name and token to the server with SIP REGISTER requests. For this you can implement RFC 8599 or send the X-MPUSH (with the provider set to “j”) and X-PIID SIP headers with the REGISTER requests in the SIP signaling.
All the details are described in the SIP Signaling chapter.
Example register request using the X-MPUSH header:
REGISTER sip:gw.mydomain.com SIP/2.0
Via: SIP/2.0/TCP 192.168.1.101:14501;alias;branch=z9hG4bK.edThn;rport
From: <sip:1111@gw.mydomain.com>;tag=tUgBfpF8h
To: sip:1111@gw.mydomain.com
CSeq: 2 REGISTER
Call-ID: enutmuwaynqib
Max-Forwards: 70
Contact: <sip:1111@192.168.1.101:14501>
Authorization: Digest realm="sip.mydomain.com", nonce="WvDOe1rwzc2EDrmrsjELzwQLYnJ7tD3H", username="1111", uri="sip:gw.mydomain.com", response="1336341b517678240fb092e0cf1159a7"
Expires: 3600
X-MPUSH: j:com.mycompany.myapp:c-10-ap_Kt0:BPC91bG7STqrz4cjrd_cqQquRLkH5iMi3eY4g
X-PIID: 14d4f932e3897a39d6a17c13b526db
X-Sy.Uppersrv: sip.mydomain.com
User-Agent: MyCoolApp
Content-Length: 0
Handle notifications
Handle notifications received through the FCM APNs interface
Once everything is set, you will receive notifications through the FCM APNs interface on incoming call or chat messages, which can be handled as described below.
Also in your app delegate, implement didReceiveRemoteNotification: and didReceiveRemoteNotification:fetchCompletionHamdler as shown below:
- (void)application:(UIApplication *)application didReceiveRemoteNotification:(NSDictionary *)userInfo
{
// If you are receiving a notification message while your app is in the background,
// this callback will not be fired till the user taps on the notification launching the application.
NSString *nfrom = @""; // other party number
NSString *ntype = @""; // can be “0” for calls, “1” for chat messages, “2” for cancel, “3” for custom messages, “4” to request re-register
NSString *nmsg = @""; // will contain the first part of the chat message
NSString *title = @""; // Title of the notification
NSString *body = @""; // Body of the notification, for example: “Incoming VoIP call from: 1234556”
NSString *sound = @"";
if (userInfo[@"nfrom"]) nfrom = userInfo[@"nfrom"];
if (userInfo[@"ntype"]) ntype = userInfo[@"ntype"];
if (userInfo[@"nmsg "]) nmsg = userInfo[@"nmsg"];
if (userInfo[@"title"]) title = userInfo[@"title"];
if (userInfo[@"body"]) body = userInfo[@"body"];
if (userInfo[@"sound"]) sound = userInfo[@"sound"];
// Print full message.
NSLog(@"FCM Firebase notif received simple FULL: %@", userInfo);
[yourViewController PKNotifyUser:nfrom type:ntype msg:nmsg tit:title bdy:body snd:sound];
}
- (void)application:(UIApplication *)application didReceiveRemoteNotification:(NSDictionary *)userInfo fetchCompletionHandler:(void (^)(UIBackgroundFetchResult))completionHandler
{
// If you are receiving a notification message while your app is in the background,
// this callback will not be fired till the user taps on the notification launching the application.
NSString *nfrom = @""; // other party number
NSString *ntype = @""; // can be “0” for calls, “1” for chat messages, “2” for cancel, “3” for custom messages, “4” to request re-register
NSString *nmsg = @""; // will contain the first part of the chat message
NSString *title = @""; // Title of the notification
NSString *body = @""; // Body of the notification, for example: “Incoming VoIP call from: 1234556”
NSString *sound = @"";
if (userInfo[@"nfrom"]) nfrom = userInfo[@"nfrom"];
if (userInfo[@"ntype"]) ntype = userInfo[@"ntype"];
if (userInfo[@"nmsg "]) nmsg = userInfo[@"nmsg"];
if (userInfo[@"title"]) title = userInfo[@"title"];
if (userInfo[@"body"]) body = userInfo[@"body"];
if (userInfo[@"sound"]) sound = userInfo[@"sound"];
// Print full message.
NSLog(@"FCM Firebase notif received fetchCompletionHandler FULL: %@", userInfo);
[yourViewController PKNotifyUser:nfrom type:ntype msg:nmsg tit:title bdy:body snd:sound];
completionHandler(UIBackgroundFetchResultNewData);
}
Function PKNotifyUser is just a simple LocalNotification on iOS. You can see an implementation example above in the PushKit notification handling.
Web
Follow these steps to add Firebase (FCM) push notifications to your WEB application. This can be any HTML5 SIP client such as a WebRTC client running in modern browsers or any HTML/Web based application.
It can be used also in HTML based applications such as Ionic, Cordova or PhoneGap projects, however for native mobile applications you might use the above discussed iOS/Android native push notifications capabilities instead of this web based push.
Please note that push notifications support in browsers is not so suitable for VoIP yet. They can’t wake-up the browser or auto-launch any webpage on incoming calls or emit any sound. They just displays a popup (if the browser is already running) where the user can click to launch your website and these notifications are known to be frequently blocked by users.
A web standard exists by W3C Push API.
HTTP Push is described in RFC 8030.
In case if you are using the Mizu webphone then jump here.
In short
· Import the necessary Firebase javascript files into your html page.
· Create a Firebase project and set the config parameters in your html page. Also add your server key and package name to the Mizu server global config (fcm_key and fcm_app)
· Create “firebase-messaging-sw.js” service worker to receive notifications in “background”.
· SIP signaling changes: implement RFC 8599 or send the X-MPUSH and X-PIID SIP headers with the REGISTER requests in the SIP signaling
Prerequisites
· Your web app must be hosted on secure website (HTTPS).
· The browser must support service worker API.
Online resources
· Add FCM support to Web project
· Tutorial
Create a Firebase project
To use Firebase messaging (notifications) in your app you'll need a Firebase project and the Firebase configurations for your web app.
1. Create a Firebase project in the Firebase console, if you don't already have one. If you already have an existing Google project associated with your mobile app, click Import Google Project. Otherwise, click Add project.
2. Click Add Firebase to your Web app and follow the setup steps. If you're importing an existing Google project, this may happen automatically and you can just copy the configurations which will have the following format:
var config = {

    apiKey: "<API_KEY>",

    authDomain: "<PROJECT_ID>.firebaseapp.com",

    databaseURL: "https://<DATABASE_NAME>.firebaseio.com",

    projectId: "<PROJECT_ID>",

    storageBucket: "<BUCKET>.appspot.com",

    messagingSenderId: "<SENDER_ID>",

  };
Add Firebase to your web project
To receive Firebase messaging (push notifications) in your web app, you need to perform a few basic tasks:
- Import firebase specific scripts
- Set the Firebase configurations which you got from Firebase console
- Initialize Firebase module
- Get an FCM token and send it to your server
- Implement onMessage() and setBackgroundMessageHandler() to receive and handle push notification messages
Below we will present a simple, but fully working example. This will consist of two files: a html page with the necessary Javascript imports and code to initialize the Firebase messaging module as a service worker Javasript file, which handles notifications, when the web page is in “background”.
Below is the fcm.html file source code:
<!DOCTYPE html>
<html>
<head>
<meta charset="utf-8" />
<title>FCM Test</title>
<script src="https://www.gstatic.com/firebasejs/5.0.3/firebase.js"></script>
<!-- Firebase App is always required and must be first -->
<script src="https://www.gstatic.com/firebasejs/5.0.3/firebase-app.js"></script>
<!-- Add additional services you want to use -->
<script src="https://www.gstatic.com/firebasejs/5.0.3/firebase-messaging.js"></script>
<script>
// configuration copied from Firebase console. Replace this code with your own.
var config = {
apiKey: "AIzaSyCREU-8xSHkP093-OrE7dSouPYa5lwI380",
authDomain: "voippush-da64b.firebaseapp.com",
databaseURL: "https://voippush-da64b.firebaseio.com",
projectId: "voippush-da64b",
storageBucket: "voippush-da64b.appspot.com",
messagingSenderId: "191412546148"
};
// Initialize Firebase module
firebase.initializeApp(config);
var messaging = firebase.messaging();
// Request permission to show notifications
messaging.requestPermission()
.then(function ()
{
console.log('Notification permission granted');
// Request token
return messaging.getToken();
})
.then(function (token)
{
// token is received here
console.log('My FCM token is: ' + token);
// send token to server - add sip header in SIP signaling
})
.catch(function (err)
{
// log error message to console in case if user denied permission to show notification or getToken() failed
console.error('ERROR, Request notification permission failed');
});
// implement onMessage() handler. Here we will receive push notification messages ONLY when the web page is in foreground
messaging.onMessage(function (payload)
{
console.log('onMessage: ' + payload);
});
</script>
</head>
<body>
FCM Test
</body>
</html>
To send the token and SIP account details to the server you can use X-MPUSH (with the provider set to “w”) and the X-PIID headers or implement RFC 8599. For the details see the SIP Signaling chapter.
NOTE: In onMessage() handler we will receive push notification messages only when the web page is in foreground. We also have to implement a service worker to receive push messages when the app is in background.
The service worker javascript file must have this exact name: “firebase-messaging-sw.js” and must be located in the root directory of your web page where you are hosting the webphone (NOT in the root directory of the webphone). Example: https://www.domain.com/firebase-messaging-sw.js
NOTE: If this file is not located in the root directory of your web site, Firebase push notification will not work at all, not even in foreground.
Below is an example code “firebase-messaging-sw.js” source code:
// import necessary scripts
importScripts('https://www.gstatic.com/firebasejs/5.0.3/firebase-app.js');
importScripts('https://www.gstatic.com/firebasejs/5.0.3/firebase-messaging.js');
// configuration copied from Firebase console. Replace this code with your own (same as in the fcm.html file)
var config = {
apiKey: "AIzaSyCREU-8xSHkP093-OrE7dSouPYa5lwI380",
authDomain: "voippush-da64b.firebaseapp.com",
databaseURL: "https://voippush-da64b.firebaseio.com",
projectId: "voippush-da64b",
storageBucket: "voippush-da64b.appspot.com",
messagingSenderId: "191412546148"
};
// Initialize Firebase module
firebase.initializeApp(config);
var messaging = firebase.messaging();
// implement setBackgroundMessageHandler() handler to receive push notification messages when the web page is in background
messaging.setBackgroundMessageHandler(function(payload)
{
console.log('[firebase-messaging-sw.js] Received background message ', payload);
// Customize notification here
var notificationTitle = 'Message title';
var notificationBody = 'Message body: ' + JSON.stringify(payload);
var notificationOptions = {
body: notificationBody,
icon: '' // icon image path, ex: 'images/notification-icon.png'
};
// Present the notification to the user
return self.registration.showNotification(notificationTitle, notificationOptions);
});
Configure the server or gateway
You need to set the following global config options (from the “Configurations” form):· pushnotification_fcm: set to 1
· fcm_key: your FCM server key
· fcm_app: your package name
The FCM server key must be loaded from firebase console -> project settings (gear icon in the top left near the “Project Overview”) -> Cloud Messaging page -> Server key (so it is NOT the “Web API Key” and NOT the “Legacy server key”)
More details about the server configuration can be found here.
Register to the server or gateway
You will need to send your app package name and token to the server with SIP REGISTER requests. For this you can implement RFC 8599 or send the X-MPUSH (with the provider set to “w”) and X-PIID SIP headers with the REGISTER requests in the SIP signaling.
All the details are described in the SIP Signaling chapter.
WebPhone
This chapter is only about the Mizutech browser SIP client. The notifications are handled the same way as described above for a generic web client, but since the Mizu webphone already comes with push notifications support, you have less to do in this case.
Push notifications are specific for the webphone WebRTC engine only. With the NS engine you already have a local service which can listen for incoming calls even if the browser is not running, providing a much superior always-on experience for endusers.
Please note that push notifications support in browsers is not so suitable for VoIP yet. They can’t wake-up the browser or auto-launch any webpage on incoming calls or emit any sound. They just displays a popup (if the browser is already running) where the user can click to launch your website and these notifications are known to be frequently blocked by users.
SIP push notifications are supported by the webphone by default but this is a service which also requires server-side support. You have the following possibilities:
· Via the free Mizu PUSH service. If you are using the Mizutech WebRTC-SIP gateway service, then you also have server side push notifications support. In this case you just need to set the webphone backgroundcalls parameter to 1 and there is no need for anything else. You can skip this documentation.
· Directly with your SIP server if your server has support for push notifications. Contact your server vendor or check your server documentations for the details and implement it accordingly for the webphone as it has less to do with this documentation (except that you might utilize part of the example code presented here).
· Using the webphone with the Mizu SIP Softswitch or IP-PBX. Push notifications are supported by all Mizu server side products.
· With the Mizu WebRTC-SIP or voip push gateway. In case if your SIP server don’t support push notifications then instead of using our free service, you can setup your dedicated gateway to handle the push notifications.
The last two points are covered by this documentation. Follow the below description in case if you wish to use the Mizu server or gateway to add push notification support for your webphone.
In short
· Create a Firebase project and set the config parameters in Webphone. Also add your server key and package name to the Mizu server global config (fcm_key and fcm_app)
· Enable push notifications by settings “backgroundcalls” webphone parameter to 1.
· Create “firebase-messaging-sw.js” service worker to receive notifications in “background”.
Prerequisites
· Webphone must be hosted on secure website (HTTPS).
· The browser must support service worker API.
Create a Firebase project
To use Firebase messaging (notifications) in your app you'll need a Firebase project and the Firebase configurations for your web app.
1. Create a Firebase project in the Firebase console, if you don't already have one. If you already have an existing Google project associated with your mobile app, click Import Google Project. Otherwise, click Add project.
2. Click Add Firebase to your Web app and follow the setup steps. If you're importing an existing Google project, this may happen automatically and you can just copy the configurations which will have the following format:
var config = {

    apiKey: "<API_KEY>",

    authDomain: "<PROJECT_ID>.firebaseapp.com",

    databaseURL: "https://<DATABASE_NAME>.firebaseio.com",

    projectId: "<PROJECT_ID>",

    storageBucket: "<BUCKET>.appspot.com",

    messagingSenderId: "<SENDER_ID>",

  };
Set Firebase configuration in your webphone
To enable Firebase messaging (push notifications) in your webphone, you need to perform a few basic tasks:
Overwrite the Firebase config “webphone_api.js” (at the beginning of the file) with the one you retrieved from Firebase console in the previous step.
Also, overwrite the Firebase config in the service worker file “firebase-messaging-sw.js” (at the beginning of the file) with the one you retrieved from Firebase console in the previous step.
Move the service worker file “firebase-messaging-sw.js” to the root directory of your web page where you are hosting the webphone (NOT in the root directory of the webphone). This is very important, otherwise web push notifications will not work. Example: https://www.domain.com/firebase-messaging-sw.js
Enable push notifications in your webphone using the backgroundcalls parameter (set to 1). See more details in the webphone documentation.
Configure the Mizutech server or gateway
You need to set the following global config options (from the “Configurations” form):· pushnotification_fcm: set to 1
· fcm_key: your FCM server key
· fcm_app: your package name
The FCM server key must be loaded from firebase console -> project settings (gear icon in the top left near the “Project Overview”) -> Cloud Messaging page -> Server key (so it is NOT the “Web API Key” and NOT the “Legacy server key”).
More details about the server configuration can be found here.
Register to server or gateway
Just register with a SIP account to Mizu server/gateway (this is usually done automatically by the webphone depending on the register parameter or you can use the register() API)
Receive and handle notifications
When the webphone is in “background”, the push notification message will be received in the “firebase-messaging-sw.js” service worker in the setBackgroundMessageHandler() callback function. When the VoIP push notification message is received a browser notification will be displayed. This notification can be customized in “firebase-messaging-sw.js”.
AJVoIP
This chapter is only about the Mizutech Android SIP library in case if you wish to implement push notifications using the MPUSH gateway or Softswitch.
The notifications are handled the same way as described above for a generic android client, but since the Mizu android SIP SDK already comes with push notifications support, you have less to do in this case.
You need this integration only if you wish to implement push notifications directly with your SIP server or via dedicated push gateway. Otherwise AJVoIP is capable for push notifications by default, using the mizutech push notification service (free tier offered by all customers) and its implementation is even more simple.
In short
· Create a Firebase project and add its json config file to your project’s module directory. Also add your server key and package name to the Mizu server global config (fcm_key and fcm_app)
· Implement Firebase as described here, here and here (Firebase registration and handling the push notifications)
Prerequisites
· A device running Android 4.0 (Ice Cream Sandwich) or newer, and Google Play services 11.8.0 or higher
· The latest version of Android Studio (You can also use other IDE such as Eclipse, however this guide is guide is for Android Studio)
Online resources
· Add FCM support to Android project
· Tutorial
Create a Firebase project
To add Firebase to your app you'll need a Firebase project and a Firebase configuration file for your app.
1. Create a Firebase project in the Firebase console, if you don't already have one. If you already have an existing Google project associated with your mobile app, click Import Google Project. Otherwise, click Add project.
2. Click Add Firebase to your Android app and follow the setup steps. If you're importing an existing Google project, this may happen automatically and you can just download the config file.
3. When prompted, enter your app's package name. It's important to enter the package name your app is using; this can only be set when you add an app to your Firebase project.
4. At the end, you'll download a google-services.json file. You can download this file again at any time.
5. If you haven't done so already, copy this into your project's module folder, typically app/.
Configure Firebase for your app
To integrate the Firebase libraries into one of your own Android project, you need to add Firebase to your Android project. This can be done in the following way:
First, add rules to your root-level build.gradle file, to include the google-services plugin and the Google's Maven repository:
buildscript {
repositories {
jcenter()
google()
}
dependencies {
classpath
'com.google.gms:google-services:3.0.0'
}
}
allprojects {
repositories {
jcenter()
google()
}
}
Then, in your module Gradle file (usually the app/build.gradle), add firebase messaging to dependencies and the apply plugin line at the bottom of the file to enable the Gradle plugin:
//...dependencies {
compile 'com.google.firebase:firebase-messaging:10.0.1'
}
apply plugin: 'com.google.gms.google-services'
Also, be sure to set minSdkVersion 9 or higher in the app's build.gradle to support FCM.
Manifest configuration
Add the following Services to your Android Manifest:
A service that extends FirebaseMessagingService. This provides the functionality to receive notifications.
<service

    android:name=".MyFirebaseMessagingService">

    <intent-filter>

        <action android:name="com.google.firebase.MESSAGING_EVENT"/>

    </intent-filter>

</service>
A service that extends FirebaseInstanceIdService to handle the creation, rotation, and updating of registration tokens.
<service

    android:name=".MyFirebaseInstanceIDService">

    <intent-filter>

        <action android:name="com.google.firebase.INSTANCE_ID_EVENT"/>

    </intent-filter>

</service>
Get the device registration token
On initial startup of your softphone, the FCM SDK generates a registration token for the client app instance. This token will be used later by the FCM server to send notifications to a specific device. To retrieve the current token, call FirebaseInstanceId.getInstance().getToken(). This method returns null if the token has not yet been generated.
Below is the implementation of MyFirebaseInstanceIDService used for receiving the token updates:
import com.google.firebase.iid.FirebaseInstanceId;

import com.google.firebase.iid.FirebaseInstanceIdService;


public class MyFirebaseInstanceIDService extends FirebaseInstanceIdService

{

    @Override

    public void onTokenRefresh()

    {

        // Get updated token and store it

        String updatedToken = FirebaseInstanceId.getInstance().getToken();

    }


}
Configure the server or gateway
You need to set the following global config options (from the “Configurations” form):· pushnotification_fcm: set to 1
· fcm_key: your FCM server key
· fcm_app: your package name
The FCM server key must be loaded from firebase console -> project settings (gear icon in the top left near the “Project Overview”) -> Cloud Messaging page -> Server key (so it is NOT the “Web API Key” and NOT the “Legacy server key”)
More details about the server configuration can be found here.
MBuilder
This chapter is useful only for MizuTech support to build your library with preconfigured push notification settings.
The following push related parameters can be preconfigured:
· Common.pushnotifications = 1; // -1: auto (def), 0: disabled, 1: enabled auto, 2: enabled direct,3: enabled via gateway
· Common.packagename = "com.company.appname.app"; //application package name or project ID. default is com.mizuvoip.mizudroid.app and loaded from the app
· Common.fcmgateway = "fcm.webvoipphone.com:35060"; //default gateway address (default value is fcm.webvoipphone.com:35060)
· Common.pushtype = -1; //-1: auto (default auto guess) , 1: X-MPUSH, 2: RFC8599
· Common.cfcm = "iX_cfcm.json" //google-services.json (also uploaded to web/ftp storage folder)
Enable push notifications
You just need to use a single API to enable/disable push notification in AJVoIP:
boolean SetPushNotifications(int pushnotifications, String fcmclientid, String packagename, String gateway)
Parameters:
· pushnotifications: -1=auto guess, 0=disabled, 1=enabled auto, 2=enabled direct, 3=enabled via gateway
· clientid: token received from FCM
· packagename: your app package name or project ID (for example com.mycompany.coolapp.voip)
· gateway: address of your MPUSH gateway or SBC (if you wish to use a gateway for push notifications)
Will return true on success, false on failure (check the log on failure).
You should call it just after you called the Init or the Start API.
For example:
- to enable push notifications, you would call the API function like this:
SetPushNotifications(2, token, packagename, “”);
- to disable push notifications:
SetPushNotifications(0, “”, “”, “”);
Other related settings:
Usually you don’t need to change any of these JVoIP parameters unless you have a good reason (just use the SetPushNotification API instead):
· pushnotifications: -1: auto (def), 0: disabled, 1: enabled auto, 2: enabled direct,3: enabled via gateway
· packagename: application package name or project ID
· fcmgateway: default gateway address (default value is fcm.webvoipphone.com:35060)
· pushtype: -1: auto (default auto guess) , 1: X-MPUSH, 2: RFC8599
For more details see the Android SIP library documentation.
Receive and handle notifications
On incoming notification your app might do the followings:
· On text message (chat): just display it as a notification (user can tap on it to launch your app and see more details)
· On call: just wake-up the app (once your app is started, it will auto-register and it will receive the incoming INVITE thus it can handle the incoming call as normally)
· You can also handle other events if you have some specific needs
We are using the Java language for the below example code. You can follow the same logic with other language such as Kotlin.
To receive notifications we need to implement MyFirebaseMessagingService. Below is an example of that:
import com.google.firebase.messaging.FirebaseMessagingService;

import com.google.firebase.messaging.RemoteMessage;

import java.util.Map;


public class MyFirebaseMessagingService extends FirebaseMessagingService

{

    @Override

    public void onMessageReceived(RemoteMessage remoteMessage)

    {

        if (remoteMessage != null && remoteMessage.getData().size() > 0)

        {
                 // ex: {nfrom=1002, ntype=0}

            Map<String, String> data = remoteMessage.getData();

            if (data != null)

            {

                Log.v(LOG_TAG, " FCM onMessageReceived message: " + data.toString());
                String ntype = data.get("ntype"); // ntype: 0=call, 1=message

                String nfrom = data.get("nfrom");

                String nmsg = data.get("nmsg");


                if (ntype == null) ntype = "0";

                if (nfrom == null) nfrom = "";

                if (nmsg == null) nmsg = "";
                 ProcessNotification(ntype, nfrom, nmsg);


} }}
public void ProcessNotification(String ntype, String nfrom, String nmsg)
{
// display notification to user or wake up your application
}
}
Important note: In Android you have the option to “wake” up your app, more exactly to start it and bring it to foreground, you don’t have to necessarily display a notification to the user. This can be achieved by sending an Intent to your application’s main Activity. Example code:
Intent intentWake = new Intent(this, MainActivity.class);

intentWake.setFlags(Intent.FLAG_ACTIVITY_NEW_TASK);

startActivity(intentWake);
AJVoIP -Mizu PUSH service
This chapter is only about the Mizutech Android SIP library in case if you wish to implement push notifications using the Mizutech push notification service. We provide this service for all our customers (free tier).
In case if you wish to use a dedicated push gateway, then follow the above chapter instead.
The notifications are handled the same way as described for a generic android client, but since the Mizu android SIP SDK already comes with push notifications support, you have less to do in this case.
Prerequisites
· A device running Android 4.0 (Ice Cream Sandwich) or newer, and Google Play services 11.8.0 or higher
· The latest version of Android Studio (You can also use other IDE such as Eclipse, however this guide is guide is for Android Studio)
Online resources
· Add FCM support to Android project
Configure Firebase for your app
To integrate the Firebase libraries into one of your own Android project, you need to add Firebase to your Android project. This can be done in the following way:
Download the google-services.json file from here and copy this into your project's module folder, typically app/. This is the Mizutech FCM service configuration file and must be shipped with your app.
Now you need to add some rules to your root-level build.gradle file, to include the google-services plugin and the Google's Maven repository:
buildscript {
repositories {
jcenter()
google()
}
dependencies {
classpath
'com.google.gms:google-services:3.0.0'
}
}
allprojects {
repositories {
jcenter()
google()
}
}
Then, in your module Gradle file (usually the app/build.gradle), add firebase messaging to dependencies and the apply plugin line at the bottom of the file to enable the Gradle plugin:
//...dependencies {
compile 'com.google.firebase:firebase-messaging:10.0.1'
}
apply plugin: 'com.google.gms.google-services'
Also, be sure to set minSdkVersion 9 or higher in the app's build.gradle to support FCM.
Manifest configuration
Add the following Services to your Android Manifest:
A service that extends FirebaseMessagingService. This provides the functionality to receive notifications.
<service

    android:name=".MyFirebaseMessagingService">

    <intent-filter>

        <action android:name="com.google.firebase.MESSAGING_EVENT"/>

    </intent-filter>

</service>
A service that extends FirebaseInstanceIdService to handle the creation, rotation, and updating of registration tokens.
<service

    android:name=".MyFirebaseInstanceIDService">

    <intent-filter>

        <action android:name="com.google.firebase.INSTANCE_ID_EVENT"/>

    </intent-filter>

</service>
Get the device registration token
On initial startup of your softphone, the FCM SDK generates a registration token for the client app instance. This token will be used later by the FCM server to send notifications to a specific device. To retrieve the current token, call FirebaseInstanceId.getInstance().getToken(). This method returns null if the token has not yet been generated.
Below is the implementation of MyFirebaseInstanceIDService used for receiving the token updates:
import com.google.firebase.iid.FirebaseInstanceId;

import com.google.firebase.iid.FirebaseInstanceIdService;


public class MyFirebaseInstanceIDService extends FirebaseInstanceIdService

{

    @Override

    public void onTokenRefresh()

    {

        // Get updated token and store it

        String updatedToken = FirebaseInstanceId.getInstance().getToken();

    }


}
Enable push notifications
This can be achieved by calling the following API:
boolean SetPushNotifications(int pushnotifications, String fcmclientid, String packagename, String gateway)
Parameters:
pushnotifications: -1=auto guess, 0=disabled, 1=enabled auto, 2=enabled direct, 3=enabled via gateway

clientid: token received from FCM

packagename: app package name. Must be set to com.mizuvoip.mizudroid.app

gateway: address of the gateway if you wish to use a gateway for push notifications

return true on success, false on failure (check the log on failure)
You should call it just after you called the Init or the Start API.
For example:
- to enable push notifications, you would call the API function like this:
API_SetPushNotifications(3, TOKEN, “com.mizuvoip.mizudroid.app”, “fcm.webvoipphone.com:35060”);
- to disable push notifications:
API_SetPushNotifications(0, “”, “”, “”);
For more details see the Android SIP library documentation.
Receive and handle notifications
On incoming notification your app might do the followings:
· On text message (chat): just display it as a notification (user can tap on it to launch your app and see more details)
· On call: just wake-up the app (once your app is started, it will auto-register and it will receive the incoming INVITE thus it can handle the incoming call as normally)
· Others such as call cancel and custom messages
We are using the Java language for the below example code. You can follow the same logic with other language such as Kotlin.
To receive notifications we need to implement MyFirebaseMessagingService. Below is an example of that:
import com.google.firebase.messaging.FirebaseMessagingService;

import com.google.firebase.messaging.RemoteMessage;

import java.util.Map;


public class MyFirebaseMessagingService extends FirebaseMessagingService

{

    @Override

    public void onMessageReceived(RemoteMessage remoteMessage)

    {

        if (remoteMessage != null && remoteMessage.getData().size() > 0)

        {
                 // ex: {nfrom=1002, ntype=0}

            Map<String, String> data = remoteMessage.getData();

            if (data != null)

            {

                Log.v(LOG_TAG, " FCM onMessageReceived message: " + data.toString());
                String ntype = data.get("ntype"); // ntype: 0=call, 1=message

                String nfrom = data.get("nfrom");

                String nmsg = data.get("nmsg");


                if (ntype == null) ntype = "0";

                if (nfrom == null) nfrom = "";

                if (nmsg == null) nmsg = "";
                 ProcessNotification(ntype, nfrom, nmsg);


} }}
public void ProcessNotification(String ntype, String nfrom, String nmsg)
{
// display notification to user or wake up your application
}
}
Important note: In Android you have the option to “wake” up your app, more exactly to start it and bring it to foreground, you don’t have to necessarily display a notification to the user. This can be achieved by sending an Intent to your application’s main Activity. Example code:
Intent intentWake = new Intent(this, MainActivity.class);

intentWake.setFlags(Intent.FLAG_ACTIVITY_NEW_TASK);

startActivity(intentWake);
Customized MizuDroid
This chapter is for customers integrating customized MizuDroid with their own SIP - push server.
Our android softphone is capable to use our SIP-PUSH proxy by default (in case if your server doesn’t have push notification capabilities).
However, we can also provide customized softphone using push notifications directly with your server or gateway.
Your custom app package name will be com.companyname.brandname in lower case with no spaces and special characters (only characters a-z, A-Z, 0-9, _, -).
For example if your company name is "My Company" and your app name is "MyPhone", then your package name will be "com.mycompany.myphone".
Create a Firebase project for this and send us the google-services.json. Then we can send you a customized softphone with your settings preconfigured. More details here.
Others
In the above chapters we have described how to implement VoIP push notifications for iOS native (both FCM and PushKit from XCode), Android native (FCM implemented with Java from Android Studio) and Web (browser HTML5 clients). These are the most important platform when push notifications are used, however this doesn’t means that you are limited to these platforms.
You can use push notifications also on other platforms such as Windows, MAC or Linux (although on desktop you can just use a service or daemon), using any IDE (Visual Studio, QT, Eclipse, Xamarin, VS Code and many more) and any language (JavaScript, C#, C++, Java, Kotlin, Swift, ObjectC or any other).
If your IDE or language is not covered in this guide, then just pickup the guide for the closest platform, have a look at the online tutorials and adapt it to your environment as there is nothing platform specific with the implementation. For the interaction with the Mizu gateway or server all you need to do is to add the two extra line for your SIP REGISTER requests (X-MPUSH and X-PIID) and follow the best practices for your platform to add push notification support with Google FCM or Apple PushKit APNS. Alternatively you can use the Push Notification for SIP standard as described in RFC 8599.
SIP Signaling
To be able to receive push notifications on incoming calls or chat messages (to wake up your app), your apps needs to request a token first from APNs/FCM and then needs to send this token somehow to the mizu push gateway or server.
The token means the registration token obtained from Google FCM or device token obtained from Apple APNs. You just need to use the API provided by the OS to get the token.
There are two ways to send the token to the gateway/server and request push notifications:
· Mizutech proprietary format using the X-PUSH header
· Standards based format using the Media Feature Tags in the Contact header and Feature-Caps as described in RFC 8599
You can use any of these in your apps (and there is no much reason to implement both).
In case if you are using the Mizu server, then you can send these required SIP headers directly to the server with the REGISTER requests.
If you are using our MPUSH gateway or
SBC then you need to set it as the outbound proxy in your app, thus all
messages will flow via the gateway.
If you don’t have a SIP proxy setting option then set it as your app SIP
domain.
In this case the signaling will flow like this: SIP Client -> [REGISTER]
-> Mizu SBC/Gateway -> [REGISTER] -> Your SIP server.
On incoming call/chat, your app will receive a push message (capable to wake-up the app if required). Once the push message is received by your app, it should immediately register (or re-register refresh binding) and it will receive the incoming request (INVITE, MESSAGE or other session), which can be handled as usually.
Please note that WebRTC clients are also supported if you have the WebRTC module installed. In this case the SIP signaling is transmitted using websocket transport as described in RFC 7118.
X-MPUSH
In short (summary)
Send the X-MPUSH header with every REGISTER request: X-MPUSH: PROVIDER:PACKAGENAME:TOKEN.
Optionally send the X-PIID and/or the X-Sy.Uppersrv headers.
Description
The reason why such proprietary protocol exists is that the RFC 8599 have been published only in 2019, before we implemented push for VoIP.
In case if you wish to avoid proprietary protocols, then just skip this chapter and look at the RFC 8599 chapter for the standards based implementation.
Otherwise, you just need to send a few
lines in the SIP signaling to the Mizu server/gateway to handle the push
notifications.
It is enough if you send these with the REGISTER requests.
Token
You must send the user token to the server in a X-MPUSH header so it can bind the SIP user with the token.
X-MPUSH:PROVIDER:PACKAGENAME:TOKEN
Where:
· X-MPUSH: is the SIP header
· PROVIDER: can have the following values
o a: android FCM
o i: apple APNS
o j: means iOS FCM (rarely used)
o w: webpush
· PACKAGENAME: is the FCM Project ID or your Apple app Bundle ID
· TOKEN: registration token obtained from Google FCM or device token obtained from Apple APNs
Example: X-MPUSH: a:com.voip.phone:9C2F93A6D1319D3CB5712B469226A719B78C3BE37CCB6E8FD27985F0A0285DF9
It is also possible to specify from the client side whether you wish to use the sandbox/test or the production gateway by prefixing the X-MPUSH header with a special character:
· s means sandbox/test (for example gateway.sandbox.push.apple.com:2195 for the legacy binary APNS or api. development.push.apple.com for the new HTTP/2 APNS)
· p means production (for example gateway.push.apple.com:2195 for the legacy binary APNS or api.push.apple.com for the new HTTP/2 APNS)
· d means default as configured in the server/gateway global config (this can be omitted)
For example to send via apple APNS sandbox gateway: X-MPUSH: s:i:APP_PACKAGE_NAME:REGISTRATION_TOKEN
Credentials
This might be used only if you are using the MPUSH gateway or SBC (not needed if you are using the Mizu softswitch).
If your server doesn't keep registrations and you wish to maintain the registered state then you also need to send the authorization details with the SIP signaling in the following format:
X-PIID: MD5(username + : + realm + : + password)
Where:
· X-PIID: is the SIP header
· MD5 means MD5 hash hex string
· + means string concatenation
· : means colon character
· username is the SIP username
· realm is the SIP realm (see comments below)
· password is the SIP password
For example if the username is “aaa”, your server realm is “cool” and the password is “xxx” then you should calculate like MD5("aaa:cool:xxx").
Please note that the realm is your own SIP server realm (not the gateway realm). This is usually your server domain or IP or software name or as received in the Authorization request from your SIP server. Some servers are using a specific string. For example Asterisk often uses “asterisk” for the realm. You should verify this in any SIP log, trace or wireshark / pcap trace (check what realm value your server is sending with the Authenticate header). For example, a common auth challenge from a SIP server looks like this:
SIP/2.0 401 Unauthorized
Via: SIP/2.0/UDP 1.2.3.4:5060;branch=z9hG4bK-xxx
Call-ID: xxx
From: <sip:a@srv.com>;tag=aaa
To: <sip:b@srv.com>;tag=bbb
CSeq: 1 REGISTER
WWW-Authenticate: Digest realm="asterisk",nonce="xxx",algorithm=md5
Server: Asterisk
Content-Length: 0
The realm value is "asterisk" in this case.
In case if you don’t wish to supply the credentials, then you should use a large register expire interval (the maximum allowed by your server, such as 86400 for one day) and/or set the pushnotification_regrefresh config to 1 to keep waking up your app with push notifications once its register timeout expires.
SIP domain
If you are using the MPUSH gateway then you might also send the target domain (the address of your SIP server) with the X-Sy.Uppersrv header, like this:
X-Sy.Uppersrv:
sip.mydomain.com
This is required only if you have multiple SIP servers and you don’t wish to force a specific server to be used with the gateway configuration (global config or routing). In case if you have a SIP proxy to be used, it can be specified in the X-Sy.Upperproxy header. In case if your SIP server logical domain name or real differs from the SIP address, then you can send it with a X-Sy.Uppersrvd header (so in this case you will use the X-Sy.Uppersrv header to specify the server IP address and the X-Sy.Uppersrvd header to specify the domain)
The latest version can extract the upper server also from the target URI.
In this case you will have to configure your SIP clients in the following way:
· Set the MPUSH gateway address as the proxy
· Set the upper/final SIP server address as the domain
More details here.
Example
A typical registration request looks like this:
REGISTER sip:gw.mydomain.com SIP/2.0
Via: SIP/2.0/UDP 192.168.1.101:14501;alias;branch=z9hG4bK.edThn;rport
From: <sip:1111@gw.mydomain.com>;tag=tUgBfpF8h
To: sip:1111@gw.mydomain.com
CSeq: 2 REGISTER
Call-ID: enutmuwaynqib
Max-Forwards: 70
Contact: <sip:1111@192.168.1.101:14501>
Authorization: Digest realm="sip.mydomain.com", nonce="WvDOe1rwzc2EDrmrsjELzwQLYnJ7tD3H", username="1111", uri="sip:gw.mydomain.com", response="1336341b517678240fb092e0cf1159a7"
Expires: 3600
X-MPUSH: a:com.mycompany.myapp:c-10-ap_Kt0:G7SThkASJx2K4Rm1033iR0mIgzI1cLg5xxpST4cjrd_cqQquRLkHMi3eY4g
X-PIID: 14d4f932e3897a39d6a17c13b526db
X-Sy.Uppersrv: sip.mydomain.com
User-Agent: MyCoolApp
Content-Length: 0
Note: If your SIP server is sensitive for the URI used for the digest authentication, then you might use your SIP server URI or the URI returned by the X-Sy.AuthURI header instead of the gateway URI.
RFC 8599
In short (summary)
Implement RFC 8599: send the pn-* tags in the Contact URI.
Optionally send the X-PIID and/or the X-Sy.Uppersrv headers.
Description
For this method you just need to implement the Push Notification with the Session Initiation Protocol standard as described in RFC 8599.
In short, your app just have to send the pn-provider, pn-param, pn-prid in the Contact header (Media Feature Tags).
· pn-provider: pns type which must be “apns” for Apple, “fcm” for Google and “webpush” for generic push
· pn-param: is the FCM Project ID or your Apple app Bundle ID
· pn-prid: registration token obtained from Google FCM or device token obtained from Apple APNs
The mizu push service has support also for other details described in RFC 8599 including Feature-Caps (RFC 6809) and Query Network PNS Capabilities.
Note: the service also recognized the old deprecated push-token-type / push-token-app / push-token-id format.
Example
A typical registration request looks like this:
REGISTER sip:gw.mydomain.com SIP/2.0
Via: SIP/2.0/UDP 192.168.1.101:14501;alias;branch=z9hG4bK.edThn;rport
From: <sip:1111@gw.mydomain.com>;tag=tUgBfpF8h
To: sip:1111@gw.mydomain.com
CSeq: 2 REGISTER
Call-ID: enutmuwaynqib
Max-Forwards: 70
X-PIID: 14d4f932e3897a39d6a17c13b526db
X-Sy.Uppersrv: sip.mydomain.com
Authorization: Digest realm="sip.mydomain.com", nonce="WvDOe1rwzc2EDrmrsjELzwQLYnJ7tD3H", username="1111", uri="sip:gw.mydomain.com", response="1336341b517678240fb092e0cf1159a7"
Expires: 3600
User-Agent: MyCoolApp
Content-Length: 0
Note: the X-PIID and X-Sy.Uppersrv headers are non-standard and optional (more details below).
Improvements
The Mizu gateways and servers implements a few features over the RFC 8599 standard to make the VoIP push notifications more effective.
Multiple upper server support
In case if your are using MPUSH gateway or SBC then it is possible to select the upper server from the client app by using the X-Sy.Uppersrv header as described here. Example: X-Sy.Uppersrv: sip.mydomain.com
Modification required in your app to support this feature:
Just send the desired target SIP server with the X-Sy.Uppersrv header (maybe also X-Sy.Uppersrvd and -Sy.Upperproxy if needed)
Keep push binding
After the 8599 RFC, push will stop to work if your app fails to refresh its registration binding before it expires.
However, refreshing the register binding (avoid expire) requires push messages to be sent and app wake-up periodically to re-register which consumes battery and it is not so robust.
To avoid continuous wake-up the mizu server can keep the push binding without the need for the app to send re-registers.
If you are using the MPUSH gateway or SBC then you should send the credentials with the X-PIID header as described here. (This is similar to sip.vapid described in RFC 8292 but easier to implement)
In this way the push binding is not removed, even if your app send an unregister or the register expires.
However the server will automatically removes the registration binding if it detects that the token is invalid (after one or more push or call failures, configurable). For example if app sent an invalid token or app was uninstalled.
In case if you don’t want to send the X-PIID header from your app for some reason then you should set the pushnotification_regrefresh config to 1 to keep waking up your app once its register timeout expires.
To force unregister and remove push notifications, your app should set the pn-prid to “null”.
This can be sent in a register request to remove only push or in an un-register message to remove also the registration binding.
It is also possible to remove the push binding if your app doesn’t send pn-* tags (for this set the pushnotification_removeat_nopn global config option to 1) or if your app sends pn-provider but not pn-prid (for this set the pushnotification_removeat_noprid global config option to 1, otherwise it will just result in a push capabilities query).
More details about push unbind and unregister can be found here.
In case if you wish to disable this behavior for some reason, then set the following global configs for your server/gateway:
pushnotification_disableunreg: 0 (to enable forwarding unregister requests)
pushnotification_upperexpire: -1 (will forward the same register expire intervals as received from your apps)
You might also adjust the followings if you need so (but these will also turn off the ability the keep your app registered when closed/sleeping):
pushnotification_persists: 0 (only if you wish to disable new register sessions created by the gateway itself)
pushnotification_keepupperreg: 0 (send register to your server only when received from your apps)
pushnotification_regrefresh: 2 (remove also push binding on unregister)
Response code 555
RFC 8599 describes that for push capability requests the server/proxy might send 555 answers meaning Push Notification Service Not Supported.
This is against the normal registration procedure where the client expects 200 OK for the REGISTER requests and sending 555 might confuse some apps and would require an additional REGISTER for the normal registration without push query.
For this reason, the mizu push service will not send 555 answer code by default if the requested provider is not supported but it will just not list the provider in the Feature-Caps header.
In case if you wish to disable this for some reason and prefer the standard behavior instead, just set the pushnotification_send555 global config option to 1.
Reference
Related RFC’s, SIP headers and tags:
· RFC 8599 Push Notification for SIP: https://tools.ietf.org/html/rfc8599
· RFC 6809: Feature-Caps: feature-capability indicators: https://tools.ietf.org/html/rfc6809
· RFC 8292: vapid encrypted identification https://tools.ietf.org/html/rfc8292
· RFC 8030: generic push: https://tools.ietf.org/html/rfc8030
· Contact tags (Media Feature Tags):
o pn-provider: pns type: apple: apns, google: fcm, generic: webpush
o pn-param: required for apple and google. not for generic webpush
o pn-prid: user token coming from the sip client app
o pn-purr: request midcall notifications (only if server sent sip.pnspurr)
o sip.pnsreg: client capable to re-register without the need for push (sent by the client. means that there is no need for push notifications (server should respond with Feature-Cap: sip.pnsreg=x in the answer))
· Feature-Caps tags (feature-capability indicators):
o sip.pns: means push supported. Example: sip.pns=same as received in pn-provider
o sip.pnspurr: means midcall push support (not requested by mizu gateways/servers)
o sip.pnsreg: server expects re-reregister without push required (but should send push if not received)
FAQ
Abbreviations
The following abbreviations are often used in this document:
· Server or gateway: this refers to the Miuztech push notification server side component and often used interchangeable
· PN: Push Notification
· PNS: Push Notification Service
· FCM: Google Firebase push notification service (cloud messaging)
· PushKit: Apple push notification implementation
· APNS: Apple push notification service (cloud messaging)
· Register: SIP client connect/register as described by the SIP protocol using the REGISTER method sent via SIP signaling
· SIP header: the key part of a “line” in the SIP signaling message, although commonly refers to the whole line (key: value)
· MPUSH: the short name of the Mizutech VoIP Push Notification Gateway
· PRID: unique Push Resource ID (user token)
How to test
Once you implemented SIP push notification support in your app as described in this document, you can test it by launching your app with push notifications enabled and make a call to it from another SIP endpoint (such as a SIP softphone).
You should see the incoming push notification and the incoming SIP INVITE (this is the call setup message and it is resent until your app responds or timeouts).
Check the logs if doesn’t work as expected or contact Mizutech support
Troubleshooting
The server will log the push module state and important issues which you can check at the “Logs” form in the MManage admin client.
You can also request push notification statistics with the “pushstat” command (send this from the “Server Console” form)
If the problem is a general issue, not related to push notifications (such as can’t register or call) check the SBC documentation “Troubleshooting” chapter and resolve the problem first before to go forward using push notifications.
If push notifications are not sent or your apps doesn’t receive them, verify the followings:
1. Make sure that your app actually obtains a device token and it sends it to the server or gateway with the SIP signaling.
2. Make sure that your app was successfully registered before (receive 200 OK answer from the server for the previous REGISTER request.
3. Check the server logs (File menu -> Folders -> Server Logs Directory). Find the SIP Call-ID of your incoming call to see what is happening. There should be push related logs at routing (between a-leg and b-leg INVITE). Search also for “ERROR” and “WARNING”.
4. If you are using Apple APNS, check the pushkit.log file
5. If the server sent the push notification message successfully but your app haven’t received it, then the problem might be with the push provider (Google FCM or Apple APNS), although these are rare
6. If the push message was delivered to your app, then the problem will be with your app push notification handling code (doesn’t wake-up or displays notification). Fix your code to resolve the problem.
Problems with push notifications
Several problems might arise when using push notifications, most of them handled gratefully by MPUSH.
· Issues with push notification subscriptions due to bug in client side code or API availability. You should follow the examples presented in this documentation and follow best practices to avoid them.
· Issues to trigger the notification or for the notification to reach the device, although cloud providers claims that their service are robust
· Issues with call routing to the correct device. This should be correctly handled by MPUSH as it fully supports also call forking and delayed resend
· Issues with app wake-up. Make sure that your wake-up code is correct or you might need to display only notification for message which doesn't require the app to run (such as chat messages)
· Server side issues might happen on high load conditions when the server is overloaded with new calls such as during emergency period when everyone is attempting to make calls. Overprovisioning can solve this problem.
Overall, however, push notifications are generally reliable, and a valuable feature for VoIP applications.
App doesn’t receive the push notification
Check the followings if no push notification have been received by your app:
· Make sure that your app succeeded with the subscription for the push notification cloud service and received a valid token.
· Make sure that you are sending the token correctly to the server with the M-PUSH SIP header or RFC 8599.
· Make sure that the incoming call reached to the sever or gateway (check the current calls form, CDR form or the server logs)
· Make sure that the server sent out the push notification correctly (check the server log and check the server config)
For common push notification delivery issues check these notes specific for PushKit.
App doesn’t receive the incoming call
To be able to receive the incoming calls, your app must be already registered to the server or initiate a new register when it wakes up during the call setup session due to the received push notification.
If the SIP INVITE message doesn’t reach the app:
· Make sure that the INVITE have been received by the gateway (check the current calls form, CDR form or the server logs)
· Make sure that your app is registered to the server (normally or upon wake-up by push notification). Check the user status on the server (“Users and devices” form)
· Check the server logs to see why the calls was not routed or misrouted
App doesn’t receive text messages
In case if your app doesn’t receive incoming chat:
· Make sure that your SIP server has support for SIP MESSAGE (RFC 3428)
· Follow the same steps as described in the above FAQ point with incoming calls (look for SIP MESSAGE instead of INVITE)
App receive push notification and calls even after unregister
You need to explicitly unbind the push registration with X-MPUSH or pn-prid set to null or disable the persistent register feature.
Otherwise the server will automatically removes the registration binding if it detects that the token is invalid (after one or more push or call failures, configurable). For example if app sent an invalid token or app was uninstalled.
For the details see the below FAQ point and here.
How to unregister from push notifications
Just set the X-MPUSH header or pn-prid Contact tag to “null”
Example:
X-MPUSH: null
It might be possible to receive a few more notifications after unregister. In this case just ignore them (don’t display any notification and don’t wake-up your app)
Note:
Unregistering with the Expires: 0 or contact expire=0 flags are skipped by default to avoid unwanted unregister behaviors from SIP endpoints as it is usually meaningless to enable both push notifications and unregistering at the same time. For real unregister (and unbind from push notifications) the endpoint must also send the X-MPUSH: null header
In case if you wish to disable this behavior for some reason, then set the pushnotification_disableunreg, pushnotification_persists and pushnotification_keepupperreg global configs for your server/gateway to 0. In this case you might also set the pushnotification_regrefresh to 2.
If you are using RFC 8599, see the “Keep push binding” section here for more details.
Note: You can also use “upperunreg” API to remove push binding and force upper unregistration for a user.
Difference from the RFC 8599 standard
The Mizu Push service implements a few improvements above the RFC 8599 standard.
The only important difference which might require the app developer attention is the persistent register/push binding behavior, which means that with the default configuration the gateway will keep your app registered to the SIP server (and capable to receive incoming calls) even if your app unregisters (REGISTER with expires set to 0) or if the register timer expires.
In case if you wish to explicitly unregister and unbind from push, you should send a (un)register with the pn-prid parameter set to “null”.
It is also possible to disable this behavior and handle un-registrations in standard compliant way.
More details can be found here.
Unsupported features:
RFC 8292 sip.vapid is not supported (however if you wish, you can pass the credentials as described here)
Push notifications for Mid-Dialog requests (pn-purr / sip.pnspurr) are not supported (our software acts as a gateway, in the signaling path, thus this is irrelevant)
Extra features:
The push gateway/server implements a few extra features above the RFC 8599 standard as described here.
High Availability
HA, failover and redundancy is supported by the MPUSH gateway for both downstream and upstream.
You can use a second backup gateway, multiple gateways for the same SIP server, handle multiple SIP servers by the same gateway or for the highest availability: use multiple gateways with multiple (same or different) SIP servers.
Client side failover:
There are multiple possibilities to implement HA toward the SIP clients:
· SIP Load Balancer
Deploy a SIP load balancer in front of the gateways to distribute the load among your gateways using any algorithm after your preference.
For this, you can use any hardware or software based SIP load balancer, including our MLB SIP Load Balancer.
· API
The best option is to implement a simple availability verification into the client software and failover to other instances if no answer or bad answer have been received. This can be done by using the wsload API which will return one of the following answers:
o ERROR, errortext indicates gateway malfunctioning
o OK: WS Load: X type … indicates that the gateway is available. The X is a number from 0 to 4 indicating the gateway load (0-low, 1-normal, 2-high, 3-very high, 4-extreme). You can treat 4 as gateway malfunction, otherwise you should prioritize the gateway returning the lowest number.
If your gateways are geographically distributed, then you can check the response time to find out the nearest one (or more correctly, a combination of the gateway load and response time should be used).
· UAC failover
Some SIP client might already have a failover mechanism implemented on the transport layer.
A simple way to handle gateway availability is on the SIP protocol level. Failover if there are no or bad response of the REGISTER (or OPTIONS/INVITE requests)
· Network
Another way to implement failover is to simply redirect your SIP clients to other gateways on failure. This is not so sophisticated like the above mentioned methods, but offers administrators a simple way to circumvent major outages. Failover can be forced by the following methods
o domain name redirect (easy usage but propagation will take some time. You need to set also the A record as SRV records usually can’t be used from browser clients)
o BGP (requires some expertize and access to BGP, thus mostly available only for ISP’s)
o dynamic IP (most server hosting providers nowadays can provide dynamic IP service which can be used instead of domain redirection as an instant redirect for all peers)
Server side failover:
This is about auto-prioritization among upper servers (your SIP servers).
You can configure multiple upper servers for a gateway and define various routing rules such as simple load balancing, quality based routing named (BRS) or any specific routing rules (depending on caller, called, time and other criteria). Check the routing guide for a quick description.
Beside the routing rules, the MPUSH gateway is capable to auto-detect malfunctioning servers and automatically deprioritize them. This is part of the BRS algorithm, but you have a basic failover even if you are not using BRS (basic failover meant to detect bad routes and deprioritize them if there are better working SIP servers).
MPUSH implements failover on all levels:
· Basic failover (“hard” failover, mentioned above, based on previous upper server behavior)
· Routing automatic (“soft” prioritization, discussed above, based on detailed statistics)
· Routing rules (upper server prioritizations/failover after pattern and/or destination priority)
· Re-Register (redirect the registration to a working server on bad or no response)
· Re-Dial (in-call failover when a bad or no response is received from the upper SIP server)
· Or simply you might use a separate MPUSH gateway for each of your SIP servers
More details can be found here, here, here and here.
VoIP Push Notification security
When using the Mizu SIP server with VoIP push notification solutions, security is the same as in legacy SIP network. No account credentials needs to be transferred and account passwords are stored encrypted/hashed in the database as usually.
When using the MPUSH gateway with third party SIP servers the clients might send their account credential to the gateway as an MD5 hash so the gateway can use the same hash for further registrations when your app is closed or sleeping. Accounts are automatically deleted from the gateway after some time of user inactivity (set to 30 days by default).
Both the Mizutech servers and gateways are secure by default settings and you can further lock down with the security related configuration options as described in the SIP server security document.
You can also harden your infrastructure and user security by using the encrypted SIPS protocol with TLS/SRTP.
Ports
In addition of the usual ports used by the SIP protocol (5060 UDP/TCP for signaling, 5061 for TLS signaling and UDP RTP port range), when push notifications are enabled the client devices (web SIP clients from browsers and Android and iOS phones) will have to communicate also with the push cloud service. This is usually done via TCP ports 443, 2196, 5228, 5229 or 5230 thus you might need to explicitly enable these port if you are using some enterprise firewall.
For the push server you should enable outbound ports 443, 2195 and 2196 to communicate with the cloud.
Cloud providers does not provide specific IP addresses where their services are listening (only domain names where the underlying IP can be changed at any time).
In case if you use the Mizu push service then also enable port 35060 for SIP (this is the port where this service is listening at fcm.webvoipphone.com / 88.150.183.67).
Change SIP server address
This is about changing your SIP server IP address or domain name (the upper SIP server where the calls are routed and received from) if you are using a single SIP server.
For example if you migrated your SIP server to a new location or if you have to change the upper SIP server details for any reason.
In case if you are using a licensed MPUSH gateway, make sure that your license allows the usage also with the new SIP server address.
GUI configuration (this will not rewrite the upper server for existing
users):
You might go trough the “Configuration Wizard” again and configure your new SIP server.
Alternatively, just search for “fwdregistrations_” on the “Configurations” form and rewrite it to your new server address.
Add the new SIP server user record at the "Users and Devices" form.
Set the new SIP server on the “Routing” form.
From SQL:
Replace OLDIP to your old SIP server IP and the NEWIP to the new SIP server IP address and then run the following SQL commands to change the upper SIP server address (copy-paste to the “Direct Query” form and hit the “Go” button):
update tb_users set hwid = REPLACE(hwid,'OLDIP','NEWIP'), ContractComment = REPLACE(ContractComment,'OLDIP','NEWIP'), ip = REPLACE(ip,'OLDIP','NEWIP'), authip = REPLACE(authip,'OLDIP','NEWIP'), domainname = REPLACE(domainname,'OLDIP','NEWIP'), proxyaddress = REPLACE(proxyaddress,'OLDIP','NEWIP'), transip = REPLACE(transip,'OLDIP','NEWIP'), name = REPLACE(name,'OLDIP','NEWIP'), username = REPLACE(username,'OLDIP','NEWIP')
update tb_users_authip set authip = REPLACE(authip,'OLDIP','NEWIP')
update tb_settings set valstr = REPLACE(valstr,'OLDIP','NEWIP')
If you (also) use a domain name, then replace OLDIP to your old SIP server domain and the NEWIP to the new SIP server domain name and then run the SQL statements again.
Can I use it with multiple servers?
Yes.
The push notification gateway can be also used with multiple SIP servers. To be able to route the users to their respective servers (register, call, chat and other sessions) you have the following possibilities:
1. Make sure that the allowupperseverselction global config is set to 1 (it can be also set from the Configuration Wizard by selecting the “allow client driven upper server selection” checkbox on the “SIP Server” page.
2. Specify the upper server from the SIP client as the target URI (domain name setting) or make sure that it is sent by the X-Sy.Uppersrv SIP header.
More details: here.
3. Specify the upper server from the gateway/server routing rules:
Add the new SIP server to the “Users and Devices”
Use the Routing form and specify your custom rules for the server selection.
For the routing rules to be applied also for register requests, you need to set the routingforregister global config option is set to 1.
4. Both:
You can use both routing rules and upper server suggestions from your SIP clients.
If the allowupperserverselection settings is 1, then the client suggestion will overwrite your routing rules.
5. Configure the gateway as your app SIP proxy address (and keep the SIP domain setting to point to your SIP server domain).
In this case the gateway will load the upper server from the target URI.
For all cases, make sure to create the necessary records from the “Users and devices” form for all your SIP servers:
· Add them as “SIP Server” (for outbound) and as “Traffic Senders” (for inbound, usually with IP authentication).
· Then configure them in the “Routing” after your needs to specify what kind of users/calls have to be routed to which SIP server.
For example you can just list them under the “default” pattern with equal priority for load balancing or configure any rules after your requirements.
You might also set the following global config options:
· routingforregister: 1 (to use Routing also for register requests)
· upperserverlookup: 2 (lookup upper server from tb_users sipservers. -1: guess (not for mizuonly servers), 0: no, 1: if no upper server was set in global config, 2: always)
Can I use it with multiple applications?
Yes.
Make sure to send your application package name with the X-MPUSH SIP header or pn-param Contact URI tag.
If you are using Firebase, add all your applications with the fcm_appX and fcm_keyX global config options where X a number from 0 to 1000 (several applications might have the same server key or different).
If you are using Pushkit, then just copy the certificates from all your applications to the server folder (renamed to pushkit.YOURPACKAGENAME.pem).
Note: Here on “application” we mean different SIP client software apps (not different user/instance of the same application as there is no special care required to handle multiple instances).
Add push notification support to VoIP server old versions
This step
is required only if your server is an old version below v. 8.7 (released before
2018 April).
It is applicable only for the full version (not the compact versions).
Not for MPUSH gateway!
1. Add missing fields:
Run the followings SQL (you can copy paste them to the “Direct Query” form in MManage or run from SQL management studio):
a. ALTER TABLE tb_users ADD [fcm] [varchar](256) NULL
b. ALTER TABLE tb_users ADD [md5x] [varchar](64) NULL
2. Modify stored procedures:
Modify the following stored procedures to add the missing fields:
a. v_check_calleduser: add the "fcm" field to the select list
b. v_checkuser: add "md5x" field to the select list
3. Upgrade:
Download and unpack the upgrade package (or ask for latest from Mizutech) and overwrite the files in the server app folder with the content of the package.
Convert a VoIP server to a WebRTC-SIP gateway
This step might be necessary only if you have installed the Mizutech VoIP server and you wish to convert into a push notification gateway.
In case if
you are using the Mizutech Softswitch, then this step is not required.
This step is required only for new installation of VoIP server/Softswitch. Not
required for the MPUSH, SBC or MRTC.
Do not perform this on a live server used as a Softswitch!
1. Backup the database first.
2. Run the server configuration wizard (MManage -> Config menu -> Configuration wizard) and select “SBC” on the “Roles and Features” page.
3. Run the “Convert to wr relay” form Config menu -> Database -> Upgrade / Change
4. The following global config options have to be set (this listing is only for informative purposes and are set automatically for SBC):
§ haswebrtc=0
§ hasflash=0
§ fs_use=0
§ haswebsocket=0
§ hasturn=0
§ enableconferencerooms=0
§ fs_pbx=0
§ forwardauthentifications=1
§ autocreatereguser=1
§ forwardauthpassword=1
§ fwdregistrations=2
§ allowupperserverselection=1 and/or fwdregistrations_ = your server details
§ fastauth=0
§ hasbilling=false
§ enforcestrongauth=false
§ MINUSERNAMELEN=2
§ minpwdlength=2
§ strongdigestauth=0
§ fwdunknownheaders=2
§ allowanonymouscaller=true
§ blocksatellitecalls=false
§ blockpremiumnumbers=0
§ blocknotbilledcalls=0
§ normalizedef=1
§ userautoaddwithowner=1
§ autonewusersencrypt=0
§ maxlinefornewunknownparents=?
§ maxlineforautotunnelusers=?
§ defroutertp=0
5. Restart the service and now it will run as a gateway
How to get support?
In case if you run into any issue, please send us the followings and we can help:
· Problem description: What you did? What should happen? What happened?
Mention also the (caller/called) username and/or SIP Call-ID of the problematic session(s).
· Detailed client log (from your app or Wireshark pcap trace file) about a failed connect/register or call session (enable max log/trace level in your WebRTC client software first if possible)
· If the problem is with inbound call, send the SIP Call-ID or the gateway CDR ID of the failed incoming call or a detailed log from your SIP server which contains also the SIP signaling (enable max log/trace level in your SIP server first if possible)
· Remote desktop (RDP) access to the machine hosting the MPUSH gateway.
Make sure that your server has the minimum requirements for support: min. 4 GB RAM, good network connectivity.
In case if you can't provide RDP access, then please send us the MPUSH gateway logs and sdf files:
o Stop the gateway first (Control menu -> Stop server) to release the currently opened log and sdf files.
o The SDF files can be found in app folder: mserver.sdf (usually at C:\Program Files (x86)\MPUSH\ or it can be accessed from the MPUSHAdmin -> File menu -> Folders -> Server Work directory)
o The log files can be found in the app Logs subfolder (can be accessed also from File menu -> Folders -> Server Logs directory).
We usually need the latest file(s) or the file which contains the failed register or call sessions.
o Compress the files and send as email attachment or if too large then make it available to download (using any file-sharing service)
Resources
· Mizutech VoIP PUSH notifications solutions
· VoIP PUSH notification gateway
· Contact
Copyright © Mizutech SRL