License and Copyright
This document is copyrighted by Mizutech SRL. Copyright © Mizutech SRL
Disclaimer: Mizutech SRL reserves the right to change any information found in this document without any written notice to the user. No warranty is made in regard to specifications or features.
You must accept the license agreement (LicenseAgreement.txt) before you use any Mizutech software!
Trademark Acknowledgement
LINUX is a registered trademark of Linus Torvalds in the United States and other countries.
Windows is a trademark of Microsoft Corporation, registered in the United States and other countries.
OpenH323 are licensed under MPL.
VideoLAN is a software project, which produces free software for video, released under the GNU General Public License(GPL version 2).
UltraVNC is licensed under the GNU General Public License.
Some video or audio codecs usable by MizuPhone requires patent license (per channel) unless it is used in pass-through mode.
For modules licensed under the GNU General Public License, the source code is included on the install CD.
Other logos, products, brand names and service names contained in this document are the property of their respective owners (trademarks or registered trademarks of their respective companies
Mizu SoftPhone is a VoIP client application, a SIP open standard compliant software, that acts as a unified communications endpoint, including the possibility of using a virtual telephone, instant messaging, video conference calls and seeing who is present on the network. With MizuPhone you can connect to any SIP server (softswitch/proxy/registrar) on the public internet or on your local area network.
MizuPhone purpose is to combine the SIP compatibility with Peer to Peer intelligence relying on an intuitive user interface. It is fully interoperable with most of the VOIP service providers, VOIP software and hardware (workstations, notebooks, PDAs, IP-Phones, etc). Mizu-Phone is highly optimized, it doesn’t consume your system resources and it doesn’t disturb you when you’re working. When you use it for HD quality video calls, it can take advantage of multi-core systems.
ü VOIP calls
ü Multiple accounts, multiple SIP server registrations
ü Ultra-Wideband codec
ü High Definition quality video calls (depending on your camera and bandwidth)
ü Instant messaging and presence using the SIMPLE protocol
ü Presence, session timers
ü SMS
ü Phone to phone and callback
ü Mute, Hold, Redial, Transfer, Forward, Conference
ü Local and remote voicemail
ü File transfer and file sharing (compatible with any SIP server)
ü History (with audio and video records)
ü AEC acoustic echo cancellation, automatic gain control, VAD, PLC, Denoise filter, Auto QoS, Dynamic Jitter
ü Audio Codecs: G711 (PCMU,PCMA), G.723.1, G729, G726, G722, iLBC, Speex, GSM
ü Video Codec: MPEG1, MPEG4, Theora, DIV3, MJPG, H263, H264
ü Fax (InBand and T38)
ü Network handling: UPNP, STUN, ICE, firewall and NAT detection
ü Transport protocols: UDP, TCP, TLS
ü XCAP, WebDAV, FTP and HTTP profile storage
ü LDAP, Outlook, WAB, Vcard, CSV contact import
ü DTMF (Inband DTMF or SIP INFO messages)
ü Balance/credit display, Microsoft Outlook synchronization, LDAP, WAB contactlists
ü Fully encrypted communications (protocol and media too)
ü Intelligent P2P based network path detection (will work even if the server is down)
ü Customizable interface and language
Minimum system requirements: Intel Pentium II 500 MHz, 128 MB RAM, Windows 2000/XP/Vista/10, Sound Card, IP network connection, Internet Explorer and a headset. For HD video calls you need a HD quality camera device, minimum directx8 compatible VGA card and a modern processor (2 GHz).
Download:You can download the SoftPhone from the Mizutech webpage (www.mizu-voip.com), or directly from this link http://www.mizu-voip.com/Portals/0/Mizu_Install.exe .
Install:to install, choose the installation folder and follow the instructions; the installation will take less than 1 minute.
Login to the softphone with profile username/password. If you are a first-time user, click on the "New user" label and enter any username/password. This is not your SIP account info, it is there to be able to separate multiple users on a single computer (in an internet coffee for instance). On your home PC or laptop you can check ‘Remember my password’ checkbox to have your data introduced automatically the next time you log on, and check ‘Login automatically’ to automate that too.
Once logged in, under File / Basic Settings menu choose Accounts. Introduce your account name in the first field. The second field is for the domain on which the service runs. Introduce here the IP address of your SIP service provider, followed by a colon (:), and the sip port number used (5060 by default). Introduce a username/password in the fourth and fifth field that is going to be your SIP account. The ‘Use this account checkbox’ serves to separate the used accounts from not used accounts. Click Save. When you are connected, the message Connected appears on the lowest line of the MizuPhone window in green. Otherwise you will see the corresponding error status in red.
You can connect to multiple VoIP servers at the same time by introducing more accounts.
Note: for customized softphones the SIP username/password needs to be entered on the main login form. All other settings are usually preconfigured by your service provider.
Once the client is registered to the VoIP server, you can start to initiate and receive calls or other activities (fine-tune your settings, add contacts, start video calls, start conference calls, send file, send chat, etc)
MizuPhone can be started in multiple ways:
· Started automatically with windows. Click on the MizuPhone icon on the bottom-right corner of the desktop
· Use windows start menu or double-click on the desktop icon
· Pressing Ctrl+Alt+M
· Click on a browser hyperlink. Example: <a href="sip:4444@domain.com">call displayname</a>
· Double click on a file with .sip extension. The file must contain an URI or it has to be a configuration file.
Depending on your version, the login username/password can mean the followings:
· Username/password to protect your local profile
· Mizutech username/password (for free Mizutech SIP server and profile storage)
· Username/password for your VOIP provider sip server
If you don’t already have a Mizutech account, click on the “New user” link and enter your username / password. If the “Create Mizutech account” checkbox is not checked, only a local profile will be created to protect your configurations and history from other users on the same computer.
If you use the softphone on your private computer, you can check the “Remember my password” and the “Login automatically” checkbox, but if you use it from a public place, make sure, that these checkboxes are cleared and always click on Menu -> File -> LogOff when you are finished.
Change the language for your needs (currently English, Swedish, Russian, German, Romanian and Hungarian is available) and hit the “Login” button to begin.
Once you’re logged in, the word ‘Connected’ will appear in green on the bottom of the application window, and the text Available will appear in the lower left corner of the application window (by default you are available but you can change that with a click on the little triangle left to the ‘Available’ text).
You can initiate voice calls in multiple ways:
· Right click on a contact and choose “Call”
· Click on the green call button
· Click on a phone number’s link to begin a call to the selected number (this is useful when a contact has more than one number)
· You can configure to call the contact when you double-click on it (the default double-click action is chat message)
· From the Menu -> Action choose Call
· Switch to the Dial tab, and enter a phone number or username.
You can also enter the full URI. E.g.: username@address:port, where the username can be a phone number too. The address can be a domain name or an IP address. If the port is missing, then the default port is used which is 5060 for the SIP protocol. On the dial tab you can quickly select your last called numbers from the phone number drop-down list.
When a call is initiated (or on incoming calls), the call tab will appear where you can see important information about the call such as contact panel, caller ID, call status, ring and call timer, disconnect reason and transfer status if any. Right click on the contact or click on the Action button to do more actions when you are in call, such as: send DTMF, hold the call, transfer the call, add more participants (conference), add video, etc.
You can initiate instant message (chat) sessions in multiple
ways:
· Right click on a contact and choose “Send Chat”
· Click on the chat icon on the contact panels
· From the Menu -> Action choose Send Instant Message
From the Chat tab you can select the desired number (if the selected contact has more than one) and the preferred sip server (if you are connected to more than one sip server). After this, you can send plain or formatted (html) message to your peer (depending on your configuration, default is html). You can insert emoticons and set text color and style too.
When already in call, right click to the contact and select “Add
video”. There are lots of video codecs to choose from. Make sure to
fine-tune your preferred video bit rate to achieve the best
possible quality. You can make even HD quality calls if you have
enough hardware and bandwidth.
 Conferences
When you are in a voice or chat session you can always add more participants to the session. The conference is handled by the softphone local mixer, so you can speak with other people even if your VOIP provider doesn’t support conference. The standard SIP conference protocol is also supported, so you can be invited to such conferences too.
Contacts can be easily added, dropped, renamed, imported or exported from Menu -> Contact. To see and edit a contact profile, click on the “Details” link or double-click on the contact photo. When a new contact is detected (by presence or automatic neighbor discovery) you will get a confirmation form when you can accept or deny the presented people. If somebody spams you, you can easily put it on the blacklist and you don’t receive any more messages from that person. To force a neighborhood discovery, click on Menu -> Contacts -> Find People near Me. If you have many contacts you can put them is separate groups (Menu -> Contacts -> Create new Group)
Right click on a contact and select “Send file”. You can send files only to other MizuPhone users, but the protocol is compatible with every SIP server (the sip server will see an ordinary call only with a special codec).
You can configure a shared directory on your computer in Settings -> Misc. Your contacts can access this file in an easy way. To access other contacts shared files, just right-click on the contact and click on Shared Files. If this option is not available, than the contact doesn’t have shared files or doesn’t use MizuPhone.
For an easier collaboration you can use the ‘Remote desktop’. Right click on a contact, select “Remote Desktop” and you will be logged in on your contact PC. You can work on your peers desktop remotely. This feature is enabled only between MizuPhone users but it is compatible with every sip server (the sip server will see an ordinary call only with a special codec).
You can receive fax images by setting an account as a fax channel. In this case, the calls will be treated as faxes (no local ringtone is generated; the incoming fax messages are stored in the predefined fax directory converted to pdf). To send fax messages, select Menu -> Actions -> Send Fax, or, alternatively, you can mark some users as being fax devices (check the ‘Is Fax Device’ checkbox the User details/ More tab); in this case, when you right click on the users, the “Send Fax” option will appear. Click on it, select the fax image (bmp or tiff) and push the “Send” button. For a good free tool to create FAX images, please check PDFCreator. After you install it, you can print any document in FAX format (Configure PDFCreator to Save as TIFF G3 fax encoding with EOLs)
MizuPhone supports the voicemail related SIP RFC’S, and additionally implements local voicemail functionality. Voicemail can be configured at File Menu -> Settings -> Voicemail. Check the “Show advanced settings” checkbox to see more options here. You will be notified when your servers has new voicemail messages if the “Remote Voicemail” option is set to “Auto” or “Yes”. For the local voicemail to work you have to set your greeting sound and the circumstances when voicemail will be activated (always, on busy, etc).
The call-forward functionality can be set on the “Voicemail” section. Just specify the phone number(s) if you want your calls to be forwarded (always, on busy, etc). You can be notified by missed calls/IM messages if you activate the “send missed calls/messages to my email address” checkbox. In this case, you need to specify your email address correctly for your profile, because notification messages will be sent to this address (File Menu -> Edit your profile). Additionally you can accept incoming calls automatically by filling the “Auto accept call from” edit box.
For a complete set of communication channels, there is also a built-in quick link to your email client. Just right click on a contact and press “Send Email”. Alternatively, the embedded email client can be used to send emails. You don’t need to have a working email client in order for this to work. You can also send SMS messages to mobile phones. SMS messages are sent like chat messages, but the number of characters is limited to 160 and the format is always plain text.
The scripting module can be installed as an Add-On.
Any external programs can be launched or controlled in response to MizuPhone events. In this way MizuPhone can be easily integrated with CRM application or can handle useful tasks. For example you can ring to your home number and an action can happen, like a video camera being started automatically.
There are more than 15 events predefined like call start, call stop, dtmf received, etc. You can write any command launchable from windows command prompt.
There are a couple of predefined keywords which will be replaced to their meaningful value when applicable, like xusername, xcaller, xcalled, xduration etc. You can launch an embedded webpage like this: “embedded www.mywebpage.com?params...”
If you want a webpage to be displayed for every incoming call with the callernumber as a parameter, like www.mycrm.com?phonenumber=123456, you have to do the following steps:
1. Install the scripting engine (Tool menu -> Add-ons -> Scripting -> Install)
2. Go to the scripting configuration (File menu -> Advanced Settings -> Scripting)
3. Check the “Enable” checkbox
4. Set the “In call start” value to www.mycrm.com?phonenumber=xcaller
5. Clear the other unneeded settings
From now on, your webpage will be displayed with every incoming call, with the caller number as the parameter.
You can explicitly set the exact name/number and the used sip server (if you have more than one) at every call. However if you don’t specify these settings, the softphone will automatically guess the best sip server for your call based on your call history and the called prefix. You can also type a complete URI (number@address:port) instead of a name. In this case the call will be routed through the server specified by address:port. The address part can be a domain name or an IP address. You can also control the dialed number by the Dial Plan (File / Advanced settings / Dial Plans).
MizuPhone can send the initial INVITE (Sip message) to multiple addresses where a contact can be. It always remembers the contact’s last location, so even if your SIP server is down, you can still call your contacts. For proper RTP routing the softphone will automatically detect your network, nat and firewall and will try to pass them correctly using various technologies (firewall control, UPNP, STUN, ICE and other proprietary methods). When the remote party RTP port is not obvious, it can start to send the RTP stream to multiple locations, and will choose the one from where it receives answer.
|
Function |
Keyboard Shortcut |
|
Launch application |
Ctrl+Alt+M |
|
Answer |
Enter |
|
Hang up |
Esc |
|
Hold/Mute |
Spacebar |
|
Increase/Decrease Volume |
Up/Down Arrows (or +,-) |
To log in proceed as described above, at Quick Start. For full version of the softphone this “login” is used to store your encrypted profile. You will have to enter your SIP account details later in the Settings -> Accounts page. For customized softphones the Settings -> Accounts page is not available. The login for is used for both your SIP server and also to encrypt your profile.
On the home page, if enable, you can see an overview about your contacts, status, voicemail and other service provider dependent information.
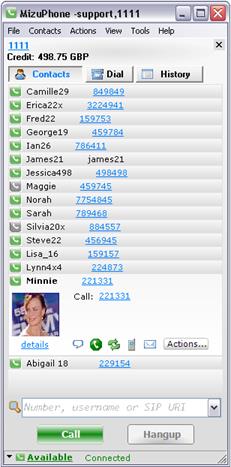
Right click on the contacts form and select ‘Add new contacts’ to add new contacts. On the ‘Add contacts manually’ tab, introduce user data in the corresponding fields, and click Save. On the second tab you can search for contacts, this feature makes easier to find contacts. On the third tab you can also import contacts from other applications you might use, like Outlook, Skype, Yahoo, Gmail, MSN, etc. Once you have introduced a few contacts you can introduce additional data on the tabs which appear after clicking the ‘details’ word, under the photo of the user. Alternatively you can right click to the contact and select “Edit contact details” Click on the Actions button to select which action you might want to do to the selected contact.
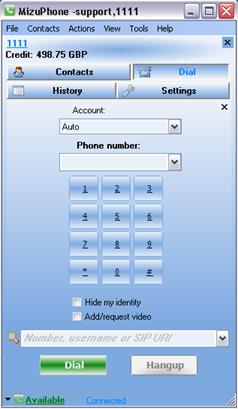
On the dial tab you see the phone interface. In case if you have multiple SIP accounts, select the account from which you want to make the phone call in the ‘Account’ drop down list, and enter the phone number, username or SIP Uri (SIP Address) in the phone number drop down list by pressing the numbers on the dial pad and using the keyboard. Click ‘Dial’ to dial the chosen address or number, and ‘Hangup’ to interrupt the call. Check ‘Hide my identity’ checkbox to hide your ID, and ‘Add/Request video’ to use video.
You can see the history of your activity on the History tab (menu View – Show/Hide… - History). You can call directly from here too just selecting a contact and hitting the Call button. Voice and video recordings are also available from this page.
You can send an SMS to any phone number you wish
using the SMS tab (menu View – Show/Hide… -SMS), by selecting an
account in the ‘Account’ drop down list, introducing your phone
number into the ‘My Phone Number’ text field, the destination phone
number into the ‘To’ text field (or choose one number from the list
by clicking on the ‘Phonebook’ button) and introducing your text in
the ‘SMS Text’ text field and clicking the ‘Send’ button.
This feature must be supported by your VoIP service provider to
work.
On the phone to phone tab (menu View – Show/Hide… -
Phone2Phone) you can call somebody from your telephone number with
this software. Select an account from ‘Account’ drop down
list, introduce your phone number into ‘My Phone Number’ text field
and click on the ‘Call’ button.
This feature must be supported by your VoIP service provider to
work.
This feature will depend on your VoIP provider callback service capabilities. When the VoIP service allows the callback service you should see your main callback access number listed here.
Under menu View - Show/Hide – Toolbar you can reach four important functions with one click on the icons: the plus sign (to add a contact), the magnifier (to search contacts), the people icon (to make conference calls), the person with a pencil (to edit your profile), the wrench + screwdriver (to go to basic settings) and the loudspeaker sign (mute on/off).
By default you are available, but you can change that from this menu or with a click on the little triangle left to the ‘Available’ text in the lower left side of the application window.
this will open the ‘My Details’ tab, where you can introduce your data, your User Name, Display name, Full name, your email address, one or more phone numbers, leave a comment, introduce your homepage if you have one, and a favorite link in the corresponding fields. Pressing the ‘More’ button shows the second part of this tab, where you can introduce more data about yourself, like occupation, the organization you belong to, your language, country, address, birthday, gender, whether you are married or not, logical URI (URI stands for the full SIP address), contact URI, and paths. By clicking ‘Load from Vcard’ or ‘Save to Vcard’ you can load personal data from a file with vcard extension or save personal data in a file with vcard extension. By clicking the ‘View contact details read only’ text you can lock the contact details form and make it read only.
Under Print you’ll find easily understandable submenus. ‘Print what you see’ means to print everything that is on the screen, ‘Print current contact’ will print the contact data of the currently selected contact, ‘Print contact list’ will print the list of contacts and you can use ‘Print history’ to print the history.
This will show the Settings tab but with the basic submenus only (appearance, application, accounts, sounds, voicemail). Go to Detailed description - Settings to find a detailed description of these functions.
This will show the Advanced Settings tab. Go to Detailed description - Settings to find a detailed description of all of these functions.
Press here to log off from the application.
Press here to exit from the application.
Will show the ‘Add contact’ form with three tabs. The first, ‘Add contact manually’ has the most important text fields, where you can introduce the name in the ‘Contact’s display name’ text field, his/her username or phone number in the ‘Username or Phone Number’ text field, an Email address into the next field, an alternative phone number in the next field, and select the account from the ‘Account’ drop down list to which you add the new contact. You can also search for a contact on the second tab, by introducing the data in the ‘Enter Username, Full name or Email address’ text field and clicking on Search button, and you can import contacts on the third tab by selecting one of the service providers in the ‘Import contacts from’ drop down list and clicking ‘Import’ Check the checkbox under the list to load contacts only with a valid phone number.
Delete the selected contact
Will present all the data of the selected contact
Select an action from the ‘Select Operation’ drop down list, and click ok.
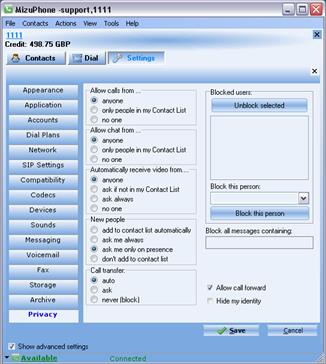
You can block/unblock selected users if you want to, on the right side of Settings/Privacy form. It’s possible to apply a filter on incoming messages at ‘Block all messages containing’ text field.
By creating groups of users, you will be able to group users, making easier to keep order in your contact list.
Will call the introduced number or SIP ID
This loads the system callback number, which you can call to receive a callback.
Will send an instant message to the selected user
Will show the Dial form. Introduce the user to start the video call. Remember that ‘Add/request video’ check box must be checked in, to enable video data.
This will show the ‘Add to conference’ tab, with your contacts on the left side. To add contacts to the conference, select the contact in the list on the left side and click Add – the selected contact will appear on the right side, under ‘Participants’. To remove users from the conference highlight the user with one click in the list on the right side, and click Remove. If you wish to add a user that is not currently in your contact list, introduce his/her ID in the ‘Other’ text field, and click on Add.
This menu item will show the ‘Add to conference’ tab, with contacts on the left side. To add contacts to the group, select the contact in the list on the left side and click Add – the selected contact will appear on the right side, under ‘Participants’. To remove users from the group, highlight the user with one click in the list on the right side, and click Remove. If you wish to add a user that is not currently in your contact list, introduce his/her ID in the ‘Other’ text field, and click on Add.
This will show the Send Fax dialog window. Introduce the fax number where you want to send the fax. Another window will appear where you can select the fax image. It has to be in TIFF file format. Click on the send button, and the image will be sent
This will show the SMS form. Select the account that you want to use in the ‘Account’ drop down list’, introduce your phone number or SIP ID into the ‘My Phone Number’ text field, introduce the destination phone number into the ‘To’ text field (you can also use the Phonebook button to select faster), and introduce the text you want to send in the ‘SMS Text’ text field (max number of characters is 160). Click on the ‘Send’ button to send the message.
Enables you to send an email from the Mizutech Softphone application itself. On the Email tab (menu Actions/Send email) introduce the destination email address into the ‘To’ text field, write a subject for your email message into the ‘Subject’ text field, click on ‘Attach file’ and select a file to attach a file and introduce the text of the email message in the large blank area (text field) below. Here you can introduce a couple of ‘Smileys’ with a click on the little Smiley, and set the font type and size with a click on the A letter next to the smiley.
Will show the phone to phone tab. Here you can call somebody’s telephone with your telephone, through the Mizu Softphone application. Choose an account in the ‘Accounts’ text field, introduce your phone number into the ‘My Phone number’ text field, and the destination number into the ‘Destination Number’ text field. Use the button ‘Phonebook’ to introduce the number faster. Click on the ‘Call’ button. The charge for this call will go in the account of your phone number.
If there is a selected contact, clicking on contact actions has the same effect as right-clicking on the contact itself. It shows a list of the following actions: send chat, call, video call, remote desktop, share file, send file, send SMS, send Email, rename, delete, block, move to group, view history and edit contact details.
Means that the MizuPhone window appears on top, and is transparent.
Means that the MizuPhone window appears at top, stays always on top
The Transparency dialog window will appear, you can introduce a value between 50-255 where 50 is the most transparent, and 255 is the least transparent.
This will show or hide the items in the submenu
Here you can sort your contacts by provider, whether they are online/offline, name and usage.
Open the ‘Received FAX’ tab; here you can see your received faxes. Clicking on the ‘Open Selected’ button will open the selected image, ‘Delete selected’ will delete it. Click on the text ‘Show fax settings’ to see the fax settings (these are discussed in details later in this document, under ‘Detailed description/Settings/ Fax'. To open the fax directory click on the text ‘Open FAX Directory’. Click ‘Close’ to close this tab.
This is a very useful tool if something is not ok, and you can’t find the problem. This will open the Logs form, where you can see live the dialog between the softphone application and the sip server. Click on the ‘Open Current Log file’ button to see the entire previous log in a separate txt text file in Notepad. This log contains the SIP dialog as well as the server log.
this menu will show the Basic configuration tab. The configuration wizard contains settings which are vital to the proper setup of Mizu Softphone. Click on ‘manual configuration’ if you want a detailed custom setup. Otherwise click on button ‘Next’. Introduce your full name and your email address in the two corresponding text fields. You’ll be able to change these settings anytime later selecting ‘Edit your profile’ from ‘File’ menu. Click ‘Next’. Introduce account name, the sip domain (which usually has the form IPaddress:sipportnumber, the port number is by default 5060, don’t change this unless your service provider tells you to do so). In the last two fields introduce your SIP username and your SIP password. Click ‘Next’ to select your bandwidth, after selecting it click ‘Next’. Under Devices tab you can select all devices used: microphone, speaker, the ringing and your webcam. To use Windows’s own audio tuning wizard click on the ‘Wizard’ link. To show Windows volume controls click on ‘Audio settings’ link. To set up the camera click on ‘Camera settings’. After you have set up all the devices click ‘Next’. Import contacts by selecting an operation at the ‘Select operation’ drop down list, click ‘Next’. By now you have completed the configuration wizard. Click ‘Save’, to save your settings.
This advanced feature will fine-tune your SIP – specific network and other settings. Click on ‘Start’ to start the wizard, this will take no more than a half a minute. Click ‘Show details’ to see the details of the network fine-tune wizard. Packet loss will give you the ratio of lost IP packets. Avg. Roundtrip is the time it takes for an IP Packet to reach the server and to go back. Jitter means the delay of a packet. Click on the button ‘Auto configure’ to have these settings automatically configured.
Will start the Windows audio wizard.
Will show the VoIP Providers tab. Here you can add to your existing accounts a predefined VoIP provider, or, you can search for a VoIP provider which provides you the least expensive services (in the second frame) or you can add a Mizutech account by clicking on the ‘Add Mizutech account’ button.
Open the Add-ons tab. Install the scripting add-on to start any external program on specified events. For example you can open a webcam in your home with a call, or open a webpage when a call arrives. Click on the ‘Install’ button to install the scripting module. Clicking on the Options button will show the File / Advanced Settings/ Scripting menu, here you can set the actions. Installing the VoIP hacks will protect you from VoIP related hacking activities. If you click Options in the VoIP hack frame, it will show the Security menu from Files / Advanced Settings.
o Export/Import: will export or import contact data. An Import action will show the Credentials form, where you can introduce the necessary contact data (username/password) and click on the button ‘Extract Contacts’. This will import contacts from the remote host.
o Download profile: with this menu you can download your profile
o Upload profile: If a remote storage is defined, upload your profile with this menu.
o Restore settings: Restore your settings from a given date! On this tab called Restore, in the first drop down list are the Softphone settings backup files sorted by date (‘Settings backups’), and in the second drop down list are the backup files of the contact’s, also sorted by date. Click on the ‘Restore’ buttons to the right to restore these.
o Delete custom status messages: will delete the custom status messages
o Delete all contacts: here you can delete quickly all contacts
o Delete all settings and contacts: this will delete all settings and contacts
o Diagnostics: this menu makes an analysis of your computer about SIP relevant data.
This menu shows the actual MizuPhone html Help file. For customized softphones this link can point to one of the provider web pages (For example a FAQ page)
This is a little program that lists your availability info in the large text field of the ‘My Availability’ tab. Read it through carefully if you don’t know how other users can contact you.
This feature will load the home page of the www.mizu-voip.comaddress in the Company site tab.
Will check the available updates
Enter here the registration key to validate the product
It shows the program version. You can read the ‘License Agreement’, the ‘Copyright’ by clicking on the links, and you can also send an email to the support team by clicking on the ‘Email to support’ link.
Mizu Softphone settings can be simplified; if you choose basic settings you will see only the most important settings. To see all the settings choose menu File / Advanced Settings or check the checkbox ‘Show advanced settings’ after menu File / Basic settings. In the following sections you’ll find a detailed description of all the features built into Advanced Settings.
 Appearance
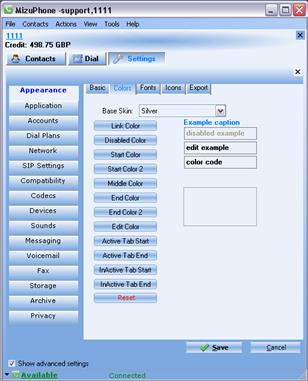
Under Appearance menu you can edit many features to change the appearance of your SoftPhone. Click on the ‘Skin’ checkbox, select from Default, Light, Silver, Blue, Turquoise, Orange, Black, Daylily, White, Brown and Water. Click on the button ‘More’ on the right side, here you’ll see 4 more tabs: Colors, Fonts, Icons, Export. Select the skin that you like from the ‘Base Skin’ drop down list. Clicking on the button ‘Link color’ you’ll select the color of links in this application, the button ‘ Disabled Color’ will set the color of disabled texts, ‘Start color’ will set the background of the application window, ‘Start color 2’ is for setting the , ‘Middle color will set ,’End color’ will set the shadows and the vertical strips of the window, ‘End color 2‘ will set the lower half of the menus and upper side of these buttons. ‘Edit color’ is for setting the color of the text fields. ‘Active tab start’ sets the upper half of active tabs, ’Active tab end’ sets the lower part of active tabs, ’Inactive tab start’ sets the upper half of inactive tabs, ’Inactive tab end’ sets the lower side of inactive tabs. The ‘Reset’ button will reset the original values.
Click on the Fonts tab to open it. ‘Label font’ is there to set the font type style and size of label fonts, ‘Edit font’ sets fonts in the edit fields, ‘Tab font active’ and ’Tab font inactive’ set active and inactive tab fonts ’Other font’ sets the button fonts and ’Reset’ resets the settings to the original values.
 To
change the icon images go to the ‘Icons’ tab. Here you can
set the icons and logos of 11 buttons and shortcuts: ’Dial pad
images’, ’Logo’ ’Program icon’, ’Disabled call button image’,
’Reload button image’, ’Accept button image’, ’Dial button image’,
’Call button image’, ’Hangup button image’, ’Disabled Hangup button
image’, and ’Close button image’. Select an icon from the icon list
below and select status icons lower down, you can replace icons
used on the Graphical User Interface on this form. Click ‘Apply
now’ to apply your settings or click ‘Reset all’ to reset to
default values. Custom images must be copied to exe
path/images/custom directory! You may need to restart the program
for some changes to take effect!
To
change the icon images go to the ‘Icons’ tab. Here you can
set the icons and logos of 11 buttons and shortcuts: ’Dial pad
images’, ’Logo’ ’Program icon’, ’Disabled call button image’,
’Reload button image’, ’Accept button image’, ’Dial button image’,
’Call button image’, ’Hangup button image’, ’Disabled Hangup button
image’, and ’Close button image’. Select an icon from the icon list
below and select status icons lower down, you can replace icons
used on the Graphical User Interface on this form. Click ‘Apply
now’ to apply your settings or click ‘Reset all’ to reset to
default values. Custom images must be copied to exe
path/images/custom directory! You may need to restart the program
for some changes to take effect!
To save all appearance settings in a configuration file choose tab ‘Export’ and press the large ‘Export current customized settings’ button.
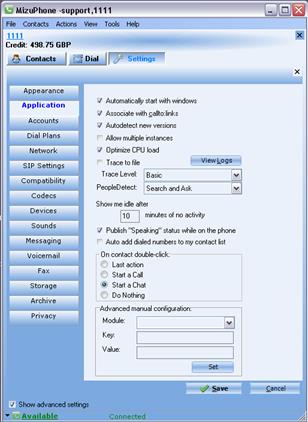
Under ‘Application’ menu there are the settings related to application behavior under windows. To make the program start whenever the computer starts, check the checkbox ‘Automatically start with windows’. Check ‘Associate with callto: links’ to make the program handle all SIP links (auto launch the softphone when you click on a SIP URI), check ‘Auto detect new versions’ make this application automatically search and install newer versions. Check ‘Allow multiple instances’ to start 3-4 or more instances of the program, all running parallel and each logged in with a separate username and password. If you check ‘Optimize CPU load’, than the program will run more efficiently lowering its priority while in the background and increasing the priority while you are in a call. By checking the checkbox Trace to file, all logs will be saved to a file. You can set different levels of logging in the ‘ Trace level’ list from minimal to max log level including RTP log. To have a view at the current activity of the application press ‘View logs’ button. To see all the logs in a text file press ‘Open Current Log file’ button on the bottom of the log window. You can close this window with the X mark on the top right corner. In the ‘People detect’ list set the way you want the application to handle new people found on the local network. Set the minutes after which people see you idle in the next text field at “Show me idle after x minutes of no activity”. If you check ‘Publish “Speaking” status while on the phone’ checkbox, the speaking status will be sent to your contacts while you are on the phone. To automatically add the numbers you talked to your contact list check the next checkbox: ‘Auto add dialed numbers to my contact list’. You can specify what event will happen on a double click on a contact in the next frame ‘On contact double-click’, with the options ‘Last action’, ‘Start a call’, ‘Start chat’ or ‘Do nothing’. In the next frame, ‘Advanced manual configuration’ a key and a value can be set on a list of modules. This is for expert users. Click on ‘Set’ button when you’re finished.
 Accounts
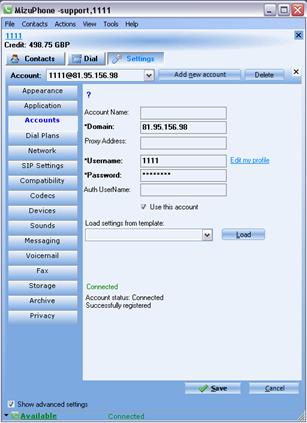
The ‘Accounts’ menu is for handling your SIP account information. Choose an account in the ‘Account’ list, or add a new account with the ‘Add new account’ button. You can delete accounts with by selecting them and pressing the ‘Delete’ button. Introduce any name you like in the first text field ‘Account name’, introduce the domain address into ‘Domain’. This has usually the form domainname:sipport, or ipaddress:sipport, where the sip port is by default 5060, don’t change that unless your SIP service provider tells you to do so. In case when a different proxy server needs to be used, introduce the proxy address into ‘Proxy Address’ text field. The username and password that you specify in the next two text fields are the SIP username and SIP password, not your external login data. ‘Auth UserName’ have to be used when your private and public username is different. Check the checkbox ‘Use this account’ to use that account, if this is not checked it won’t appear at login. You can also load settings from a template file in the next text field with the ‘Load’ button.
 Dial Plans
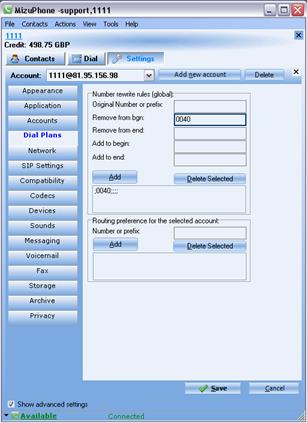
This menu makes it easier to use prefixes. In the first frame, ‘Number rewrite rules (global)’ are the prefix rules defined by you. Introduce the original number or prefix in the first text field, introduce the prefix you might want to remove from the beginning of the phone number in the second text field, and / or the suffix you want to remove from the end in the third text field, and/or add a prefix to the beginning of the phone nr. in the fourth text field, and / or add a suffix to the end of the phone number in the fifth text field. Click ‘Add’ to add the modified phone number to the list in the next text field, or select one and press ‘Delete selected’ to delete it. In the next text field, ‘Routing preference for the selected account’ you can add phone numbers or prefixes for the selected account above. Again, delete these if you want with the ‘Delete selected’ button.
 Network
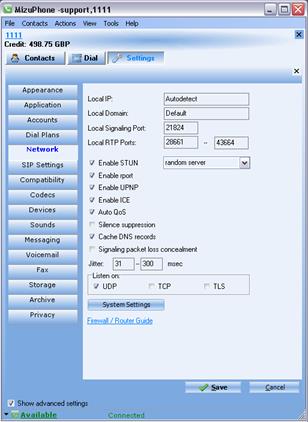
The local network related settings are presented on this page. Introduce a local IP only if there is a multi-home configuration, force this IP only in that case, otherwise leave the default ‘auto detect’ setting. Change ‘Local Domain’ only if you’re told to do so, otherwise leave the default setting. The local signaling port is set by the application at start, again change it if you’re told to do it, and otherwise leave the given port. ‘Local RTP Ports’ is the range of RTP (media) ports set by the application. Usually only the first 2-4-6 port will be used in the given range. The next 8 checkboxes make the NAT traversal easier and improve the functionality of the program. ‘Enable STUN’ will enable a part of the application based on the STUN protocol (STUN stands for Session Traversal Utilities for NAT).
‘Enable rport’will
enable rport, a part of the program that works based on RFC 3581.
The Session Initiation Protocol (SIP) operates over UDP and TCP,
among others. When used with UDP, responses to requests are
returned to the source address the request came from, and to the
port written into the topmost Via header field value of the
request. This behavior is not desirable in many cases,
especially, when the client is behind a Network Address Translator
(NAT). Rport defines a new parameter for the Via header
field, that allows a client to request that the server send the
response back to the source IP address and port from which the
request originated.
-’Enable UPNP’ enables the UPnP architecture, if your router has
support for it.
-’Enable ICE’ will enable ICE, a protocol published in RFC 4091
(the acronym stands for Interactive Connectivity Establishment, developed
by the IETF Internet Engineering Task Force). Check this checkbox
to make NAT traversal easier.
-’Auto QoS’: this will enable the automated Quality of System.
-Check checkbox ’Silence Suppression’ to eliminate computing
capacity wasted on parts of a conversation, when there is only
silence transmitted.
-’Cache DNS records’ – this will store the DNS records.
-‘Signaling packet loss concealment’ –will conceal packet losses in
signaling.
Jitter is the delay with which a delayed packet comes, measured in milliseconds. By default this is set to 30-300 at will change its size dynamically based on your network conditions. Increasing max jitter may help, if the voice quality is poor.
You can set on which protocol ports to listen in the ‘Listen on’ frame. UDP is the most efficient protocol for SIP. A click on the ‘System settings’ button shows the windows network properties window, and you get some NAT help if you click on the ‘Firewall / Router Guide’.
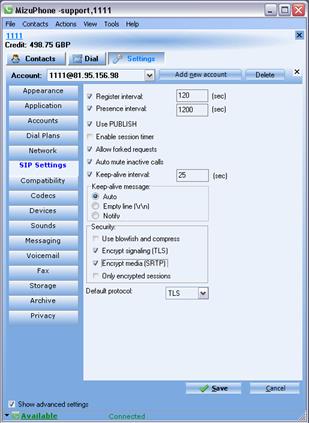
Under SIP settings menu you can set everything related to the SIP protocol. The checkbox ‘Register interval’ and it’s value to the right set the time interval at which REGISTER messages are sent to the server. ‘Presence interval’ and the value to the right sets the interval at which presence information is sent to the server. If you check ‘Use Publish’, your presence and contact information will be sent to your SIP server using the PUBLISH method. Check ‘Enable session timer’ to measure the time spent in conversations. If you have more telephones or communication devices logged in with the same ID check ‘Allow forked requests’ and an incoming call will ring on all the devices logged in. The first device to answer takes control of the incoming call. Check at ‘Auto mute inactive calls’ to silence calls that arrive while you are in a conversation. Check ‘Keep alive interval’ to let the application send keep-alive messages, the default value of 25 seconds is sufficiently dense. You can set the keep alive message too in the ‘Keep alive message’ frame, to the values: Auto, Empty line or Notify. Under SIP Settings menu you can find the security settings, in the ‘Security’ frame, check the checkboxes ‘Use blowfish and compress’, ’Encrypt signaling(TLS)’, ’Encrypt media (SRTP)’, and ’Only encrypted sessions’ to increase the security of your conversations. The most convenient default protocol is UDP, but you can select other settings, in the ‘Default protocol’ list. Click ‘Save’ to save your settings.
 Compatibility
You should use these settings if you have signaling or media related issues with your VoIP server.
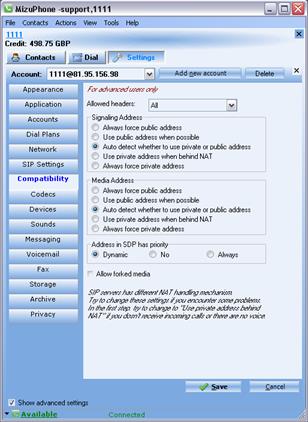
Select Basic only/Extended/Non Standard/All from the Allowed headers list. The signaling address and the media address (IP addresses) can be set for the followings: always force public address, use public address when possible, auto detect whether to use private or public address (this is default), use private address when behind NAT, and always force private address. The default setting for ‘Address in SDP has priority’ frame is dynamic, but you can set it to “has no priority” or “has priority always”. Check the checkbox ‘Allow forked media’ to enable the softphone to initiate multiple media streams on call start.
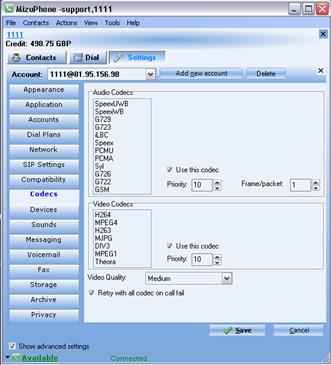
Set different priorities for the list of audio and video codecs available! The softphone will use only the codecs that have the ‘Use this codec’ checkbox checked. In the ‘Audio codecs’ priority you can set the codec priorities as they will appear in media offering (SDP). The lower the priority number the higher the priority! Under Video codecs you have the choice between 7 video codecs. The default setting for Video quality is medium, but you can use low bandwidth and HD quality too. Mark the checkbox ‘Retry with all codec on call fail’ to improve your call success ratio.
 Devices
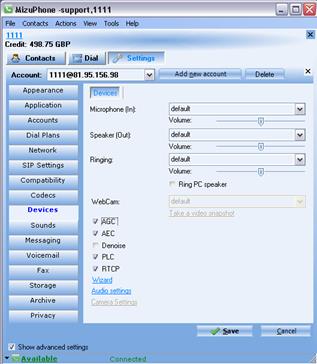
This menu is for setting the audio and video devices used and the volume of these devices. In the ‘Microphone’ list select the Sound card or chipset that is used for the microphone and set the volume of your microphone. In the ‘Speaker’ list select the device used by the speaker and set its volume. Select the device used for ringing in the ‘Ringing’ list. Check ‘Ring pc speaker’ if you want that the PC speaker rings too. After selecting the device used by the Webcam you can select between 6 improvements to your application: AGC (stands for Automatic Gain Control), AEC (is an acronym for Acoustic Echo Cancellation), Stereo (to convert mono sources to stereo), Denoise for noise suppression and background noise cancellation, PLC (Packet Loss Concealment), and RTCP to send RTCP packets too. Click on the ‘Wizard’ link to start Windows’s own Audio and Video Tuning Wizard and / or on the link ‘Audio settings’ to show the ‘Sound and Audio Devices Properties’ and the Windows volume control. A click on the ‘Camera settings’ link will bring you to the settings of your camera.
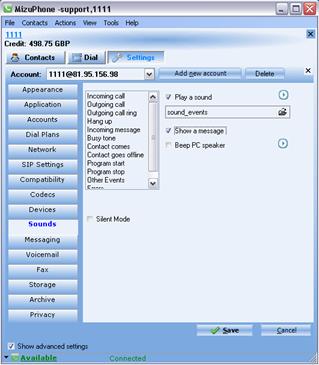 Sounds
This menu lets you set the voice files for all the events, like incoming call, outgoing call, etc. Select the menu in the list, check the checkbox ‘Play a Sound’ and select a file to play in the drop down list. For some events ‘Show message’ is available too, use it if you need it. Use the checkbox ‘Silent mode’ if you want the Mizu Softphone to work in silence.
 Messaging
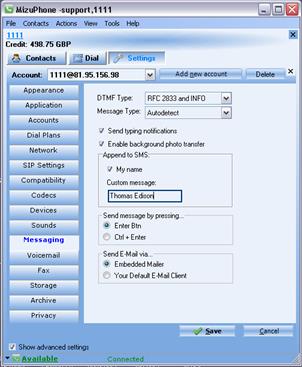
In the first list select the way DTMF dual tone mode frequency messages are sent. In ‘Message type’ select how to send chat messages. Checking the ‘Send typing notifications’ means that a notification will be sent while you are typing a message to a contact. ‘Enable background photo transfer’ will transfer a photo within a sip message. With the settings in the ‘Append to SMS’ frame you can append your name or a custom message to every SMS sent. For sending a message you can set to use the Enter button or the CTRL + Enter combination. In the next frame, ‘Send E-Mail via…’ you can select to send Email via the embedded mailer in Mizu Softphone, or to use the computer’s default Email client.
 Voicemail
In ‘Activate voicemail’ frame you can set in which case a call should go to voicemail: always, while already in call, on busy status, on don’t disturb status, on no answer, or on call reject. In the next frame, ‘Call forward’ set the phone numbers where to forward calls in the cases specified: always, while already in call, on busy status, on don’t disturb status, on no answer, or on call reject. Set a greeting voice to be played (a file) in the ‘Greeting voice prompt’ field. Check the boxes ‘Send missed calls to my email address’ and ‘Send missed messages to my email address’ to listen to missed calls and read missed chat messages from your email box. Check ‘Auto accept calls from All callers’ to automatically accept all incoming calls from the specified telephone number or address. In the ‘No answer timeout’ frame set the time interval after which the voicemail or call forward should activate in the case of no answer. In the ‘Remote voicemail’ frame choose to use the settings to check for new voicemail events or not or automatic. Introduce the number or address to call for remote voicemail. If you use remote voicemail instead of local voicemail, check the box ‘Forward calls to remote’
 Fax
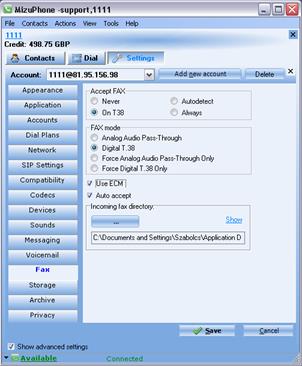
FaxThis form lets you select between various settings related to Fax image transmission and reception. The next frame, ‘FAX mode’ lets you select the way fax messages are coming. Check the box ‘Use ECM’ (ECM stands for error correction mode) to improve the quality of received faxes. Check ‘Auto accept’ to automatically accept incoming faxes. Set the directory in which faxes are stored in the ‘Incoming fax directory’ frame by clicking on the button ‘…’ and use the link ‘Show’ to go to incoming faxes.
 Storage
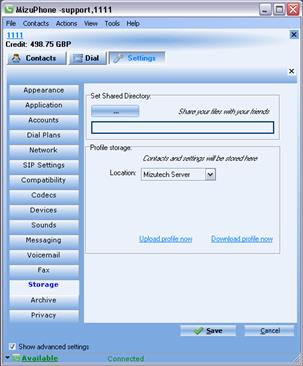
You can share directories with your contacts in the, “Set shared directory” frame clicking on the button ‚…‘ and selecting the directory. Store your profile on a different machine, other than your computer, on a HTTP location or on a FTP server (introduce username password and URL). Use the links ‘Upload profile now’ to upload your profile and ‘Download profile now’ to download your profile.
 Archive
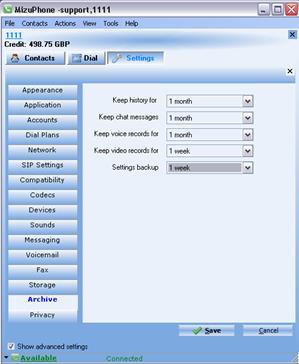
Here are the archive settings. You can keep the history, chat messages, voice records, video records and settings backup for the time interval set in the fields to the right (1 day, 1 week, 1 month, 1 year and forever).
In the frames on the left side you can set how and when you let people contact or disturb you. Unblock selected users in the frame ‘Blocked users’ with the ‘Unblock selected’ button or block people selected in the list below, with the button ‘Block this person’. Filter messages containing ugly words by introducing these into the field ‘Block all messages containing’. Check ‘Allow call forward’ to allow call forward, and check ‘Hide my identity’ to hide your identity. Click ‘Save’ to save your settings or ‘Cancel’ to set up later.
If you use a NAT or firewall that cannot be handled automatically by MizuPhone, you can explicitly set the listening SIP and RTP ports on the softphone, then configure your device (router, NAT or firewall) to route the requested ports to your softphone (setup a virtual server configuration). You usually have to route the default SIP port (5060) and some RTP ports (for example between 50000 and 50005). And, of course, you have to be registered on your SIP server(s).
The best quality built in codec is SpeexUWB (speex ultra wideband), but in order to be used, your peer must also have this codec. PSTN calls don’t have wideband codecs, because of their characteristics. For this codec to work properly, you will need a quality 45 kbits upload and download (29 kbits for raw codec payload + rtp and udp payload + some signaling). To achieve the best quality, you must use a headset. If you hear noise, enable noise suppression. If you hear cutting voice, check this FAQ.
Enable the silence detection.
Increase the jitter buffer.
Use a low bandwidth codec (for example iLBC).
Make sure that some other program doesn’t consume all of your CPU time!
Make sure you have at least 10 kbits/sec upload and download.
Switch to the Dial page.
Enter the “phone number” in the following format:
username@domainname:port
for example:
(if you omit the port, the default port will be 5060)
Set Setting->Application->Trace Level to “Details”
Eventually you can install a network sniffer (for example Wireshark) and set to the port to local signaling port.
When you check the “Remember my password” checkbox, your password will be saved.
To delete the saved password, just click on File menu -> LogOff (for example when you leave a public internet location)
Go to File Menu -> Settings -> Codecs (activate the “Show advanced settings” if you don’t see codecs).
Set the priority for your codec to the lowest value. (0=highest priority, 100=lowest priority)
Eventually you can disable all other codecs (uncheck the “Use this codec” checkbox; but in this case, calls may fail if the remote endpoint don’t have the selected codec)
Your profile means your data, settings, contact list and history archives.
You need to protect these data if you share your computer with others or when using MizuPhone from a public location.
With MizuPhone you can protect these sensitive data with a username and password which is requested on the login form.
Enter any username and password and your data will be encrypted and safe.
In customized softphone versions the username and password you enter on the login form will automatically be used for authentication by your service provider.
Your profile can be stored on a public server, so when you sit at another computer your settings and contactlists can be downloaded and you don't have to type it again.
If you don't need this feature, than just check the "Login automatically" checkbox to get rid of the login form.
Your profile can be stored on a public server, so when you sit at another computer your settings and contactlists can be downloaded and you don't have to type it again.
With Skype, MSN, Yahoo, etc this thing is very obvious, but with MizuPhone you are free to choose your provider(s) and your central profile location, so it will require a little time to set-up, but it is more secure
If you don't have access to such a central storage location, then create a free Mizutech account because Mizutech will give your profile storage on their servers for free.
Your profile is encrypted except when using advanced XCAP storage option, when the server will manipulate your profile and thus it cannot be encrypted by default.
It is not saved when you modify the volume during the call (it will be applied only for current call)
But you can modify permanently from File Menu -> Settings -> Devices
This is because the softphone tries to initiate the call on multiple paths with different via branch. And it seems that the other end cannot handle separate via branch correctly. You can disable this from File Menu -> Advanced Settings -> Sip Settings -> uncheck the “Allow forked requests”
You can just logoff from File menu and enter the new login username and password.
When a headset is connected via the Audio port on the computer, the computer doesn’t ring at incoming calls
You can control the ringer device from File Menu -> Settings -> Devices.
Copyright © Mizutech SRL. All rights reserved.