WebPhone documentation
Contents
Planned for the next release (April-May). 60
The Mizu WebPhone is a SIP client application implemented as a platform independent java applet and will run in any java enabled browser. Since it is based on the open standard Session Initiation Protocol, it can inter-operate with any other SIP-based networks allowing people to make true VoIP calls directly from webpage.
It will cost you less than 10 minutes to deploy the webphone on your website:
1. Check out the webphone presentation on our website if you haven’t done it before.
2. Download the demo package and check the Example.html source code (for the basic functionality you only need to rewrite the “serveraddress” applet parameter -in the html source- to your preferred sip server address. SIP username/password can be also set as applet parameters –preconfigured or from your server side script- or let the users to enter their credentials, depending on your needs)
3. Create a similar html on your website (copy-paste the applet tag from the Example.html anywhere to your webpage and copy the webphone.jar near the html files). If you are comfortable with server side development (.PHP, .NET or any other), then you might generate the applet part dynamically for better control.
4. For more advanced usage check the “examples” directory from the demo package and read through this documentation. Use/modify the skins found in the demo package or create your own skin with simple HTML/CSS; or just hide the webphone user interface and integrate it’s functionality into your existing website
Deployment in short:
1. Copy the webphone.jar to your webserver and refer to it from anywhere from your html with the “applet” tag. Set at least the “serveraddress” applet parameter to the IP or domain name of your VoIP server.
2. That’s all. Your users now can initiate or accept calls.
3. Optional:
a. Change any of the applet parameters after your needs (these are listed in the documentation)
b. Create your application logic from JavaScript and/or your own skin (be it a simple click to call button or a full featured user interface). For this you can use/modify any of the skin examples from the demo package. Have a look in the documentation, Java Script API section for the details.
See the deployment chapter or the quick guide for more details.
· Standard SIP client for voice calls (in/out), chat, conference and others
· SIP and RTP stack compatible with any standard VoIP servers and devices like Cisco, Voipswitch, Asterix, softphones, ATA and others
· Standard java applet (Runs from browsers under all popular OS. No native installer needed. Java is not needed on your servers)
· Connects directly to the VoIP server or to peers (no need for any intermediary media server or relay)
· Transport protocols: UDP, encrypted UDP, TCP, TLS, TCP tunnel, SOCKS proxy traversal, HTTP proxy traversal, HTTP, VPN tunneling, tunnel*
· NAT/Firewall support: stable SIP and RTP ports ,keep-alive, rport support, fast ICE/fast STUN protocols and auto configuration
· Peer to peer encrypted media
· Standard encryption: TLS, DTLS (optional), SRTP
· Signaling and media tunneling and encryption*
· RFC’s: 2543, 3261, 2976, 3892, 2778, 2779, 3428, 3265, 3515, 3311, 3911, 3581, 3842, 1889, 2327, 3550, 3960, 4028, 3824, 3966, 2663, 3022 and others
· Supported methods: REGISTER, INVITE, reINVITE, ACK, PRACK, BYE, CANCEL, UPDATE, MESSAGE, INFO, OPTIONS, SUBSCRIBE, NOTIFY, REFER
· Audio codec: PCMU, PCMA, G.729, GSM, iLBC, SPEEX, OPUS
· Video codec: H264, H263, H261, MPEG1, MPEG4, MPEG2, VP8,Theora
· HD Audio: Wideband, ultra-wideband and full-band codecs (speex, opus)
· Audio enhancements: Stereo output (will convert mono sources to stereo) , PLC (packet loss concealment), AEC (acoustic echo canceller), Noise suppression, Silence suppression, AGC (automatic gain control) and auto QoS
· Conference calls (built-in RTP mixer)
· Voice recording (local and/or ftp upload), custom audio streaming
· DTMF (INFO method in signaling or RFC2833)
· IM/Chat (RFC 3428), SMS and presence capability
· Redial, call hold, mute, forward and transfer (attended and unattended)
· Call park and pickup, barge-in
· Balance display, call timer, inbound/outbound calls, Caller-ID display
· Voicemail (MWI)
· Click to call
· Additional features: call parking, early media, local ring-back, PRACK and 100rel, replaces
· Server side integration using PHP, .NET, J2EE , Node.js, etc
· Integration with any webpage or third party application
· API: HTTP API, JavaScript API, Native API/VoIP SDK
· Branding and customization: Use with your own brand. Customizable user interface, skins and languages (with ready to use, modifiable skins)
· Custom features
· Unlimited lines
· Flexibility (all parameters/behavior can be changed/controlled by applet parameters and/or from java script)
*tunneling and encryption works only when used with Mizu VoIP softswitch or tunneling server.
· A convenient dialer that can be offered for VoIP endusers since it runs directly from your website
· Callcenter VoIP client for agents/operators (easy integration with your existing software)
· Embedded in VoIP devices such as PBX or gateways
· Click to call functionality on any webpage
· VoIP conferencing in online games
· Buy/sell portals
· Social networking websites , facebook phone
· As an efficient and portable communication tool between company employees
· VoIP service providers can deploy the webphone on their web pages allowing customers to initiate SIP calls without the need of any other equipment directly from their web browsers
· VoIP enabled support pages where people can call your support people from your website
· VoIP enabled blogs and forums where members can call each other
· VoIP enabled sales when customers can call agents
· Java Script phone
· Turn all phone numbers into clickable links on your website
· Integrate it with any Java applications (add the webphone.jar as a lib to your project)
· HTTP Call Me buttons
· HTML5 VoIP
· Asterisk integration (or with any other PBX)
· Integration with other web or desktop based software to add VoIP capabilities
· Unlike traditional softphones, the webphone can be embedded in webpages
· Easy customization for all kind of use-case (by the numerous parameters and optionally by using the API)
· Compatible with all browsers (IE, Firefox, Safari, Opera, Chrome, etc) and all OS (Windows, Linux, MAC, etc) with Java SE support
· Full compatibility with your VoIP server including Class 5 features
· Users don’t have to download anything to be able to initiate true VoIP calls
· Bypass corporate firewalls, proxies and all VoIP filtering (when encryption and/or HTTP tunneling is turned on)
· No need for third party media server. Full SIP functionality is embedded so it can connect directly to your server like any other hardware IP phone or softphone. Not ActiveX based.
· Easy to use and easy to deploy (copy-paste HTML code)
· Easy integration with your existing infrastructure since it is using the open SIP/RTP standards
· Easy integration with your existing website design
· Proprietary SIP/RTP stack guarantees our strong long term and continuous support
· Support for all the common VoIP features
· Everything packaged in one single easy to use jar file
Server side:
· Any Web server to host the files (the webserver doesn’t need to have Java)
· At least one SIP account at any VoIP service provider (or your own SIP server)
Client side:
· Java SE capable browser (Java S2SE 4+. This can be installed automatically if not found): supported by 96% of the browsers after world-wide statistics
· Java Script capable browser when the API is used: supported by 98% of the browsers after world-wide statistics
· Microphone and speakers (preferably a headset)
· Minimum 350 MHz P3 or similar processor for the advanced codec’s (e.g. G.729 or speex wideband)
· 10 MB free RAM
We are providing a demo version which you can try and test before any payment. The demo version has all features enabled but with some restrictions to prevent commercial usage. The limitations are the followings:
· maximum 10 simultaneous webphone in the same time
· will expire after several months of usage (usually 2 or 3 months)
· maximum ~100 sec call duration restriction
· maximum 10 calls / session limitation. (After 10 calls you will have to restart your browser)
· will work maximum 20 minute after that you have to restart it or restart the browser
· can be blocked from Mizutech license service
Note: for the first few calls the limitations might be weaker than described above.
On request we can also send out demo with only the trial period limitation (will expire after several weeks of usage) and without the other limitations.
Download link: http://www.mizu-voip.com/Portals/0/Files/webphone_demo.zip
The webphone is sold with
unlimited client license (Advanced and Gold) or restricted number
of licenses (Basic and Standard). You can use it with any VoIP
server(s) on your own and you can deploy it on any webpage(s) which
belongs to you or your company. Your VoIP server(s) address (IP or
domain name) and optionally your website(s) address will be
hardcoded into the software to protect the licensing. You can find
the licensing possibilities on the
pricing page.
After successful tests please ask for your final version at
webphone@mizu-voip.com.
Mizutech will deliver your webphone build within one workday after
your payment.
Release versions don’t have any limitations (mentioned above in the
“Demo version” section) and are customized for your domain. All
“mizu” and “mizutech” words are removed so you can brand it after
your needs (with your company name, brand-name or domain name),
customize and skin (we also provide a few skin which can be freely
used)
Your final build must be used only for you company needs (including your direct sip endusers).
Title,
ownership rights, and intellectual property rights in the Software
shall remain with MizuTech and/or its suppliers.
The agreement and the license granted hereunder will terminate
automatically if you fail to comply with the limitations described
herein. Upon termination, you must destroy all copies of the
Software. The software is provided "as is" without any warranty of
any kind.
Some audio codecs that can be used with the webphone (e.g. G.729) can be patented in your country and require you to pay royalties to their licensors (patent license per channel). Mizutech doesn’t sell codec patent licenses (but the codecs are implemented in the webphone).
You may:
Use the webphone on any number of
computers
Give the access to the webphone for your customers or use within
your company
Use the webphone on multiple webpage’s and with multiple VoIP
servers (after the agreement with Mizutech). All the VoIP servers
must be owned by you or your company. Otherwise please contact our
support to check the possibilities
You may not:
Resell the webphone
Sell “webphone” services for third party VoIP providers and other
companies
Reverse engineer, decompile or disassemble the webphone
Modify the software in any way (except modifying the applet
parameters, skins and to add digital certificate if
needed)
The webphone
is shipped with a simple user interface presenting the most
commonly used functions.
However you can easily customize the user interface by
applet
parameters (compact, width, height, color parameters,
enable/disable functions etc).
If you need total control on your design then there is a Java Script API which you can use to easily customize the user interface and create your own design or use/modify one of the existing skins (these are found in the demo package). This means that any web developer can easily create any user interface with their favorite tool using HTML, DHTML, AJAX, Flash, etc and run the webphone in the background or in compact mode, controlling it by javascript function calls. See the JavaScript API section for more details. Another possibility is to create your GUI in Java although this will require more time and Java knowledge.
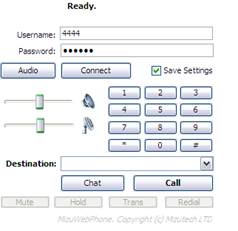
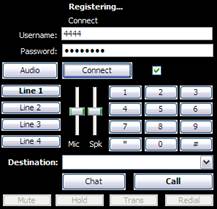
Basic user interface examples:
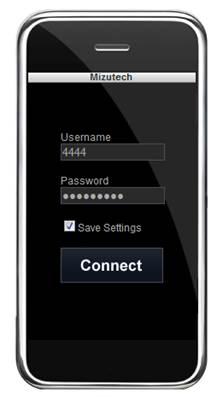
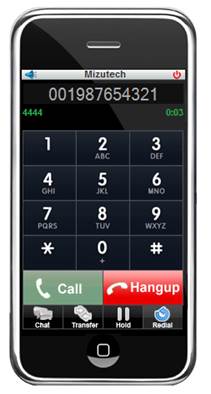
Skinned interface example (iPhone skin):
Although the webphone is like a swiss army knife which can be used for many purposes, its main goal is to easily add VoIP call capabilities to your website. The whole application is built into one file making its deployment fairly easy. The file size is like an image on your webpage, so it can be downloaded quickly by browsers. To add it to your webpage, you just have to put the webphone.jar on your web server and copy-paste a short code in your html. Any web developer can handle this task in a few minutes.
By default the applet file is named “webphone.jar”. Copy this file in your webpage directory (Usually near the html file in which you would like to be displayed. Otherwise you must enter the correct path for the codebase applet parameter).
Then copy paste the applet tag into your html (or compose it dynamically from any server side script like PHP or .NET)
The applet tag is defined as follow (with some basic parameters):
<applet
archive = "webphone.jar"
codebase = "."
code = "webphone.webphone.class"
name = "webphone"
width = "300"
height = "330"
hspace = "0"
vspace = "0"
align = "middle"
mayscript = "true"
scriptable = "true"
alt="Enable or install java: http://www.java.com/en/download/index.jsp"
>
<param name = "serveraddress" value = "SERVER_ADDRESS">
<param name = "loglevel" value = "1">
<param name = "MAYSCRIPT" value = "true">
<param name = "scriptable" value = "true">
<param name = "pluginspage" value = "http://java.com/download/">
<param name = "permissions" value = "all-permissions">
<b>You must enable java or install if not already installed from <a href="http://www.java.com/en/download/index.jsp"> here </a> </b>
</applet>
(set the value for the VoIP server to your server IP or domain name)
For a working example please check the Example.htm. Enter your VoIP server address (ip or domain) for the serveraddress parameter, then you can open the Example.htm in your browser. (Please note that the files have to be hosted on a VoIP server. If you launch the html file from your local file system then java might not work properly.)
Alternatives for the “applet” tag are the followings:
· object tag
· deployment toolkit
· JNPL
Examples for these can be found in the demo package or you can read more here.
Optionally you might also copy the mediaench.dll near your file if you wish to use features like AEC or denoise (see the FAQ for more details)
Note that beyond the file download, the webphone has nothing to do with the webserver. From the client browser it will communicate directly with the SIP server which you have set by the applet parameter or JS API (or it can also work without a server by calling to direct SIP URI), just like a traditional softphone.
In our demo package you will find several HTML examples for the webphone deployment. Make sure to copy the webphone.jar near the html file.
Here you can find some examples hosted on our website:
· Demo with basic user interface
The webphone can load its parameters also from the webpage URL. So you can create a html file as mentioned above with the webphone embedded in “applet” tag and then simply launch the page like this:
Note: you should use clear password only if the account is locked on your server (can’t call costly outside numbers). Otherwise you should pass it encrypted or use MD5 instead. These are explained in the “Applet parameter security” section.
The webphone can load its parameters also from the webpage URL. So you can create a html file as mentioned above with the webphone embedded in “applet” tag and then simply launch the page like this:
For this, just copy-paste the code below into your html:
<script type="text/JavaScript" src="http://www.mizu-voip.com/G/webphone/skins/wp_tel.js"></script>
<script type="text/javascript">
wp_tel.serveraddress = ''; // yoursipdomain.com your VoIP server IP address or domain name
wp_tel.username = '';
wp_tel.password = '';
wp_tel.md5 = ''; //use either password or md5 (leave it empty if you set the password)
wp_tel.skin = ' skin_click2callB'; // skin folder name
</script>
As you can seem this refers to Mizutech website. You can easily host the same on your webserver, just copy the webphone.jar, the wp_tel.js and the webphone.jar to your directory.
Applet tag placed on VoIP server providers’ webpage, allowing their customers to make VOIP calls directly from the browser:
<applet
archive = "webphone.jar"
codebase = "."
code = "webphone.webphone.class"
name = "webphone"
width = "300"
height = "330"
hspace = "0"
vspace = "0"
align = "middle"
>
<param name = "serveraddress" value = "sipserverdomain.com">
<param name = "permissions" value = "all-permissions">
<b>Java is currently not installed or not enabled.</b>
</applet>
If the user is already logged in on your webpage, then you can make the applet more user-friendly by not asking for their username and password again.
In this case you should generate the html page with the “username” and “password” parameters prefilled (This can be done from your server side scripting, for example from PHP or .NET)
On your pages where you display the click to call button or the forum posts (near the nicknames) you can display a small picture representing the online/offline/busy status of the actual user (presence status). The status of the user can be queried from your SIP server. If you use Mizu Softswitch, you have to initiate the v_userstatus ‘username’ SQL query to the database to know the status of the actual user.
If the agent is online, the button must be clickable and load a different page, iframe, div-ajax, object, frame, flash, javascript:NewWindow or whatever will launch the java applet.
<applet
archive = "webphone.jar"
codebase = "."
code = "webphone.webphone.class"
name = "webphone"
width = "240"
height = "50"
hspace = "0"
vspace = "0"
align = "middle"
>
<param name = "compact" value = "true">
<param name = "call" value = "true">
<param name = "serveraddress" value = "yourdomain.com">
<param name = "username" value = "loggedin_user_username">
<param name = "password" value = "loggedin_user_password">
<param name = "callto" value = "called_user_name">
<param name = "permissions" value = "all-permissions">
<b>Display error here or offer java runtime download b>
</applet>
The serveraddress, username, password and callto must be generated properly from your server side scripting language (PHP, .NET or any other)
Based on online statistics (http://www.thecounter.com/stats/) 94% of the browsers have support for java. Using the toolkit or the JNLP deployment methods the Java engine is automatically installed on the client device.
You can also present alternative methods for users who don't have Java installed or enabled in their browsers. Most of the softphones will recognize sip uri links placed on your webpage (for example sip://callednumber@sipserver.com) and will start the call automatically. Alternatively you can redirect your users to download the java runtime or offer them a softphone download link in case if they don’t have java enabled.
If you are using the old “applet” or “object” methods you should direct the user to download the java runtime or present alternative methods to call. Example:
<applet
archive = "webphone.jar"
codebase = "."
code = "webphone.webphone.class"
name = "webphone"
width = "240"
height = "50"
hspace = "0"
vspace = "0"
align = "middle"
>
<param name = "compact" value = "true">
<param name = "call" value = "true">
<param name = "serveraddress" value = "yourdomain.com">
<param name = "username" value = "loggedin_user_username">
<param name = "password" value = "loggedin_user_password">
<param name = "callto" value = "called_user_name">
<param name = "permissions" value = "all-permissions">
<p>
If you don't have Java installed you can install from <b>
<a href="http://www.java.com/en/download/index.jsp">here</a></b>.<br>
You must allow this applet to access your computer (Accept the certificate,
Click on allow blocked content on IE).<br>
Otherwise it cannot access you microphone and cannot initiate phone calls.<br>
If Java doesn't work for you, then click <b>
<a href="sip:// called_user_name@yourdomain.com">here</a></b> to start a call from
your desktop soft phone application.<br>
If you don't have a softphone you can download a free one from <b>
<a href="http://www.mizu-voip.com/Download.aspx">here</a></b></p>
</applet>
Detect java runtime with java-script:
<HTML>
<HEAD>
<SCRIPT LANGUAGE="JavaScript">
onError = errHandler; // Without he parentheses, because we don't want IE to do this. Like this, only NS does.
function appLoaded() {
if (!document.applets[0].isActive)
alert("IE: Applet could not be loaded");
}
function errHandler() {
alert("NS: Applet could not be loaded");
consume();
}
</SCRIPT>
</HEAD>
<BODY onLoad = appLoaded();>
<applet code="webphone.class" archive="webphone.jar" height="50" width="240">
<param name=" webphone" value="/etc/inet/hosts">
</applet>
</BODY>
</HTML>
Preferred method since version 4.7: Use the simple “applet” tag (you might check java presence from javascript if needed).
Parameters can be specified in the following ways:
· applet parameters (by using the applet tag and set the parameters like: <param name = "parameter_name" value = "parameter_value">
· webpage URL (the webhone will simply look at the embedding document/window url at startup. Prefix all parameter with “wp_”)
· command line (when used as a standalone executable. Example: webphone.jar serveraddress=1.2.3.4 username=xxx password=xxx)
· wpcfg.ini file in ini file format (only as local app. not usable from web)
· cookies (prefix all keys with “wp_”. For example wp_username)
· using the API_SetParameter function from javascript
· skin config file: config.js (if you are using our skin templates)
· SIP signaling (sent from server) with the x-mparam header (or x-mparamp if need to persist). Example: x-mparam=loglevel=5;aec=0
Any of these methods can be
used or they can be even mixed.
All parameters can be passed as strings and will be converted to
the proper type internally by the webphone.
Parameters can be also encrypted. See the “Applet parameter
security” section for the details.
For a basic usage you will
have to set only your VoIP server ip or domain name
(“serveraddress” applet parameter)
The rest of the parameters are optional and should be changed only
if you have a good reason for it.
Note: once a parameter is set, it might be cached by the webphone and used even if you remove it later. To prevent this, set the parameter to “DEF” or “NULL”. So instead of just deleting, set its value to “DEF” or “NULL”. “DEF” means that it will use the parameter default value if any. “NULL” means empty for strings, otherwise the parameter default value. Example: <param name = "transport" value = "DEF">
The parameters can
be used to control the most important settings and applet behavior
like server domain, SIP authentication parameters, called party
number and whether a call have to be started immediately as the
applet starts or you let the user to enter these parameters
manually.
(string)
The domain name or IP address of your SIP server. By default it uses the standard SIP port (5060). If you need to connect to other port, you can append the port after the address separated by colon.
Examples:
“mydomain.com” -this will use the default SIP port: 5060
“sip.mydomain.com:5062”
“10.20.30.40:5065”
Default value is empty.
If not set, then you (or the users) will be able to call only using full SIP URI and it is more difficult to accept incoming calls. If set, then any username/phone number can be called what is accepted by the server.
(string)
This is the SIP username (A number/Caller-ID for the outgoing calls). The webphone will authenticate with this username on your server.
When compact is true, then this parameter must be filled properly. Otherwise it can be empty or omitted so the users will have to type it.
Default value is empty.
Note: If you need a different name for SIP user name and Auth name (authorization name) then you might have to also use the “sipusername” applet parameter.
(string)
SIP authentication password. When compact is true, then this parameter (and also the username) must be filled properly. Otherwise it can be empty or omitted (the user will have to enter its password). This parameter can be set also in encrypted format or you can use the md5 parameter instead of the password. More details about the parameters encryption can be found in the “Applet parameter security” section.
Default value is empty.
(number)
With this parameter you can set wether the webphone should register (connect) to the sip server.
0: no
1: auto guess (yes if username/password is set, otherwise no)
2: yes
The webphone will also reregister automatically based on the “registerinterval” parameter.
Default value is 1.
(boolean)
If set to true then the applet immediately starts the call with the given parameters (for example with your page load). The serveraddress, username, password, callto must be also set for this to work.
Default value is false.
Usually when this parameter is true, then the “compact” parameter is also set true.
Usually when this parameter is false, then the “compact” parameter is also set false.
(string)
Can be any phone number/username that can be accepted by your server or a SIP URI. When “autocall” or “compact” is true, then this parameter should be filled properly. Otherwise it can be empty or omitted (the user will enter the number to call)
Default value is empty.
These parameters can be used to
control how the applet user interface (if any) will look like.
For more customization you can write your own user interface and
use the java script API to control the webphone or use/modify one
of the existing skins.
(number)
the size of the space occupied by the applet can vary depending on the other parameters.
-if the compact parameter is set to false, than you should set the applet_size_width to 300 and the applet_size_height to 330.
-If the compact parameter is set to true, than you should set the applet_size_width to 240 and the applet_size_height to 50.
You can run this applet in hidden mode, when all parameters are passed from server side scripts. In this way you can set the applet_size_width and applet_size_height to 1.
The applet size can be set also from html.
(boolean)
False: the applet will be shown in its full size with username, password input box and dial pad
True: the applet will have only a Hangup/Call button and a call status indicator. In this mode the username, password and callto parameters are already set from parameters, so when the applet is launched it immediately starts dialing the requested number.
Default value is false.
Usually when this parameter is true, than the “call” is also set true.
Usually when this parameter is false, than the “call” is also set false.
(boolean)
Multiple lines enable the user interface to handle more than one call in the same time. (This doesn’t mean multiple server accounts/registrations. If you need to use the webphone with multiple VoIP servers at the same time, then just launch more instances)
Set to false to hide line buttons. (The phone will still be able to handle multiple calls automatically)
You can restrict the available virtual lines with the “maxlines” parameter.
When set to true, you might also have to set the “hasvolume” to 1 or 2 and the automute or autohold applet parameters described in this document.
Default is false.
(string)
Controls the basic design settings. The following values are defined:
· mizu (on request)
· metal
· windows
· mac
· motif
· platform
· system
Default value is null (system specific design is loaded)
(number)
With these parameters you can customize the colors on the applet.
Default value is empty.
The following applet parameters are defined:
· boxbgcolor
· color_background
· color_label_foreground
· color_edit_background
· color_edit_foreground
· color_buton_background
· color_buton_foreground
· color_buton_dial_background
· color_buton_dial_foreground
· color_other_background
There are 3 ways to specify the color parameter:
Ø integer number: This number represents an opaque sRGB color with the specified combined RGB value consisting of the red component in bits 16-23, the green component in bits 8-15, and the blue component in bits 0-7
Ø hex number prefixed with #: representation of the color as a 24-bit integer (htmlcolor)
Ø the name of the color: the following values are defined: black,blue,cyan,darkgray,gray,gren,lightgray,magneta,orange,pink,red, white and yellow
(string)
The following languages are built-in:
-en: english (default)
-ru: russian
-hu: hungarian
-ro: romanian
-de: deutsch
-it: italian
-es: spanish
-tr: turkish
-pr: portugheze
-jp: japanese
-fr: french
Both the 2 char and the full name variant can be used. For example: language = “it”
If you are using a html skin, then you will also have to translate the strings in your html.
If you wish the javascript status messages to be also translated, set the “translatemode” applet parameter to 0.
Other languages can be added on your request or just translate your html user interface.
In some countries you might also have to set the locale applet parameter to one of the following values: CANADA, CHINA, CHINESE, ENGLISH, FRANCE, GERMAN, GERMANY, ITALIAN, ITALY, JAPAN, JAPANESE, KOREA, KOREAN, ROOT (root locale), TAIWAN, UK, US. The default value is ENGLISH.
(string)
Set the character decoding for SIP signaling.
Default is empty (will load the local system default).
More details:
http://docs.oracle.com/javase/7/docs/api/java/nio/charset/Charset.html
http://www.iana.org/assignments/character-sets/character-sets.xhtml
(boolean)
Set to false if you don’t need the connect button
(number)
0: never
1: hangup only
2: always
(boolean)
Set to false if you don’t need the conference button and conference
features.
(boolean)
Set to false if you don’t need the hold button
(boolean)
Set to false if you don’t need the mute button
(boolean)
Set to false if you don’t need the redial button
(boolean)
Set to false if you don’t need the audio button
(boolean)
Set to false if you don’t need the popup for the incoming
calls
Note: this will not block the incoming calls; will only hide the default user interface –popup dialog- so most probably you will have to replace it with your own html user interface or handle the incoming calls automatically from javascript.
(number)
0=no
1=API only
2=SMS
3=IM all (default)
(number)
0=no volume controls
1=dynamic (default)
2=vertical
3=horizontal (useful if you disable the
multiple lines)
Set to false if you don’t need the volume controls
button
(number)
0=no
1=text (if hasvolume is set to 3)
2=icons (if hasvolume is set to 2)
(boolean)
Set to true to display the “Extension” edit box.
Default is false.
When sipusername is set (by applet parameter, user input or javascript api) then it will be used as the sip username and the username field will be used only for authentification. Otherwise the “username” field will be used for both.
(boolean)
Set to true to display the “display name” input box.
Default is false.
(boolean)
Set to true if you wish to hide the username/password input
controls. Default value is false.
(boolean)
Set to false if you are not using the java user interface. (When a custom html/js/css or other skin is used). This is an optional setting.
Default is true.
These
parameters are more rarely used or should be used only if you have
at least a minimal technical knowledge (VoIP and/or
JavaScript). You should modify only those
parameters which you fully understand otherwise better if you leave
all with the default values (the default values are already
optimized for production).
(string)
This optional attribute specifies the base URL of the applet--the
directory that contains the applet's code. If this attribute is not
specified, then the document's URL is used (your html page
URL).
Use it if you deploy the webphone.jar in a different directory on your webserver (not the same directory as your webpage).
For the toolkit deployment use “JAVA_CODEBASE” instead of “codebase”.
Default is ‘.’ which means the same directory (the html document directory)
These parameters are more rarely used or should be used only if you have at least a minimal technical knowledge (VoIP and/or JavaScript)
(number)
Check rport in SIP signaling (requested and received from the SIP server by the VIA header)
0=don’t ask (rtport request will not be added to the VIA header)
1=use only for symmetric NAT (only when it is sure that the public address will be correct)
2=always (always request and use the returned value except if already on public ip)
3=request even on public IP (meaningless in most cases)
9=request with the signaling, but don’t use the returned value (good If you want to keep the local IP and for peer to peer calls)
Change to 0 or 2 only if you have NAT issues (depending on your server type and settings)
(Usually use_rport and use_fast_stun should have the same value set)
Default is 1
(number)
Fast ICE negotiations (for p2p rtp routing):
0=no (set to 0 only if your server needs to always route the media)
1=auto
2=yes
3=always (not recommended)
Default is 1
Note: if set to 1 or 2 then the stun should not be disabled
(number)
Fast stun request on startup.
-1=force private address (if the client has both private and public IP, than the private IP will be sent in the signaling)
0=no
1=use only for stable symmetric NAT (recommended)
2=use only for symmetric NAT
3=always
4=use even on public IP
Change if you have NAT issues (depending on your server type and settings)
(Usually use_fast_stun and use_rport should have the same value set)
Default is 1
(number)
Specify whether the UDP have to be connected before sending on the socket. (Some server might require udp connect and in this way the webphone can always detect its local address correctly. However this should not be used whit multiple servers or separate domain and outbound proxy)
0=no
1=on init
2=on first send (not recommended. can block)
3=on both or any (not recommended)
Default value: 0
(number)
NAT keep-alive packet type.
0=no keep-alive
1=space + CRLF (_\r\n) (very efficient because low bandwidth and low server usage)
2=NOTIFY (standard method)
3=CRLF (\r\n) (very efficient because low bandwidth and low server usage. Not recommended)
4=CRLFCRLF (\r\n\r\n) (very efficient because low bandwidth and low server usage. After RFC draft)
Default is 4.
(number)
NAT keep-alive packet send interval in milliseconds.
Set to 0 to disable.
Default value is 28000. (28 sec)
(number)
Registration interval in seconds (used by the re-registration expires timer).
If your server supports keep-alive messages (to prevent NAT binding timeouts), then you might set to a longer interval (~3600 sec) to prevent high CPU usage on your server especially if you have many hundreds of SIP UA running at the same time. If your server doesn’t support keep-alive, then you might set this to a lower value (between 30 and 90 sec. 60 sec is a good choice for most NAT devices and routers). Note that usually this is not necessary because server side support is not needed to keep the NAT bindings.
The actual resend of the REGISTER messages will be sent at a shorter interval the cover the UDP packet loss and network/server delays.
Hide the connect/register button or don’t call the API_Register function to disable registrations.
Valid range is between 1 and 30000. (If below 10, then 120 sec will be used).
Default value is 120.
(number)
Specify registration interval in milliseconds.
In the signaling the expire interval will be set to (registerival/1000)*2+10 but the new re-registrations will be sent at every registerival/1000 seconds allowing one registration to be lost from two attempt due to any reason.
If your server supports keep-alive messages (to prevent NAT binding timeouts), then you might set to a longer interval (~3600 sec) to prevent high CPU usage on your server especially if you have many hundreds of SIP UA running at the same time. If your server doesn’t support keep-alive, then you might set this to a lower value (between 30 and 90 sec. 60 sec is a good choice for most NAT devices and routers).
Default is 60000 (60 sec)
This parameter is deprecated after version 4.3. Use the above “registerinterval” instead of this.
(boolean)
Set to false to prevent unregister messages to be sent by the webphone (for example to prevent unregister on web page reload).
Default is true
(number)
Accept the expires interval sent by the server.
0: no
1: yes (prioritize the contact expire)
2: yes (prioritize the global expire)
Default value is 1.
(number)
If to treat session progress (183) responses as ringing (180). This is useful because some servers never sends the ringing message, only a session progress and might start to send in-band ringing (or some announcement)
The following values are defined:
0: do nothing,
1: change status to ring
2: start to ring, start local ring and be ready to accept media (which is usually a ringtone or announcement)
3: start media receive and playback (and media recording if the “earlymedia” applet parameter is set)
4: change status to ringing and start media receive and playback (and media recording if the “earlymedia” applet parameter is set to true)
Default value is 2.
*Note: on ringing status the webphone is able to generate local ringtone. However this locally generated ringtone playback is stopped immediately when media is started to be received from the server (allowing the user to hear the server ringback tone or announcements)
(number)
Change this option only if you have RTP setup issues with your server(s).
UDP packets to send to open the NAT device and initiate the RTP. Some servers will require at least 5 packets before starting to send the media after the 183 “session in progress” response. In this case set this value to 10 (In this way the server will receive at least 5 packets even on high packet loss networks)
0: no
1: write only an empty udp packet
2: write a normal RTP packet
3 or more: write this number of RTP packets
Default is 2
*Note: instead of sending more “fake” packets, you can set the “earlymedia” to 1 or more to begin the rtp stream immediately.
*Note: you can use the “natopenpackettype” to specify the format. 1 means short CRLFCRLF packet (default). 2 means full RTP packet with zeroed content.
(number)
Start to send media when session progress is received.
0: no
1: reserved
2: auto (will early open audio if wideband is enabled to check if supported)
3: just early open the audio
4: null packets only when sdp received
5: yes when sdp received
6: always forced yes
Default is 2.
*Note: For the early media to work, the webphone has to open the NAT when SDP is received. This can be done by sending a few fake rtp packets or by starting to send the media immediately when session in progress is received. The first method consume less bandwidth, but it is not supported by some servers.
(number)
Some server cannot handle the final codec offer in the ACK message correctly.
In this case you will have to set this setting to 0, otherwise you will have one way audio.
0=never (RFC compliant)
1=auto guess (not send in case of certain servers and autocorrect in subsequent calls)
2=when multiple codecs are received
3=always reply with the final codec in the ACK message
Default value is 1.
(string)
Outbound proxy address (Examples: mydomain.com, mydomain.com:5065, 10.20.30.40:5065)
Leave it empty if you don’t have a stateless proxy. (Use only the serveraddress parameter)
Default value is empty.
(number)
Used only for HTTP tunneling with Mizu VoIP servers.
0: no
1: same as sip proxy (proxyaddress)
2: system default
3: manual (must be set by the httpproxyurl applet parameter –deprecated after version 3.5)
4: auto
Default value is 4.
(string)
Used only for HTTP tunneling when usehttpproxy is set to 3 or 4.
Set your http proxy address here. Example: 192.168.1.1:8080
Default value is empty.
This feature is removed after version 3.5 because it is not compatible with older JVM and using the browser capabilities offers better proxy handling.
(string)
Useful when the transport parameter is set to 4 (auto) to specify the http tunneling gateway address.
Default value is null (address loaded from the “serveraddress” applet parameter)
(number)
Transport protocol.
0: UDP (User Datagram Protocol. The most commonly used transport for SIP)
1: TCP (signaling via TCP. RTP will remain on UDP)
2: TLS (encrypted signaling)
3: HTTP tunneling (both signaling and media. Supported only by mizu server or mizu tunnel)
4: HTTP proxy connect (requires tunnel server)
5: Auto (automatic failover from UDP to HTTP if needed)
Default is 0.
(number)
Media encryption method
0: not encrypted (default)
1: auto (will encrypt if initiated by other party)
2: SRTP
3: ZRTP (optional module)
Default is 0.
(number)
Media encryption method
0: most compatible
1: default auto
2: strict (might disconnect if peer is not respect the standard or on protocol error)
3: allow only strict SRTP call, otherwise disconnect
Default: 1
(boolean)
Enable/disable video features.
You must download the phone video package for this to work and read its documentation for more details. The video module is provided “as is”. Mizutech currently doesn’t provide direct technical support for this functionality.
(number)
DTMF send method
0=disabled
1=sip INFO method
2=RFC2833 in the RTP (if RTP stream is working, otherwise it will send also SIP INFO)
3=both INFO and RFC2833
4=RFC2833 (will not send SIP INFO even if there is no RTP stream negotiated)
Default is 2.
(number)
Subscribe to voicemail notifications (MWI). Accepted values:
0=disabled
1=display voicemail only if NOTIFY is received automatically without subscription
2=auto-detect if voicemail SUBSCRIBE is needed
3=subscribe for voicemail messages after successful registration
4=subscribe for voicemail messages on startup
Default value is 2. Set to 3 if your server has support for MWI to be sure that the webphone will check the voicemail.
(String)
Specify the voicemail address. Most servers will automatically send the voicemail access number so you don’t need to set this parameter.
(number)
-1=default transfer type (same as 6)
0=call transfer is disabled
1=transfer immediately and disconnect with the A user when the Transf button is pressed and the number entered (unattended transfer)
2=transfer the call only when the second party is disconnected (attended transfer)
3=transfer the call when the webphone is disconnected from the second party (attended transfer)
4=transfer the call when any party is disconnected except when the original caller was initiated the disconnect (attended transfer)
5=transfer the call when the webphone is disconnected from the second party. Put the caller on hold during the call transfer (standard attended transfer)
6=transfer the call immediately with hold and watch for notifications (unattended transfer)
Default is -1 (which is the same as 6)
If you have any incompatibility issue, then set to 1 (unattended is the simplest way to transfer a call and all sip server and device should support it correctly)
(number)
Specify if replace should be used with transfer so the old call (dialog) is not disconnected but just replaced.
This way the A party is never disconnected, just the called party is changed. The A party must be able to handle the replace header for this.
-1=auto
0=no
1=yes
Default is -1
(int)
Allow incoming replace requests.
0=no
1=yes and always disconnect old ep
2=yes and don't disconnect if in transfer
3=yes but never disconnect old ep
Default is 2.
(number)
Specify if line should
disconnect after transfer
0=no
1=on refer sent
2=on refer
received
3=on both
4=all (default)
(number)
Specify if line should disconnect after transfer
-1=auto
0=never
1= on C party connected status
2= on timeout
3= on connected or timeout
4= on ok for refer
Default is -1
(number)
Specify if line should disconnect after transfer
-1=auto
0=no
1= yes
Default is -1
(number)
Milliseconds to wait before
sending REFER/INVITE while in transfer.
Default value is 400.
(number)
Specify if line should disconnect after transfer
-1=auto
0=no
1= disconnect
2= reload
Default is -1
(number)
Specify if line should disconnect after transfer
-1=auto
0=never
1= if no notify received
2= always
Default is -1
(number)
SRV DNS record lookup setting:
0: don’t lookup
1: lookup A record first. If fails then lookup srv record (because mostly the srv record is not set anyway)
2: lookup srv record first. If fails then lookup A record (RFC compliant)
3: check also without the _sip._udp. Prefix
If the srv lookup returns multiple records, than the webphone will failover to the next server on connection failures.
Default value is 1.
(number)
Domain record lookup mode
0=auto
1=yes always re-query
2=use cache if needed (default)
3=use cache whenever possible
4=from cache only
5=disable
Default value is 0.
(string)
Audio device name for recording (microphone). Set to a valid device name or “Default” which would select the system default audio device.
(string)
Audio device name for playback (speaker). Set to a valid device name or “Default” which would select the system default audio device.
(string)
Audio device name for ringtone. Set to a valid device name or “Default” which would select the system default audio device. You can also set it to “All” to have the ringtone played on all devices.
(number)
Generate ringtone for incoming and outgoing calls.
0=no (you can generate ringtone also by using the JavaScript api to playback a sound file when you receive ringing notifications)
1=play ringtone for incoming calls
2=play ringtone for incoming and outgoing calls. (ringtone for outgoing calls can be generated also by your VoIP sever. When remote ringtone is received, the webphone will stop the local ringtone playback immediately and starts to play the received ringtone or announcement)
Default is 2.
(string)
Specify a ringtone sound file to be used. (Only the file name, not the full path. Copy the file near the webphone.jar on your webserver). If not specified, then the webphone will use its own built-in ringtone for call alert.
The file should be in the following format: PCM SIGNED 8000.0 Hz (8 kHz) 16 bit mono (2 bytes/frame) in little-endian (128 kbits).
You can use any sound editor to convert your file to this format (usually from File menu -> Save as).
Default value is empty.
(number)
Ring while in call if incoming or outgoing call
0=No
1=Only a beep for incoming call
2=Yes, normal ring
Default value is 1
(number)
Default microphone volume in percent from 0 to 100. 0 means muted. 100 means maximum volume, 0 is muted.
Default is 50% (not changed)
Note: The result volume level might be affected by the AGC if it is enabled.
(number)
Default speaker volume in percent from 0 to 100. 0 means muted. 100 means maximum volume, 0 is muted.
Default is 50% (not changed)
Note: The result volume level might be affected by the AGC if it is enabled.
(number)
Default ringback volume in percent from 0 to 100. 0 means muted. 100 means maximum volume, 0 is muted.
Default is 50% (not changed)
(number)
Check if system volume settings are too low or muted and increase if yes.
0: no
1: at first run
2: always
Default: 2
(number)
Will play a short sound when calls are connected
0=Disabled
1=For auto accepted incoming calls
2=For incoming calls
3=For outgoing calls
4=For all calls
Default value is 0
(number)
Automatic gain control.
0=Disabled
1=For recording only
2=Both for playback and recording
3=Guess
Default value is 3
This will also change the effect of the volumein and volumeout settings.
For the AGC to work the mediaench module must be also deployed. See the related FAQ section for more details.
(boolean)
Set to true for 2 audio channel or false for 1 (mono).
When stereo is set, the webphone will convert also mono sources to stereo output.
Default is false.
(boolean)
Enable/disable packet loss concealment
Default is true (enabled)
(number)
Enable/disable voice activity detection.
0: auto
1: no
2: yes for player (will help the jitter)
3: yes for recorder
4: yes for both
Default is 2.
Note: this is automatically set to 4 if the aec2 algorithm is used.
(number)
Enable/disable acoustic echo cancellation
0=no
1=yes except if headset is guessed
2=yes if supported
3=forced yes even if not supported (might result in unexpected errors)
Default is 1.
For this AEC to work the mediaench module must be also deployed. See the related FAQ section for more details.
(number)
Secondary AEC algorithm.
0=no
1=auto
2=yes
3: yes with extra (this might be too much under normal circumstances)
Default is 1
Note: for full echo cancellation you can set the aec to 1,2 or 3 and aec2 to 2 or 3.
(number)
Noise suppression.
0=Disabled
1=For recording only
2=Both for playback and recording
3=Auto guess
Default value is 3
(number)
Enable/disable silence suppression
Usually not recommended unless your bandwidth is really bad and expensive.
-1=auto
0=no (disabled)
1=yes
Default is -1 (which means no, except mobile devices with low bandwidth)
(boolean)
Enable/disable rtcp. (RFC 3550. Partial support)
(number)
GSM codec setting. 0=never,1=don’t offer,2=yes with low priority,3=yes with high priority
Default is 1.
(number)
iLBC codec setting. 0=never,1=don’t offer,2=yes with low priority,3=yes with high priority
Default is 1.
(number)
Narrowband speex codec setting. 0=never,1=don’t offer,2=yes with low priority,3=yes with high priority
Default is 1
(number)
Wideband speex codec setting. 0=never,1=don’t offer,2=yes with low priority,3=yes with high priority
Default is 1
Note: to enable wideband in all circumstances, set the “disablewbforpstn” and “disablewbonmac” applet parameters to false.
(number)
Ultra wideband speex codec setting. 0=never,1=don’t offer,2=yes with low priority,3=yes with high priority
Default is 1
Note: to enable wideband in all circumstances, set the “disablewbforpstn” and “disablewbonmac” applet parameters to false.
(number)
Narrowband (8000 Hz) opus codec setting. 0=never,1=don’t offer,2=yes with low priority,3=yes with high priority
Default is 1
Note: The opx dll/so/jnilib files have to be placed near the webhone.jar for the opus codec to work.
(number)
Wideband (16000 Hz) opus codec setting. 0=never,1=don’t offer,2=yes with low priority,3=yes with high priority
Default is 1
Note: to enable wideband in all circumstances, set the “disablewbforpstn” and “disablewbonmac” applet parameters to false. The opx dll/so/jnilib files have to be placed near the webhone.jar for the opus codec to work.
(number)
Super wideband (24000 Hz) opus codec setting. 0=never,1=don’t offer,2=yes with low priority,3=yes with high priority
Default is 1
Note: to enable wideband in all circumstances, set the “disablewbforpstn” and “disablewbonmac” applet parameters to false. The opx dll/so/jnilib files have to be placed near the webhone.jar for the opus codec to work.
(number)
Ultra wideband (fullband at 48000 Hz) opus codec setting. 0=never,1=don’t offer,2=yes with low priority,3=yes with high priority
Default is 1
Note: to enable wideband in all circumstances, set the “disablewbforpstn” and “disablewbonmac” applet parameters to false. The opx dll/so/jnilib files have to be placed near the webhone.jar for the opus codec to work.
(boolean)
Whether to disable wideband codec on mac devices.
Mac OS X has a JVM bug which prevents java to reopen the audio devices with different sample rate.
Set this to false only if you are using wideband codec for each calls (so there is no chance that a call have to be handled in narrowband)
Default value is true
(int)
This setting will disable speex and opus wideband and ultrawideband for outgoing calls to regular phone numbers since these are usually not supported for pstn calls and they might requires longer initialization.
0: no
1: check at first call
2: check all calls
Default is 1. Set to 0 to never disable wideband.
(number)
G.729 codec setting. 0=never,1=don’t offer,2=yes with low priority,3=yes with high priority
Default is 2
*In some countries a license/patent is
required if you use G.729 so enable only if you have licenses or
licenses are not required in your case (consult your lawyer if you
are not sure)
(number)
G711alaw codec. 0=never,1=don’t offer,2=yes with low priority,3=yes with high priority
Default is 2
(number)
G711ulaw codec. 0=never, 1=don’t offer, 2=yes with low priority, 3=yes with high priority
Default is 1
(number)
Set to 2 to always put low computational and low bandwidth codec in the offer list, specifically GSM and PCMU. Low CPU or bandwidth devices might choose these codecs (such as a mobile phone on 3G).
Set to 0 to disable.
Default is 1 (auto)
(number)
Number of payloads in one UDP packet.
By default it is set to 0 which means 2 frames for G729 and 1 frame for all other codec.
(number)
Sets traffic class or type-of-service octet in the IP header for packets sent from UDP socket which can be used to fine-tune the QoS in your network. As the underlying network implementation may ignore this value applications should consider it a hint.
The value must be between 0 and 255.
Valid values:
Ø 0: disabled
Ø 1: automatic (set to 10 under normal conditions and disabled when in tunneling)
Ø 2: low-cost routing
Ø 4: reliable routing
Ø 8: throughput optimized routing
Ø 10: low-delay routing
Ø or’ing the above values (from above 2)
Default value is 1.
Notes:
for Internet Protocol v4 the value consists of an number with precedence and TOS fields as detailed in RFC 1349. The TOS field is bitset created by bitwise-or'ing values such the following :
IPTOS_LOWCOST: 2
IPTOS_RELIABILITY: 4
IPTOS_THROUGHPUT: 8
IPTOS_LOWDELAY: 16
The last low order bit is always ignored as this corresponds to the MBZ (must be zero) bit.
For Internet Protocol v6 tc is the value that would be placed into the sin6_flowinfo field of the IP header.
This parameter might work only in preset environments; otherwise java applet might not have enough rights to modify the IP headers.
Under Windows OS it have to be enabled by setting the HKEY_LOCAL_MACHINE\SYSTEM\CurrentControlSet\Services\TcpIp\Parameters\DisableUserTOSSetting registry value to 0.
(number)
Specify if other lines will be muted on new
call
0=no (default)
1=on incoming call
2=on outgoing call
3=on incoming and outgoing calls
4=on other line button click
Default is 0
(number)
Specify if other lines will be muted on new
call
0=no (default)
1=on incoming call
2=on outgoing call
3=on incoming and outgoing calls
4=on other line button click
Default is 0
(number)
Specify if line should disconnect after transfer
-1=auto
0=no
1= yes
2= hold and reload if needed
Default is -1
(number)
Specify how to hold
-2=no
-1=auto (defaults to 2)
0=no
1=not used
2=hold
3=other party hold,
4=both in hold
Default is -1
(number)
Default mute direction
0=no
1=muted
2=speakers only
3=mic only
4=both
Default is 3
(number)
If to send ACK for authentication requests
(401,407).
0=no
1=yes (default)
Should be changed only if you have compatibility issues with the server used.
(number)
You may change it if you have compatibility
issues with stateless proxies
0=never
1=no
2= conform RFC
3= yes. Sending for both server and contact URI (default)
4=always
(boolean)
Enable 100rel (PRACK)
Set to false if you have incompatibility issues.
Default is false.
(boolean)
Will send the client MAC address with all signaling message in the X-MAC header parameter.
Default value is false.
(string)
Set a custom sip header (a line in the SIP signaling) that will be sent with all messages. Can be used for various integration purposes (for example for sending the http session id). You can also change this parameter runtime with the API_SetSIPHeader java script function.
Default value is empty.
(string)
Add any prefix for the called numbers.
Default is empty.
(boolean)
If set to true, than users must register before to make any calls.
Default value is false.
(boolean)
Set to true to reject all incoming call if there is already a call in progress.
Default value is false.
(String)
Specify a number where calls should be forwarded when the user is already in a call. (Otherwise the new call alert will be displayed for the user or a message will be sent on the JS API)
Default is empty.
(String)
Specify a number where ALL calls should be forwarded.
Default is empty.
(String)
Specify a number where ALL calls should be transferred.
This might be used if your server doesn’t support call forward (302 answers).
Default is empty.
(int)
Set to ignore all incoming calls.
0=don’t ignore
1=silently ignore
2=reject
Default value is 0.
(boolean)
Set to true to automatically accept all incoming calls (auto answer).
Default value is false.
Note: Autoanswer can be also forced from the server by the “P-Auto-Answer: normal” SIP header.
(string)
Block incoming communication from these users. (users/numbers separated by comma).
Default value is empty.
(int)
Set to ignore calls if target doesn’t match
0=accept all incoming calls
1=check if target user match
2=check rinstance
3=check rinstance strict
4=check all strict
Default value is 0.
(number)
Maximum ring time allowed in millisecond.
Default is 90000 (90 second)
(number)
Maximum speech time allowed in millisecond.
Default is 10800000 (3 hours)
(number)
Automatically start the sipstack after a specified time.
0=no (the sipstack will be started on the first register or call event)
1=on startup if not tunneling or serveraddress/username/password are set (the sipstack will be started at applet init)
2=on startup always (the sipstack will be started at applet init)
Other=seconds (the sipstack will be started after the specified seconds)
Default value is 1
You can set to 0 if there is less change that the webphone will be used once the users will open the webpage hosting the webphone.
You can set to 1 or higher if there is a high probability that the user will use the webphone to make calls (this will shorten the setup time for the first call)
(number)
You can slow down or speed up the SIP protocol timers with this setting. You may set it to 15 if you have a slow server or slow network.
Default value is 10.
(number)
Same as “timer” but it affects idle, connect
and ring timeout and maximum call durations.
Default value is 10.
(number)
RTP timeout in seconds to protect again dead sessions.
Calls will be disconnected if no media packet is sent and received for this interval.
You might increase the value if you expect long call hold or one way audio periods.
Set to 0 to disable call cut off on no
media.
Default value is 300 (5 minute)
(number)
RTP timeout in seconds for js notify.
After this timeout a warning message is sent on the java script interface without any further action.
The following log will be generated:
“WARNING,media timeout (notify)”
Default value is 0 (disabled)
(number)
RTP stream keep-alive packet send interval in milliseconds.
This is useful if your server has an RTP timeout setting to prevent disconnects when the webphone is hold or muted.
Default value is 0. (You might set it to 25000 for example)
(boolean)
Send rtp even if muted (zeroed packets)
Set to true only if your server is malfunctioning when no RTP is received.
Default value is false.
(number)
For call disconnect compatibility improvements. Some VoIP devices might have bugs with CANCEL forking, so it is better to always send a BYE after the CANCEL message on call disconnect. In this case set the discmode parameter to 3.
1: quick
2: conform the RFC
3: send BYE after CANCEL when needed
4: double: always repeat the CANCEL and the BYE messages
Default value is 2.
(number)
Maximum time in milliseconds to wait for unregistration when the API_Unregister is called or the webphone is closed.
If set to 0 that an unregister message is sent (REGISTER with Expires set to 0) but the webphone is not waiting for the response, which means that it will not repeat the un-register in case if the UDP packet was lost.
Default value is 2000.
(number)
Deprecated by waitforunregister.
Wait for the SIP engine to proper disconnect in miliseconds. By default it is set to 100. You might increase this value to give more time for the webphone on slow PC’s to send the proper unregistrer message when the applet is closed.
Default value is 50.
(string)
Instead of using the password parameter you can pass an MD5 checksum for better protection: MD5(username:realm:password)
(The parameters are
separated with the ‘:’ character)
The realm is usually your server
domain name or IP address (otherwise it is set on your server)
If you are not sure, you can find out the realm in the “Authenticate” headers sent by your server with the” 401 Unauthorized” messages. Example:
WWW-Authenticate: Digest realm="YOURREALM", nonce="xxx", stale=FALSE, algorithm=MD5
Default is empty.
(string)
Can be set together with the md5 applet parameter. You should be able to obtain it from your VoIP server (usually the server domain name)
Default is empty.
(boolean)
Specify if the transport will be encrypted (both media and the signaling)
Compatible only with Mizu VoIP servers.
Automatically turned on when using http tunneling.
Default is false.
(number)
Some server doesn’t allow “web” or “proxy” authentication.
0=normal
1=only proxy auth
2=only simple auth
(string)
Specify default SIP username. Otherwise the “username” parameter will be used for both the username and the authentication name.
If this is not specified, then the “username” will be used for the From field and also for the authentication.
If both username and sipusername is set then
-the username will be used in the From and Contact fields (CLI/caller-id)
-the sipusername will be used for authentication only
Default is empty.
(string)
Specify default display name used in “from” and “contact” headers.
Default is empty (the “username” field will be displayed for the peers)
(number)
Specify if you will supply encrypted passwords
via applet parameters or via the javascript api
0=no (default)
1=xor
2=des+base64
3=xor+base64 (this is the preferred method; easiest but still secure enough)
4= base64
This method is deprecated from version 3.4. All parameters can be passed encrypted now by just prefixing them with the “encrypted__X__” string where X means the id of the encryption method used.
From version 4.8 there is no need to specify this parameter anymore. Just prefix any applet parameter with encrypted_X as described in the “Applet parameter security” section
(number)
0=no (default)
1=local (in the user home directory)
2=remote ftp
3=both
(number)
The format of the recorded filenames.
0=date-time + peer name (default)
1=date-time + sip call-id
2=sip call-id
3=date-time + username
4=date-time + username + peer name
The date-time will be formatted in the following way: yyyyMMddhhmmss
Note: You can also use the “voicerecfilenameprefix” parameter to add a prefix for the file name.
(string)
FTP location for the recorded voice files if the “voicerecording” parameter is set to 2 or 3.
Format: ftp://USER:PASS@HOST:PORT/PATH/TO/THEFILE
Example: ftp://user01:pass1234@ftp.foo.com/FILENAME
The FILENAME part of the string will be replaced with the file name according to the “voicerecfilename” parameter.
(number)
Recorded file compression.
0: PCM wave stereo files with separate channels for in/our (default)
1: raw gsm. 2 files will be generated for each call. One for the recorder file and another for the playback. These files can be played with players supporting gsm codecs for example quicktime (which works also as a browser plugin) or a winamp plugin is downloadable from here.
2: ogg/vorbis (optional, on request; module not included by default)
(number)
The maximum recorded file length.
-1: dynamic, no limit
1: max around 1 minute
2: max around 2 minute
…
Default is -1.
(number)
How to synchronize the recording/playback side:
-1: Auto
0: No (don’t synchronize)
1: Yes (fill with noise the other channel)
2: Yes (wait for both side)
Default: 2
(string)
FTP location for general storage (for example for settings, contactlists)
Format: ftp://USER:PASS@HOST:PORT/PATH/TO/THEFILE
Example: ftp://user01:pass1234@ftp.foo.com/FILENAME
The FILENAME part of the string will be replaced with the actual file name.
(string)
HTTP location for general storage (for example for settings, contactlists)
Format: http://www.yourdomain.com/webphonestorage/
(number)
Sometime is useful to not allow configuration/settings storage on the user device (username,password,etc)
0=disable config storage
1=save only
2=load only
3=save and load (default)
(boolean)
Set to true to clear all previously stored or cached settings.
Default is false.
(number)
Specify local SIP signaling port to use.
Default is 0 (a stable port which is selected randomly at the first usage)
Note: this is not the port of your server where the messages should be sent. This is the local port for the webphone.
(number)
Specify local RTP port base.
Default is 0 (random between 20000 and 21000)
Note: If not specified, then the webphone will choose a random port between 20001 and 21000 which is then remembered at the first successful call and reused next time (stable rtp port).
(String)
Specify local IP address to be used.
This should be used only on devices with multiple ethernet interface to force the specified IP.
Default is empty (autodetect)
(number)
Although the jitter size is calculated dynamically, you can modify its behavior with this setting.
0=no jitter,1=extra small,2=small,3=normal,4=big,5=extra big,6=max
Default is 3
(number)
You can limit the jitter buffer size with this setting.
With the jittersize left as default (3) the maximum buffered packet count is limited to 8, so you might set this parameter to a lower value.
One packet means a received udp packet which might contain one or more audio frame.
For example when using G.729 the typical media stream are with 2 frames/packet. Each frame is 10 msec length.
A jitter limitation of 5 would mean maximum 100 msec to be cached. (while the default setting would allow 8 packet which means 160 msec)
Default value is 99 (no limitation)
(boolean)
This will increase the priority for the whole thread-group which might help on slow CPU’s or when other applications are generating high CPU load.
Note: the priority of the threads handling media are increased regardless of this setting.
Default is false.
(number)
Tracing level. Values from 0 to 6.
If you set it to more then 3, then a log window will appear and also will write the logs to a file (if file write permissions are enabled on the client side).
With level 0, the applet will not even display important even notifications for the user. Don’t use this level if possible.
Loglevel 4 means a full log including SIP signaling. Loglevel 5 or 6 should be avoided (this can slow down the applet)
Increased log levels has big impact on performance and usability. Use it only for short tests.
Text logs are sent to the following outputs:
-status display (only level 1 –these are the most important events that needs to be displayed also for the user)
-log window if loglevel is higher than 3
-file if loglevel is higher than 3 (webphonelog.dat in the java user home directory which depends on the OS/java/browser used)
-java console (if the logtoconsole applet parameter is set to true)
Default is 1.
(boolean)
Whether to send tracing to the java console.
Default is false.
(boolean)
If set to true then will send a capability request (OPTIONS) message to the SIP server on startup. The serveraddress applet parameter must be set correctly for this to work. This method is useful to release the security restrictions when using the applet with the java script API and also to open the NAT devices.
Default value is false.
(boolean)
If set to true then will send a short message (\r\n) to the SIP server on startup. The serveraddress applet parameter must be set correctly for this to work. This method is useful to release the security restrictions when using the applet with the java script API and also to open the NAT devices.
Deprecated since v.3.8.2
Default value is false.
(number)
NAT keep-alive interval in milliseconds which is usually sent from register endpoints.
Default value is 28000. (28 seconds)
(number)
Number of buffers used for audio recording.
Default is 7.
(number)
Audio recording mode. 0 means default; 1 means event based; 2 means device poll.
Default is 0.
(boolean)
Set to true for encrypted communication (both media and
signaling)
Works only with mizu servers.
(number)
Maximum port number from 1 to 4. When set to 1, multiline functionality will be disabled (but the webphone can have unlimited simultaneous calls).
If you would like to reject all incoming calls if the webphone is already in a call, then use the “rejectonbusy” applet parameter instead of setting the maxlines to 1.
Default value is 4.
(number)
Maximum session time in minutes
Used when the webphone is controlled from java script to avoid situations when the java applet is still running but the user http session is already expired.
You must call the API_register periodically (for example in every 20 minute) to avoid the timer expiry.
Default value is 60 minute.
(number)
Controls how the applet will cleanup and exit.
Possible values:
-1: auto (default; currently it is the same as 2)
0: do nothing
1: just finish
2: finish and cleanup
3: open exiturl in _self
4: open exiturl in _top
5: call system exit
6: open url and call exit
(String)
Specify the URL loaded on exit if the exitmethod is 3,4 or
6.
Default is: http://www.mizu-voip.com/F/appletexit.htm (an empty page)
(String)
Java script function to be called for the notifications.
Default value is “webphonetojs”
(number)
If you have a java script function called webphonetojs, you can get
notifications about webphone status, line status, events and cdr
record.
0=no notifications,1=status and cdr,2=important events,3= all logs including SIP signaling messages (depending also on loglevel).
Default is 2.
(number)
Set to a value in seconds if you wish to receive extended periodic
statistics for each line (STATUS notifications).
Default is 0 (no periodic statistics)
(string)
If your webphonetojs is embedded in other html elements, then you
can give the path here. Example:
document,externform,innerform2.
By default it is an empty string. This means
that the webphonetojs must be placed on the top level (after
<body> for example)
(number)
To get the event notification from the webphone to your javascript you will either use webhonetojs or API_Poll:
-1=auto/on demand (will turn to 2 on first API_Poll)
0=don’t use polling (you must use the webhonetojs to capture the events)
1=use polling
2=use polling or webhonetojs (will delete events on webphonetojs)
3=use polling only (webhonetojs will not work)
Default is -1
The following methods can be used to secure
the webphone usage:
-don’t hardcode the password if possible (let the users to enter it) or if you must hardcode it then use encryption
-restrict the account on the VoIP server (for example if the webphone is used as a support access, then allow to call only your support numbers)
-always pass the password parameter encrypted if you have to
-instead of password, use the MD5 and the realm parameters if possible (and this can also passed in encrypted format for the highest security)
-instead of applet parameters you can also use the javascript api (API_Register)
You just have to prefix
them like:
encrypted__X__encryptedvalue
where X means the id of the encryption method used:
1: simple xor (Each webphone has it’s unique
key. Ask your key from Mizutech support)
2: des (most secure but more difficult to
implement)
3: xor+base64 (this is the preferred method;
easy to use and secure enough)
4: base64 (unsecured)
Example: <param name = "password"
value = "encrypted__3__d3691adb28b5591">
You can also
use the applet to make the encryption for your parameters. For
this, launch the applet with “loglevel” set to 4.
An “encrypt” button will appear on the bottom of the
screen.
The same
format can be used to encrypt the string parameters for the API
function calls.
You should restrict the webphone account (usage, routing) from your
VoIP server to make the webphone more secure.
The simplest encryption method is the XOR encryption.
Each webphone has a unique key.
For the current key demo version it is “h39idbfqw7116ghh”.
To encrypt any string, you have to XOR it with this key byte by byte.
First char with ‘h’
Second char with ‘3’.
Third char with ‘9’
etc
To verify your work:
Set the “loglevel” applet parameter to 5.
An “encrypt” button will appear which will use the built-in encryption so you can use to encrypt any string with it or to verify your code used to generate the encrypted strings.
To pass a xor encrypted parameter you just have to prefix it with “encrypted_1_”.
For example instead of using
<param name = "username" value = "4444">
You can write the following:
<param name = "username" value = "encrypted_1_XORENCRYPTEDUSERNAME">
The same string format are also accepted on the java script api for the string function parameters.
XOR encryption should be used together with base64 encoding. In this case the encrypted_1_ prefix have to be changed to encrypted_3_
When using base64, first apply the xor, and base64 for the XORed bytes.
Xor+base encryption in PHP looks like this: encrypted__3__<? print base64_encode(stringtoencrypt ^ key); ?>
This is only a simplified example. If the key is smaller than the string to encrypt then you must xor it char by char (and restart with the first char of the key after the last one)
These examples are written in Java but you should be able to find similar functionalities in your preferred language be it JavaScript, PHP, J2EE, .NET or any other programming environment.
public static String strxor(String
str, String key) {
try {
String result = null;
byte[] strBuf = str.getBytes();
byte[] keyBuf = key.getBytes();
int c = 0;
int z = keyBuf.length;
ByteArrayOutputStream baos = new ByteArrayOutputStream(strBuf.length);
for (int i = 0; i < strBuf.length; i++) {
byte bS = strBuf[i];
byte bK = keyBuf[c];
byte bO = (byte)(bS ^ bK);
if (c < z - 1) {
c++;
} else {
c = 0;
}
baos.write(bO);
}
baos.flush();
result = baos.toString();
baos.close();
baos = null;
return result;
} catch (Exception e) { Common.PutToDebugLogException(3,"xor",e); }
return str;
}
import
javax.crypto.*;
import javax.crypto.spec.*;
import java.security.spec.*;
public class DesEncrypter {
Cipher ecipher;
Cipher dcipher;
String passPhrase = "XXX"; //get from Mizutech
int iterationCount = 3;
// 8-bytes Salt
byte[] salt = {
(byte)0xA9, (byte)0x9B, (byte)0xC8, (byte)0x32,
(byte)0x56, (byte)0x34, (byte)0xE3, (byte)0x03
};
DesEncrypter()
{
try{
KeySpec keySpec = new PBEKeySpec(passPhrase.toCharArray(), salt, iterationCount);
SecretKey key = SecretKeyFactory.getInstance("PBEWithMD5AndDES").generateSecret(keySpec);
ecipher = Cipher.getInstance(key.getAlgorithm());
dcipher = Cipher.getInstance(key.getAlgorithm());
AlgorithmParameterSpec paramSpec = new PBEParameterSpec(salt,iterationCount);
ecipher.init(Cipher.ENCRYPT_MODE, key, paramSpec);
dcipher.init(Cipher.DECRYPT_MODE, key, paramSpec);
} catch (Exception e) { Common.PutToDebugLogException("des ctor",e); }
}
public String encrypt(String str) {
try {
// Encode the string into bytes using utf-8
byte[] utf8 = str.getBytes("UTF8");
// Encrypt
byte[] enc = ecipher.doFinal(utf8);
// Encode bytes to base64 to get a string
return new sun.misc.BASE64Encoder().encode(enc);
} catch (Exception e) { Common.PutToDebugLogException("des encrypt",e); }
return str;
}
public String decrypt(String str) {
try {
// Decode base64 to get bytes
byte[] dec = new sun.misc.BASE64Decoder().decodeBuffer(str);
// Decrypt
byte[] utf8 = dcipher.doFinal(dec);
// Decode using utf-8
return new String(utf8, "UTF8");
} catch (Exception e) { Common.PutToDebugLogException("des decrypt",e); }
return str;
}
}
The webphone has an easy to use API and can be easily controlled by external applications or webpages. You can use one of the followings:
· Java Script API (using client side JS code)
· HTTP API (for any automation)
· SDK (for direct embedding into your Java application)
· From web server side (.NET/PHP/others) : just generate your html output to contain the proper applet parameters and JavaScript
The webphone has an easy to use API and can be easily controlled by external javascript function calls.
You can completely hide the webphone (or run it in compact mode) and present your custom design created with html, css, flash or with any other tool.
The syntax is very simple:
applethandle.functionname(parameters);
Where applethandle can be obtained in one of the following ways:
document.applets[0]
document.getElementById('webphone').getSubApplet()
document.getElementById('webphone')
For a more complete example about how to obtain the applet handle please check the ”Toolkit_with_JS.htm” or other skin examples that you should find in the demo package.
Notifications (status updates, events, etc) from the webphone is wired to your javascript function named “webphonetojs”.
With the java script API you can implement a VoIP application on your website. You might choose to do some actions in the background, present a single “call” or callback button (with presence?) or to display a phone interface. The most important steps are the followings:
1. write a function named “webphonetojs” to catch all messages from the applet. Regarding the incoming messages you can display the status of the phone (registered,ringing,in-call,etc), the most important events and alert the user about incoming calls or chat messages.
2. load the applet with the webpage using the applet tags or with the “toolkit” method with the proper parameters (serveraddress, etc)
(the parameters can be preconfigured, but you can also pass them via the API)
3. get a handle for the applet (document.applets[0] or check the skins in the demo package for a more complex example)
4. optionally call the API_Register automatically or when the user click on the “Connect” button (by default if you provide a username and a password applet parameter, the webphone will register automatically on startup)
5. call the API_Call function when the user clicks on your “Call” or “Dial” button
6. popup a window (or enable an “accept” button) when you receive notifications about incoming calls to your “webphonetojs” function. Then call API_Accept or API_Reject according the user action
7. if you will present a dial pad for the users, then you might call the API_Dtmf function whenever the user presses a button
8. you might put additional buttons or other controls on your interface for the following functions: audio settings, logout, hold, mute, redial, transfer, conference and others.
Short example:
<SCRIPT LANGUAGE="javascript">
function webphonetojs(message)
{
//this is an optional function if you would like to be notified about webphone events
//this function will be called by the applet
//you will have to parse the message and act accordingly
alert(message);
}
function do_something()
{
document.applets[0].functionname();
}
</SCRIPT>
<input type=button value='applet action' onClick='do_something()'>
Example call-flow
Obtain the webphone handle (see the initcheck in our javascript examples or just use document.applets[0])
API_ServerInit(“11.12.13.14”); //remove java security restrictions –this can be skipped from version 3.6
API_Register(“11.12.13.14”, “username”, “xxxx”); //connect to the server
API_Call(-1, “+363012345678”); //make a new call
//wait for connect message by checking the message received on the webphonetojs function
//notify the user when the call is ringing or connected
API_MuteEx(-2,true,0); //can be called when the user press a button
API_MuteEx(-2,false,0); //reenable audio when the user press a button
API_Hangup(-2); //disconnect all calls
...also call the API_HTTPKeepAlive in every 5 minute to avoid session timeout (defined by the httpsessiontimeout applet parameter)
There are many functions defined in the webphone, but you usually need only the functions prefixed with API_ and documented below:
Most of the functions return a boolean value. True when the operation was completed or initiated successfully, otherwise false.
Some of the functions are executed asynchronously (API_Call, API_Register, etc). This means that it can return a true value immediately and fail later. For example for API_Call the return value means only that the call was initiated successfully. At this point we don’t know if the call will be successful (connected) or not. You can get the call status by parsing the messages received by the function named “webphonetojs” or you can periodically poll the webphone status with the API_GetStatus function.
The line parameter means the channel number. The following values are defined:
Ø -2: all channels
Ø -1: the current channel set previously by API_SetLine or by other functions. Usually this will mean the first channel (1)
Ø 0 : undefined
Ø 1: first channel
Ø 2 : second channel
Ø etc (you can control the max number of the channels with the maxlines applet parameter which is set to 4 by default)
Most commonly you will have to pass always -1 as the channel number. You will have to use other values only if you will present a GUI were the user can select different lines. Otherwise the webphone can do this automatically allocating new channels when needed.
Function string parameters can be passed in encrypted format. (Read the FAQ for more details regarding the encrypted parameters)
You must call this function periodically more frequently than the timeout specified by the “httpsessiontimeout” applet parameter. (For example call this in every 5 minute)
This is to prevent orphaned webphone instances (when your html page was closed or crashed but the webphone is still running in the background).
If you don’t wish to call this function periodically, then you should set the “httpsessiontimeout” applet parameter to 0.
Most of the applet parameters can be set with this function except applet gui parameters (like the colors). Some parameters can take effect only when the applet is reinitialized.
This function should be used only in special cases. You should be able to control the applet without to use this function by using applet parameters.
You can pass a set of parameters with this function in value=key lines separated by CR (\r\n).
boolean API_SetCredentials(String server, String username, String password, String authname, String displayname)
Will set the server address (ip:port or domain:port) the SIP username and the password. These values can also be preset by applet parameters. Parameters with empty strings will be omitted. For example if you would like to change only the username and the password, you can write API_SetCredentials(“”,”newusername”, “newpassord”)
If authname is empty, then the username will be used for authentications. The displayname is usually empty (no special displayname will be presented for peers). If other parameters are empty, then they can be specified by user input (If the applet has a visible user interface).
Instead of passing the password directly you can use MD5 checksum.
In this case the md5 parameter must be the md5 checksum for username:realm:password
The realm parameter is optional (can be set as an empty string) but it is recommended for easy error detection. If present and the server realm don’t match with this one, an error message will be displayed by the webphone.
This has to be called only if you use the webphone as and SDK. Don’t call it from JavaScript! Will start the engine.
This function call is optional to stat the sip stack on demand.
If not called, then the sip stack is started anyway if the “startsipstack” applet parameter is set, otherwise will start at first registration or outgoing call attempt.
boolean API_Register(String server, String username, String password, String authname, String displayname)
Will connect to the SIP server. This can be also done automatically by applet parameter (“register”). Need to be called only once (subsequent reregistrations are done automatically. When called subsequently, than the old registrar endpoint is deleted, a new one will be created with a new call-id and the webphone will reregister). Parameters can be empty strings if you already supplied them by applet parameters or by the API_SetCredentials call.
If you already passed the server, username and password (or md5) parameters with the API_SetCredentials functions, then you can call this function with empty parameters: API_Register(“”,””,””,””,””);
This function have to be called only once at the startup. Further re-registrations are done automatically based on the “registerinterval” parameter.
Even if you wish to force re-registration, you should not call this more frequently than 40 seconds (because up to 40 seconds might be needed for a slow registration attempt especially if tunneling is used)
Will stop all endpoints (hangup current calls if any and unregister)
Will (re)subscribe for voicemail notifications. No need to call this function if the “voicemail” applet parameter is set to 2. The line parameter should be set to -1.
Will set the current channel. (Use only if you present line selection for the users. Otherwise you don’t have to take care about the lines).
Note: Instead of using each API call with the line parameter, you can just use this function when you wish to change the active line and use all the other API calls with -1 for the line parameter.
Will return the current active line. This should be the line which you have set previously except after incoming and outgoing calls (the webphone will automatically switch the active line to a new free line for these if the current active line is already occupied by a call)
Query the status of the line.
Note: this is rarely needed since you receive the status also by event notifications
Initiate call to a number or sip username.
If the peer parameter is empty, then will redial the last number.
Initiate call to a number or sip username.
If the peer parameter is empty, then will redial the last number.
The calltype can have the following values:
Ø 0: initiate voice call
Ø 1: initiate video call
Ø 2: initiate screensharing session
Disconnect current call(s). If you set -2 for the line parameter, then all calls will be disconnected (in case if there are multiple calls in progress). The “reasontext” parameter is optional.
Connect incoming call.
Disconnect incoming call. (API_Hangup will also work)
Forward incoming call to peer (with 302 Moved Temporarily disconnect code)
Transfer current call to peer which is usually a phone number or a SIP username. (Will use the REFER method after SIP standards).
You can set the mode of the transfer with the “transfertype” applet parameter.
If the peer parameter is empty than will interconnect the currently running calls (should be used only if you have 2 simultaneous calls)
Instead of calling the API_Transfer function and pass a number, with this function you can let the webphone to ask the C number from the user.
Add video media for an existing voice call.
The calltype can have the following values:
Ø 1: add video
Ø 2: add screensharing
Will stop the video stream at the specified line.
Mute current call.
The direction can have the following values:
Ø 0: mute in and out
Ø 1: mute out (speakers)
Ø 2: mute in (microphone)
Ø 3: mute in and out (same as 0)
Ø 4: mute default (set by the “defmute” applet parameter, which is “mute microphone only” by default)
Return if the selected line is muted or not.
Return values:
Ø -1: unknown
Ø 0: not muted
Ø 1: both muted (in/out)
Ø 2: out muted (speaker)
Ø 3: in muted (microphone)
Ø 4: both muted (in/out; same as 1)
Query if the selected line is on hold or not
Return values:
Ø -1: unknown
Ø 0: no
Ø 1: not used
Ø 2: on hold
Ø 3: other party held
Ø 4: both in hold
Note: pass -2 for the line to find if any endpoint is in hold
Hold current call. This will issue an UPDATE or a reINVITE.
Set the second parameter to true for hold and false to reload.
Same as API_Hold, but without the second parameter. This call will always invert the hold status for an endpoint (If the call was active, then it will switch to held status and if the call was in hold, then it will reactivate it).
Add people to conference.
If peer is empty than will mix the currently running calls (if there is more than one call)
Otherwise it will call the new peer (usually a phone number or a SIP user name) and once connected will join with the current session.
Send DTMF message by SIP INFO or
RFC2833 method (depending on the “dtmfmode” applet parameter).
Please note that the dtmf parameter is a string. This means that
multiple dtmf characters can be passed at once and the webphone
will streamline them properly. Use the space char to insert delays
between the digits. The dtmf messages are sent with the
protocol specified with the “dtmfmode” applet
parameter.
Example:
API_Dtmf(-2,” 12 345 #”);
Send a chat message. (SIP MESSAGE method after RFC 3428)
Peer can be a phone number or SIP username/extension number.
Instead of calling the API_SendChat function and pass a message, with this function you can let the webphone to open its chat form.
Will open the chat form (the “number” parameter can be empty)
Peer can be a SIP username or extension number.
On successful delivery the following event is sent: EVENT, chat sent successfully
On failed delivery the following event is sent: WARNING, chat message not delivered
Will start/stop a voice recording session.
· Startstop: 0 to stop, 1 to start locally, 2 to start remote ftp, 3 start to record both locally and to remote ftp, 4 start to record as it is set by the “voicerecording” applet parameter
· Now: used if the startstop is set to 0. 0 means that the recorded file will be saved and/or uploaded at the end of the conversation only. 2 means that the file will be saved immediately
· Filename: file name used for storing the recorded voice (if empty string, than will use a default file name)
This function should be used only if you would like to control the recording duration.
If all conversations have to be recorded, then just set the “voicerecording” applet parameter after your needs.
The last recorded call can be played by calling the API_PlaySound with the file set to “lastvoicerecord”.
boolean API_PlaySound(int start, String file, int looping, boolean async, boolean islocal, boolean toremotepeer, int line, String audiodevice, boolean isring)
Play any sound file.
At least wave files are supported in the following format:
PCM SIGNED 8000.0 Hz (8 kHz) 16 bit mono (2 bytes/frame) in little-endian (128 kbits)
Playback to remote peer is supported only with narrowband codec’s (disable speex wideband and ultrawideband if file playback is needed)
The file must be found near the webphone.jar.
· start: 1 for start or 0 to stop the playback, -1 to pre-cache
· file: file name
· looping: 1 to repeat, 0 to play once
· async: false if no, true if playback should be done in a separate thread
· islocal: true if the file have to be read from the client PC file system. False if remote file (for example if the file is on the webserver)
· toremotepeer: stream the playback to the connected peer
· line: used with toremotepeer if there are multiple calls in progress to specify the call (usually set to -1 for the current call if any)
· audiodevice: you can specify an exact device for playback. Otherwise set it to empty string
· isring: wheter this sound is a ringtone/ringback
Examples:
-playback a file locally (mysound.wav must exist on your webserver near the webphone.jar file):
API_PlaySound(1, "mysound.wav", 0, false, false,false, -1)
-playback a file to the connected remote peer (mysound.wav must exist on your webserver near the webphone.jar file):
API_PlaySound(1, “mysound.wav", 0, false, false,true, -1)
-stop the playback:
API_PlaySound(0, "", 0, false, false,false, -1)
Open audio device selector dialog (built-in user interface).
Will return the list of audio devices separated by \r\n.
Set the dev parameter to 0 to list the recording device names. Set to 1 for to get the playback or ringer devices.
Note: usually you don’t need to use this function. Just call the “API_AudioDevice” to let the users to change their audio settings.
Will return the currently selected audio device for the dev line (dev values are 0 for recording, 1 for playback, 2 for ringer).
Select an audio device. The devicename should be a valid audio device name (you can list them with the API_GetAudioDeviceList call)
The “dev” parameter can have the following values:
-0: recording device (microphone)
-1: playback device (speaker, headset)
-2: ringer device (speaker, headset)
The “immediate” parameter can have the following values:
-0: default (after the “changeaudiodevimmediate” applet parameter)
-1: next call only
-2: immediately for active calls
Note:
For the ringer device you can also pass the “All” string as the devicename to make the webphone to ring on all devices for incoming calls.
All devices can also accept the “Default” devicename which will select the system default audio device.
For the device you can also pass a number which is the order of the audio device as returned by API_GetAudioDeviceList staring from 1. Valid values are between 1 and 9 or 0 for the system default device.
Usually you don’t need to use this function. Just call the “API_AudioDevice” to let the users to change their audio settings.
Set volume (0-100%) for the selected device.
The dev parameter can have the following values:
-0 for the recording (microphone) audio device
-1 for the playback (speaker) audio device
-2 for the ringback (speaker) audio device
Return the volume (0-100%) for the selected device.
The dev parameter can have the following values:
-0 for the recording (microphone) audio device
-1 for the playback (speaker) audio device
-2 for the ringback (speaker) audio device
Return the program version number.
Returns line status or global status if you pass -2 as line parameter. The possible returned texts are the same like for notifications (listed below).
If the strict variable is set to 1, then it will return “Unknown” if no such line is activated. If the strict variable is set to 0, then it will return the default active line if the line doesn’t exists.
You should use the notifications described below to get the actual status of the webphone instead of continuously polling it with this function call.
You might call this function periodically (from a timer at around 1 second) instead of using the webphonetojs events.
It will return exactly the same strings like the js events. Accumulated events since the last call will be separated by \r\n.
The “jsscriptpoll” applet parameter must be set to 1,2 or 3 for this to work. This can also be used as a workaround if javascript notifications are not working in the target environment.
Contacts are normally handled by the caller process (your app) because they have less to do with the VoIP stack (except presence status). This should be done very easy with any server side script (.PHP, .NET) and better adopted to your needs. You can easily use the java script API to add VoIP functionality to your address book or contact list. The status (Online/Offline/Busy) of the users can be loaded from your VoIP server database. Based on the user presence you can display the different buttons with your design. Near each contact you can display a call/chat button which will launch a webphone instanced preconfigured with the actual contact (“callto” applet parameter).
However for your convenience, the webphone also provides a simple contact management API.
Contacts parameters are stored as tab delimited string with the following parameters:
imstatus,name,sip,phone,phone2,phone3,othernumbers,sipcontacturi,email,web,address,speeddial,extra,internalextra
boolean API_SetContacts(String contacts)
Set all contacts (contact parameters separated by new line)
String API_GetContacts()
Will return all contacts (in separated lines the parameters described above)
boolean API_DelContact(String name)
Delete contact.
boolean API_AddContact(String params)
Add a contact.
boolean API_SetContact(String name, String params)
Change contact.
String API_GetContact(String name)
Will return a single contact in the format described above.
Helper functions to set/get individual fields:
boolean API_SetContactName(String name, String param)
Set contact name.
boolean API_SetContactSIP(String name, String param)
Set contact sip uri.
boolean API_SetContactPhone(String name, String param)
Set contact phone number.
boolean API_SetContactSpeedDial(String name, String param)
Set contact speed dial number (short number).
String API_GetContactName(String name)
Get contact name.
String API_GetContactSIP(String name)
Get contact sip uri.
String API_GetContactPhone(String name)
Get contact phone number.
String API_GetContactSpeedDial(String name)
Get contact speed dial number (short number).
Presence is based on SIP SIMPLE SUBSCRIBE/NOTIFY mechanism and it is used to detect the online status of the contacts.
There is no need to manage the contacts within the webphone (as described above) to have presence functionality (so you can manage the contacts externally in your application).
The following steps are required:
1. Related settings:
o enablepresence: 0/1
o email = email address sent with contact info
o presenceexpiresec = 3600
o autoacceptpresencrequests = -1; //-1: not set (1), 0=auto reject all,1=ask for new users,2=yes, autoaccept new unknown users
2. First you should call API_PushContactlist to pass all the usernames and phonenumbers from your external contact list if any. This is necessary, because for existing contacts the webphone can accept the requests automatically, while for other it might ask for user permission
3. On first start you might call API_NumExists. If using the Mizu VoIP server, then it will return all existing contacts with SERVERCONTACTS,userlist notification where userlist are populated with the valid users and their online status.
4. Call API_CheckPresence(userlist). To save server resources, you should carefully select the contacts. (Send only the contacts which are actually used and called numbers. We recommend up to 50 contacts. If the user select a contact, then you can call this function later with that single contact to request its status)
5. Use the API_SetPresenceStatus(statustring) function call to change the user online status with one of the followings strings: Online, Away, DND, Invisible , Offline (case sensitive)
6. Once these are done, the following notifications can be received from the webphone:
NEWUSER,username,displayname,email
PRESENCE, status,username,displayname,email
(displayname and email can be empty)
On newuser, you should ask the user if wish to accept it. If accepted, call the API_NewUser function. The same function should be called when the user adds a new contact to its contactlist.
For presence the following status strings are defined (be prepared to receive any of these and handle it with case insensitive by displaying red/green/gray/other icons):
o Open/Online/Reachable/Available/Call Me/Registered [GREEN]
o DND (Do not disturb; halt popups and sounds) [RED]
o Busy/Speaking (can be auto set) [ORANGE/YELLOW]
o Pending/Forwarding [ORANGE/YELLOW]
o Away/Idle [ORANGE/YELLOW]
o Close/Unreachable/Offline/Unregistered [GREY/WHITE]
o Unknown/Not Set [GREY/WHITE/NOCOLOR]
o Invisible (no status notifications will be sent) [GREY/WHITE/NOCOLOR]
Other suggestion for colors:
o red: busy/dnd
o bright green: online
o pale green: away/forwarding/pending
o white: user exists but unknown status or invisible
o no color: user doesn’t exists / no presence feature
Some other not so important API calls are listed below:
boolean API_Test()
You might use this function to check the API availability (should return true).
boolean API_ServerInit(String address) -deprecated
Call this function before to start any communication with this address (usually an IP number). This is required to release the Java security restrictions. Wait 1-2 second before calling the next function like API_Register or API_Call. This function is deprecated since v.3.8 (no need to call this, just call API_Register or others directly)
boolean API_Stop()
Will stop all endpoints. This function call is optional when you unload the applet from external app.
boolean API_Exit()
Will stop all endpoints and terminates the webphone. This function call is optional when you unload the applet or wish to issue a forced termination. Its behavior can be controlled by the “exitmethod” applet parameter.
boolean API_CapabilityRequest(String server, String username)
Will send an OPTION request to the server. Usually you should not use this function.
The server parameter can be empty if you already set it with other API calls or by applet parameter.
The username parameter can be empty (in this case the “From” address will be set to “unknown”)
boolean API_SetSIPHeader(int line, String hdr)
Set a custom sip header (a line in the SIP signaling) that will be sent with all messages. Can be used for various integration purposes (for example for sending the http session id). You can also set this with applet parameter (customsipheader).
String API_GetSIPHeader(int line, String hdr)
Return a sip header value received by the webphone. If not found it will return a string beginning with “ERROR:” such as “ERROR: no such line”.
boolean API_SendSIP(String msg)
Will send a custom SIP signaling message (for example OPTIONS, NOTIFY, etc). The message will be sent within 1-3 seconds after the function call is completed.
String API_GetLastRecSIPMessage(String line)
Get the last received SIP message as clear text. Line is the line number or the SIP call id.
boolean API_IsOnline()
Return true if network is present
boolean API_IsRegistered()
Return true if the webphone is registered (“connected”) to the SIP server.
int API_IsInCall()
Return whether the sip stack is in call: 0=no,1=ringing,2=speaking
int API_GetCurrentConnectedCallCount()
Get number of current connected calls
String API_GetRegFailReason(boolean extended)
Will return a text about the reason of the last failed registration. Set the extended parameter to true to get more details
String API_GetCallerID(int line)
Will return the remote party name
String API_GetIncomingDisplay(int line)
Get incoming caller id (might return two lines: caller id \n caller name)
String API_GetLastCallDetails()
Get details about the last finished call.
boolean API_ShowLog()
Show a new window with logs.
void API_AddLog(String msg)
Add a message to the webphone log.
String API_HTTPGet(String url)
Send a HTTP GET request. Check if return string begins with “ERROR”.
boolean API_HTTPPost(String url, String data)
Send a HTTP POST request.
String API_HTTPReq(String url, String data)
Send a HTTP POST or GET request. (If data is empty, then GET will be sent). Can be tunneled. Can block for up to 20 seconds.
boolean API_HTTPReqAsync(String url, String data)
Send a HTTP POST or GET request. (If data is empty, then GET will be sent). Can be tunneled. The result will be returned in notifications with “ANSWER” header.
boolean API_SaveFile(String filename, String content)
Will save the text file to local disk webphone working directory in encrypted format (use API_SaveFileRaw to save as-is)
String API_LoadFile(String filename)
Load file from local disk.
boolean API_SaveFileRemote(String filename, String content)
Save file to remote storage (preconfigured ftp or http server )
boolean API_LoadFileRemote(String filename)
Load file from remote storage. The download process is performed asynchronously. You need to call this function only once and then a few seconds later call the API_LoadFile function with the same file name. It will contain “ERROR: reason” text if the download failed.
String API_LoadFileRemoteSync(String filename)
Will download the specified file from remote storage synchronously (will block until done or fails).
String API_GetBlacklist()
Get blacklist
boolean API_SetBlacklist(String str)
Set whole blacklist (users/numbers separated by comma)
boolean API_AddToBlacklist(String str)
Add to blacklist
To receive notifications and events from the webphone you have to create a java script function called webphonetojs that takes one string parameter. The webphonetojs function must be placed in the same html page and same DOM level. If you place it elsewhere, then you must use the jsfunctionpath applet parameter to specify.
The webphone will call this functions when something happens –according to the “jsscripevent” applet parameter (status change, error message, call finished, etc) passing the messages as the function parameter. (If your webphonetojs function is embedded in other html elements, then you can give the path by using the jsfunctionpath applet parameter)
From the java script code you usually will have to parse the received string. The parameters are separated by comma ‘,’. First you have to check the first parameter (until the first comma) to determine the event type. Then you have to check for the other parameters according to the specification below.
Please note that you can get more than one event at once, separated by newline (,EOL \r\n) so you should check for new lines first and then parse all events.
The following messages are defined:
Where line can be -1 for general status or a positive value for the different lines.
General status means the status for the “best” endpoint.
This means that you will usually see the same status twice (or more). Once for general webphone status and once for line status.
For example you can receive the following two messages consecutively:
STATUS,1,Connected,peername,localname,endpointtype,peerdisplayname,[callid]
STATUS,-1,Connected
You might decide to parse only general status messages (where the line is -1).
The following statustext values are defined for general status (line set to -1):
o Ready
o Register…
o Registering…
o Register Failed
o Registered
o Accept
o Starting Call
o Call
o Call Initiated
o Calling…
o Ringing…
o Incoming…
o In Call (xxx sec)
o Hangup
o Call Finished
o Chat
Note: general status means the “best” status among all lines. For example if one line is speaking, then the general status will be “In Call”.
The following statustext values are defined for individual lines (line set to a positive value representing the channel number starting with 1):
o Unknown (you should not receive this)
o Init (webphone started)
o Ready (sip stack started)
o Outband (notify/options/etc. you should skip this)
o Register (from register endpoints)
o Subscribe (presence)
o Chat (IM)
o CallSetup (one time event: call begin)
o Setup (call init)
o InProgress (call init)
o Routed (call init)
o Ringing (SIP 180 received or similar)
o CallConnect (one time event: call was just connected)
o InCall (call is connected)
o Muted (connected call in muted status)
o Hold (connected call in hold status)
o Speaking (call is connected)
o Midcall (might be received for transfer, conference, etc. you should treat it like the Speaking status)
o CallDisconnect (one time event: call was just disconnected)
o Finishing (call is about to be finished. Disconnect message sent: BYE, CANCEL or 400-600 code)
o Finished (call is finished. ACK or 200 OK was received or timeout)
o Deletable (endpoint is about to be destroyed. You should skip this)
o Error (you should not receive this)
You will usually have to display the call status for the user, and when a call arrives you might have to display an accept/reject button.
For simplified call management, you can just check for the one-time events (CallSetup, CallConnect, CallDisconnect)
Peername is the other party username (if any)
Localname is the local user name (or username).
Endpointtype is 1 from client endpoints and 2 from server endpoints.
Peerdisplayname is the other party display name if any
CallID: SIP session id
For example the following status means that there is an incoming call ringing from 2222 on the first line:
STATUS,1,Ringing,2222,1111,2,Katie,[callid]
The following status means an outgoing call in progress to 2222 on the second line:
STATUS,2,Speaking,2222,1111,1,[callid]
To display the “global” phone status, you will have to do the followings:
1. Parse the received string (parameters separated by comma)
2. If the first parameter is “STATUS” then continue
3. Check the second parameter. It “-1” continue otherwise nothing to do
4. Display the third parameter (Set the caption of a custom html control)
5. Depending on the status, you might need to do some other action. For example display your “Hangup” button if the status is between “Setup” and “Finishing” or popup a new window on “Ringing” status if the endpointtype is “2” (for incoming calls only; not for outgoing)
If the “jsscripstats” is on (set to a value higher than 0) then you will receive extended status messages containing also media parameters at the end of each call:
STATUS,1,Connected,peername,localname,endpointtype,peerdisplayname,rtpsent,rtprec,rtploss,rtplosspercet,serverstats_if_received,[callid]
This notification is received for incoming chat messages.
Line: used phone line
Peername: username of the peer
Presence: presence status string; one of the followings: CallMe,Available,Pending,Other,CallForward,Speaking,Busy,Idle,DoNotDisturb,Unknown,Away,Offline,Exists,NotExists,Unknown
This notification is received for incoming chat messages.
Line: used phone line
Peername: username of the sender
Text: the chat message body
After each call, you will receive a CDR (call detail record) with the following parameters:
Line: used phone line
Peername: other party username, phone number or SIP URI
Caller: the caller party name (our username in case when we are initiated the call, otherwise the remote username, displayname, phone number or URI)
Called: called party name (our username in case when we are receiving the call, otherwise the remote username, phone number or URI)
Peeraddress: other endpoint address (usually the VoIP server IP or domain name)
Connecttime: milliseconds elapsed between call initiation and call connect
Duration: milliseconds elapsed between call connect and hangup (0 for not connected calls. Divide by 1000 to obtain seconds.)
Discparty: the party which was initiated the disconnect: 0=not set, 1=webphone, 2=peer, 3=undefined
Disconnect reason: a text about the reason of the call disconnect (SIP disconnect code, CANCEL, BYE or some other error text)
This message is sent immediately after startup (so from here you can also know that the SIP engine was started successfully).
The what parameter can have the following values:
“api” -api is ready to use
“sip” –sipstack was started
Important events which should be displayed for the user.
The following TYPE are defined: EVENT, WARNING, ERROR
These messages will be received only if you set the “jsscriptevent” applet parameter to 2. (by default is set to 2)
Should be displayed for the users in some way.
Detailed logs (may include SIP signaling).
The following TYPE are defined: EVENT, WARNING, ERROR
These messages will be received only if you set the “jsscriptevent” applet parameter to 3. (by default is set to 2)
Format: messageheader, messagetext. The followings are defined:
“CREDIT” messages are received with the user balance status if the server is sending such messages.
“RATING” messages are received on call setup with the current call cost (tariff) if the server is sending such messages.
“MWI” messages are received on new voicemail notifications if you have enabled voicemail and there are pending new messages
“PRESENCE” peer online status
“SERVERCONTACTS” contact found at local VoIP server
“NEWUSER” new user request
“ANSWER” answer for previous request (usually http requests)
Please check the JSAPI.htm source for a working demo.
For this you will have to launch the webphone yourself (for example ShellExecute on Windows), then send commands to the webphone listening port:
-UDP (configurable by the “wpapiudplistenport“ applet parameter. 0 by default which means disabled)
-TCP (configurable by the “wpapilistenport“ applet parameter. 19422 by default)
-HTTP (configurable by the “wpapilistenport“ applet parameter. 19422 by default)
The following formats are accepted:
· clear text (so you can easily test it manually with telnet)
· HTTP (GET/POST/AJAX)
o URL parameters (so you can easily test it manually with your browser)
o JSON
o form post
o XML
o SOAP
Example from browser (HTTP with URL parameters): http://127.0.0.1:19422/?function=API_Call&line=-1&peer=1234
Example from telnet (clear text TCP):
telnet 127.0.0.1 19422
?function=API_Call&line=-1&peer=1234
For the function parameters you can use the exact same name as in this documentation or you can use param1, param2 … paramn format.
If you are using simple UDP or TCP (not HTTP) then the NOTIFICATIONS are also sent automatically on the same socket. Otherwise you need to use API_Poll().
From HTTP clients we recommend AJAX HTTP requests with URL parameters.
From local applications we recommend UDP with clear text. For faster processing you can also split the commands between EOFCOMMAND/BOFCOMMAND and the parameters between EOFLINE/BOFLINE.
For example: BOFCOMMANDBOFLINEfunction=API_CallEOFLINEBOFLINEparam1=-1EOFLINEBOFLINEparam2=1234EOFLINEEOFCOMMAND
Read this section only if you are a Java developer. Otherwise this is not needed for the webphone normal usage.
Using the MizuTech webphone you can easily add VoIP functionality to any JVM (java) application.
This section describes how to use the webphone as an SDK so you can embed it into your project.
All the settings and API calls are described above in this documentation (JavaScript API section). You can use the exact same settings and functions also from your java code, only the following changes are needed:
-add the webphone.jar lib to your project
-listen on UDP port 19421 (localhost: 19421) for the sipstack messages and parse them (as described in the "JavaScript Notifications" section)
-instantiate a webphone object (webphone webphoneobj = new webphone())
-call the API_SetParameter() to pass any settings (applet parameters)
-call the API_Start() to start the sipstack
-call any other functions as described in the JavaScript API
Note: all API_ calls are thread safe and will not throw exceptions (on exception they will send an ERROR message and/or return false/-1 depending on the context). The jar in the demo package is signed with a valid CA certificate. Contact us if you need an unsigned build.
Example code (exception and error handling are removed for simplicity):
--------------------------------------
YourCodeSipCall.java
--------------------------------------
package yourpackage;
import webphone.*;
webphone webphoneobj = null;
SIPNotifications sipnotifications = null;
//init
sipnotifications = new SIPNotifications();
sipnotifications.Start();
webphoneobj = new webphone();
webphoneobj.API_SetParameter("serveraddress", "127.0.0.1");
webphoneobj.API_SetParameter("username", "sipusername");
webphoneobj.API_SetParameter("password", "xxxx");
webphoneobj.API_SetParameter("loglevel", "1");
webphoneobj.API_Start();
//make a call:
webphoneobj.API_Call( -1, "numbertocall");
//the following lines should be used from another function, for examples triggered by your Hangup button:
webphoneobj.API_Hangup( -1);
//stop
sipnotifications.Stop();
--------------------------------------
SIPNotifications.java
--------------------------------------
package yourpackage;
import java.net.DatagramSocket;
import java.net.DatagramPacket;
public class SIPNotifications extends Thread
{
boolean terminated = false;
byte[] buf = null;
DatagramSocket socket = null;
DatagramPacket packet = null;
public SIPNotifications()
{
}
public boolean Start()
{
try{
socket = new DatagramSocket(19421);
buf = new byte[3600];
packet = new DatagramPacket(buf, buf.length);
this.start();
return true;
}
catch (Exception e)
{
e.printStackTrace();
}
return false;
}
public void Stop()
{
terminated = true;
if(socket != null) socket.close();
}
public void run()
{
try{
while (!terminated) {
packet.setData(buf, 0, buf.length);
packet.setLength(buf.length);
//DatagramPacket packet = new DatagramPacket(buf, buf.length);
socket.receive(packet);
if (packet != null && packet.getLength() > 0) {
String str = new String(packet.getData(), 0,
packet.getLength());
ProcessNotifications(str);
}
}
}
catch (Exception e)
{
e.printStackTrace();
}
}
public void ProcessNotifications(String msg)
{
//todo: process notifications here (change your user interface or business logic depending on the sipstack state / call state)
}
}
//Note: In case if you don’t hear a ringtone, then just deploy also the ring wave file and set its path with the “ringtone” applet parameter.
-beta version with basic SIP call functionality
-initial stable release (RFC 3261 and 2543, PCMU, PCMA)
-new: DTMF with INFO
-new: speex codec
-new: IM (chat) with MESSAGE method
-new: basic presence
-fix: sip signaling message handler
-new: quick STUN
-new: rtport handling
-new: GSM codec
-new: outbound proxy
-new: applet parameters: signalingport, rtpport, register interval
-fix: registration and call timeouts
-fix: authentication sent with all request
-fix: sip stack initialization on Vista
-fix: sip message parser
-improvement: jitter buffer
-improvement: thread priority optimizations
-new: mute, transfer, redial
-improvement: handling record route
-improvement: rtp packet replay to all request -open NAT
-fix: via branch and to tag was kept persistent across dialogs
-fix: save setting not worked since version 1.6
-fix: redial
-improvement: opening NAT at call begins by sending UDP packets to possible destinations
-improvement: jitter buffer fine-tune and configuration possibilities
-improvement: receiving early media (like ringtones and announcements)
-new: multiple lines (up to 4)
-new: select audio device
-new: volume controls
-improvement: attended transfer
-improvement: extended authentication options (qop, auth-int)
-fix: call transfer Refer-to URI brackets
-fix: auto dial and register
-fix: handling ACK for 200 OK
-new: call hold option
-new: default volume applet parameters
-new: java to javascript API
-new: javascript to java API
-new: ringtone for incoming and outgoing calls
-improvement: ability to enable/disable/set priority for g711 codec’s
-fix: hold and mute sometimes disabled
-fix: register endpoint timeout
-fix: cdr records not sent to javascript
-new: more options to enable/disable certain functions
-improvement: call transfer compatibility
-improvement: better handle reinvite requests
-improvement: multiline status management
-improvement: call hold and call transfer
-improvement: changed some default GUI settings
-fix: microphone control change bug
-fix: some incoming calls was dropped because wrong cseq initialization
-new: authorization name and display name parameters
-improvement: new discontransfer applet parameter
-improvement: OpenSIPS compatibility
-improvement: new color parameters
-fix: route/record-route handling in transfer, hold and disconnect
-fix: cseq sometime is not increased for subsequent register requests
-fix: ring not stopping on call reject/hangup
-fix: call transfer sends wrong refer-to URI
-fix: display registered status when not registered
-new: g.729 codec
-new: wideband and ultra-wideband codec
-auto convert mono to stereo sound
-improvement: better audio device handling (try to open all existing device on failure)
-fix: some SIP messages don’t contain the URI in message header
-new: accept header
-new: API_MuteEx function
-new: jnlp documentation and examples
-improvement: allow header now list all supported methods
-improvement: remaining credit display timings
-improvement: display sent dtmf digits
-improvement: support for multiple instances
-fix: sdp body is missing from INFO messages sending DTMF
-fix: removed static variables to improve multithread stability
-new: http tunneling
-new: deployment toolkit example
-new: DTMF RFC2833
-new: Toolkit_with_JS.htm deployment example
-new: easy encryption for all applet and java function string parameters
-new: API_SetParameter function
-new: code frame count setting
-improvement: js and jnlp now accept jre 1.4
-improvement: possibility to pass MD5 instead of password
-fix: API_SendDtmf was not able to send more than one DTMF digit at once
-fix: STUN sets external IP even on wrong conditions
-new: http tunneling using browser http send/receive capabilities to automatically bypass http proxies
-new: plc algorithm (packet loss concealment)
-new: Spanish translation
-new: capability request applet parameter and function call
-new: media timeout option
-new: srv dns record lookup option
- improvement: rtcp option
-fix: final codec offer in ACK caused one way audio problem. Now this can be disabled with the setfinalcodec option.
-fix: sequence number overrun caused media RTP problems after 21 minute
-new: api_playsound
-new: ackforauthrequest
-new: 100rel PRACK support
-new: earlymediasend applet parameter
-new: logtoconsole applet parameter
-new: autoaccept applet parameter
-new: rejectonbusy applet parameter
-new: sendmac applet parameter
-new: call timeout setting
-new: API_GetVersion
-new: API_Chat
-new: API_TransferDialog
-new: iPhone skin
- improvement: show the sip display-name for incoming calls
- improvement: receive chat messages as javascript notifications
-improvement: call to URI (loading the server from URI and not from settings)
-improvement: discparty parameter in CDR records
-improvement: transfertype 3 and 4
-improvement: http tunneling
-improvement: java script event notifications
-fix: background color settings in the chat and audio settings form
-fix: one way audio on some circumstances since version 3.5
-fix: restored compatibility with java 1.4
-fix: authentication with empty parameters (for example empty opaque)
-new: voice recording
-new: aec (automatic echo canceller -beta version)
-new: automatic transport detection (failovering from UDP encryption -> TCP-tunneling -> HTTP)
-new: httpsessiontimeout applet parameter
-new: ringtimeout applet parameter
-new: waitforunregister option
-new: option to enable peer to peer calls (direct call to SIP URI)
-new: various new applet parameters and API function to allow more external control
-improvement: disabled nagle algorithm for TCP tunneling
-improvement: auto detect audio card wideband capabilities before the first call is made
-improvement: packet loss concealment enhancements. Plc is enabled by default
-improvement: handling of out of order packets
-improvement: jitter buffer fine-tuning
-improvement: call transfer
-improvement: bigger range for the volume control
-improvement: thread manager
-improvement: random UDP port for tunneling
-improvement: autodetect direct server access possibility (while using tunneling_
-improvement: call duration display in hh:mm:ss format
-fix: always clear old credentials on new settings and on unregister
-fix: API_Dtmf, API_Unregister (waitforunregister)
-fix: iphone skin compatibility with IE, Chrome, Firefox and Safari
-fix: codec change on reinvite
-new: conferencing
-improvement: iLBC codec (now it is enabled by default with low priority)
-improvement: iPhone like skin example and documentation upgrade
-new: denoise filter (noise suppression)
-new: AGC (auto gain control)
-new: the ability to set custom ringtone
-new: call forwarding
-new: silence detection and suppression
-new: streaming audio file to the other end
- improvement: AEC module complete rewrite(currently available on windows only)
-improvement: call recording and sound playback API’s
-improvement: new encryption for TCP and HTTP tunneling
-improvement: API_PlaySound can play both local and remote files
-improvement: HTTP tunneling
-fix: address incomplete bug with INVITE
-fix: one way audio in conference
-fix: some minor issues with codec negotiations
-new: skins
-new: recording in gsm format
-new: failowering based on SRV records
-new: voicemail
-new: mediaench (AEC, AGC, denoise) now available also on MAC
-improvement: more than 40 minor improvements and bug fixes
-improvement: JS API
-fix: compatibility with the recent java update
-fix: via branch bug
-fix: other minor issues
-fix: dtmfmode when set to 3 now sends in both formats
-new: opus codec
-new: video module (“as is”)
-new: ogg/vorbis recording
-new: java API
-improvement: aec
-improvement: reregistration
-improvement: rtp read threading
-fix: more than 20 minor bug fixes
-new: stable TLS/SRTP
-new: native audio layer for windows
-new: integrated with the new tunneling module
-new: a new skin template
-improvements: API
-fix: conference and other audio related bugs
-new: peer to peer encrypted media
-new: presence and contact list management
-new: public universal API accessible via UDP/TCP/HTTP
-new: more flexible configuration
-new: desktop mode
-new: blacklist
-improvements: tunneling
-multiengine: webrtc/flash/native backend
-skin wizard
-new JavaScript API
1.
Download and try the demo
from
http://www.mizu-voip.com/Portals/0/Files/webphone_demo.zip
The pricing can be found at
http://www.mizu-voip.com/Support/Webphonepricing.aspx
2. Contact Mizutech at webphone@mizu-voip.com with the following details
-a brand name for your custom build (can be your company name or web domain name for example)
- your VoIP server(s) address (ip or domain name) (or your web server(s) address in special cases; these have to be hardcoded in your release; otherwise anybody could just download it from your website and use as it owns)
-your company details for the invoice (if you are representing a company)
3. Mizutech support will send your own (branded) webphone build within one workday on your payment.
For the payments we prefer wire transfer. On your request we will send the bank details by email. If wire transfer is not possible then we can offer various alternative methods (credit card payment, paypal, etc)
We offer free
basic (email based) support to all our customers.
For “gold partners” we offer phone and 24/7 emergency support.
Maintenance upgrades are also free.
Email to webphone@mizu-voip.com
with any issue you might have.
Guaranteed supports hours depend on the purchased license plan and
are included in the price.
Later if needed, the support can be increased by 2 years for around
$600 (this is optional. There is no need for any support plan to
operate your webphone).
You will receive the followings:
Ø the webphone itself. This is one single file usually named as “webphone.jar” and you will receive your own branded (or white label) build without any demo or trial limitations with lifetime license
Ø latest documentations, examples and skins
Ø invoice (on request or if you haven’t received it before the payment)
Ø support on your request according to the license plan
Yes, please contact us at webphone@mizu-voip.com. Please contact us only with webphone related or VoIP specific projects.
No. The applet can be deployed by anybody. If you already have a website, then you should be able to copy-paste and rewrite the example HTML codes. Some basic Java Script knowledge is required only if you plan to use the Java Script API (although there are copy-paste examples for the API usage also)
Yes. The
webphone is using the SIP protocol standard to communicate with
VoIP servers and sofswitches. Since most of the VoIP servers are
based on the SIP protocol today the webphone should work without
any issue.
If you have any incompatibility problem, please contact
webphone@mizu-voip.com
with a problem description and a
detailed log (loglevel set to 4). For more tests please send us
your VoIP server address with 3 test accounts.
No. The webphone works only on devices with support for Java Standard Edition. This means almost all PC/laptop OS and a few linux based phone (not Android). Most mobile OS is not supported (including iPhone, Android, Symbian and Windows phones). For Java Mobile Edition we have a separate client application that can be used to initiate calls, callbacks and phone to phone calls or send SMS message through our VoIP server. For other devices (iPhone, Android, Symbian) please check our mobile softphones: http://www.mizu-voip.com/Software/MobileSoftphones.aspx
The webphone works on any platforms when java is supported. The users must have the Java 2SE installed and enabled for their browser. When java is not installed the toolkit or JNLP deploy methods will automatically direct the user to the java download page and is automatically installed without the need to restart the OS. If java is not available then alternative methods can be used (native/webrtc/flash).
If the webphone doesn’t start in your browser, then make sure that java is working correctly: http://www.java.com/en/download/testjava.jsp
No.
No. The webphone will connect directly to your softswitch or SIP proxy. There is no need to any additional software components or services for the webphone (except your VoIP server or an account on a third party SIP server).
No.
The webphone will connect to your voip server directly.
The webphone might contact Mizutech servers for the following
reasons:
-demo versions might contact Mizutech licensing servers time to
time. This is completely removed in final builds (after your
order)
-applet launcher script is set to www.mizu-voip.com/webphonedeploy.js
in some examples. You can rewrite
it to www.java.com/js/deployJava.js
or just download this short java
scrip file from any of the previously mentioned locations and host
it on your web server.
-the applet will use a random stun server by default hosted by
Mizutech. This light stun protocol is usually not required for
normal functionality so you can safely disable it (set the
“use_fast_stun” applet parameter to 0) or set the
“stunserveraddress” applet parameter to your stun
server.
Ø Webserver (rented, hosted)
Ø Some server side scripts if more customization/changes are necessary that is permitted by html applet parameters of from java script
Ø Voip access (one of the followings):
· account(s) at any VoIP service provider OR
· a free or open source VoIP server (asterisk, openSIPS) OR
· rent a softswitch (SaaS) OR
· purchase a server with commercial support (Mizutech, Cisco, brekeke, etc)
Flash doesn’t have the codec’s commonly used in VoIP (such as g711 (pcmu/pcma), gsm, speex, g.729, g.723, etc) and plugins are not allowed. It has only its proprietary codec, so all implementation will need a separate “media gateway” which will do the conversion. Please note that codec conversion should be avoided in VoIP whenever possible because sound quality loss, high resource utilization, additional costs and additional network complexity.
The VoIP applet is a close-source application. The source code is available only for internal usage and for a higher price.
Although the default applet size is very small
by default (with a download time less than one second with a good
internet connection), we can reduce the size of your copy even more
by removing some components not used by you. Contact us about the
possibilities. You might be required to pay for this additional
customization. The applet can be also cached by the browser client
(so it is downloaded only the first time when a user visit your
page)
We are usually selling the webphone with unlimited client usage. We have separate pricing options to fulfill all of our customers’ needs and budget: http://www.mizu-voip.com/Software/WebPhone.aspx. Alternatively we can offer the applet as a service with small monthly fees, but this may be not so efficient like the one-time payment (because increased bank fees for small amount of transfers)
No.
The calls are directly routed between the webphone.jar (which is running in the client browser) and your VoIP server(s). From this point of view the webphone acts as any other SIP endpoint (like a normal softphone or IP Phone).
The webphone.jar is downloaded from your web server as any other
resource (like an jpg image for example).
After the client browser will download the webphone from your webserver the whole functionality has nothing to do anymore with your web server. The webphone will connect directly to your VoIP server(s) using SIP/RTP protocols.
· Make sure that the “serveraddress” applet parameter is set correctly (otherwise you will be able to make calls only to direct SIP URI).
· Optionally: Register to the server. This can be done automatically if the “username” and “password” parameters are preset. Alternatively you can register from javascript (API_Register) or just let the user to fill in the username/password fields and click on the “Connect” button. If the applet is registered, then it can already accept incoming calls (it will do it automatically, or you can handle incoming calls from your javascript, or you can entirely disable incoming calls)
· If you are using javascript, make sure that you have the applet handle (document.applets[0] or check the initcheck function in the skin examples)
· Now you can make outgoing calls in the following ways:
o Automatically with applet start. For this you will have to preset the username/password/autocall and callto applet parameter. Then the applet will immediately launch the outgoing call when starts (usually with your page load)
o Just let the users to enter a called number and hit the “Call” button
o If you are using a custom skin, then just call the API_Call function (from user button click or from your business logic)
Read through the applet parameters to find out more call divert settings, such as auto-answer or forward.
If you set the applet loglevel higher than 1 than you will receive
messages that are useful only for debug. A lot of ERROR and WARNING
message cannot be considered as a fault. Some of them will appear
also under normal circumstances and you should not take special
attention for these messages. If there are any issue
affecting the normal usage, please send the detailed logs to
Mizutech support (webphone@mizu-voip.com)
in a text file attachment.
If you see a white page or just a java error on your page that usually means wrong applet parameters. Please inspect your html/JS code and if the problem still persist you should check the java console from your OS.
Make sure that java is working correctly: http://www.java.com/en/download/testjava.jsp
Deploy methods are described above in this documentation or you can find more here: http://docs.oracle.com/javase/tutorial/deployment/deploymentInDepth/runAppletFunction.html
If you are using the JS API on MAC, make sure that the html and the webphone.jar are loaded from the same domain, otherwise you will have a security related exception. This means that you should not refer to foreign domains from the “archive” applet parameter.
Other issues are described here: http://docs.oracle.com/javase/tutorial/deployment/applet/problemsindex.html
Load process: http://docs.oracle.com/javase/7/docs/technotes/guides/jweb/deployment_flow.html
By default only the PCMU,PCMA, G.729 and the speex ultra-wideband
codec’s are offered on call setup which might not be enabled on
your server or peer UA.
You can enable all other codec’s (PCMA, GSM, speex narrowband, iLBC
and G.729 ) with the usexxx applet parameters set to 2 or 3 (where
xxx is the name of the codec: use_pcma=2, usgsm=2,
use_speex=2,use_g729=2,use_ilbc=2).
Some servers has problems with codec negotiation (requiring re-invite which is not support by some devices). In these situations you might disable all codec’s and enable only one codec which is supported by your server (try to use G.729 if possible. Otherwise PCMU or PCMA is should be supported by all servers)
If the calls are disconnecting after a few second, then try to set
the “invrecordroute” applet parameter to “true” and the
“setfinalcodec” to 0.
If the calls are disconnecting at around 100 second, then most
probably you are using the demo version which has a 100 second call
limit.
If the calls are disconnecting at around 3600 second (1 hour) and
you are using the java scrip API then please check the
httpsessiontimeout applet parameter (you need to call the
API_HTTPKeepAlive function periodically from a javascript
timer)
Select UDP (and not TCP or TLS) for the link protocol on your Avaya
configuration.
· Switching between wideband and narrowband is not supported with default OS settings under MAC and Linux (the webphone will handle this automatically without any extra workaround)
· Some Linux distributions doesn’t have full duplex audio driver for Java. In these circumstances only one audio stream can be used (the webphone should be able to handle this automatically with default settings)
· Some OS/browser configurations might not support wideband audio (in these circumstances the webphone will automatically use narrowband only)
· No technical support for video related functionality (we provide it “as is”)
· Local file storage is not reliable from browsers due to OS and browser security restrictions (might not remember last login settings and local voice recording should not be used)
· The full STUN specification is not implemented due to file size considerations (a light STUN version is used with a built-in list of available servers if needed)
· Processing of In-Band DTMF is not supported (INFO or RFC2833 are both supported)
· The webphone is targeting PC platforms only. For smartphones you should check our mobile softphone’s.
MAC related issues
If the java (JVM or the browser) is crashing under MAC at the start or end of the calls, please set the “cancloseaudioline” applet parameter to 3. You might also set the "singleaudiostream” to 5.
If the webphone doesn’t load at all on MAC, then you should check this link.
One way audio problem on OSX 10.9 Maverick / Safari: Safari 7.0 allows users to place specific websites in an "Unsafe Mode" which grants access to the file. Navigate to "Safari -> Preferences -> Security (tab) -> Internet plug-ins (Manage Website Settings)". Find the site in question and modify the dropdown to "Run In Unsafe Mode". You will be asked to accept the site's certificates. Alternatively, simply use the latest version of the FireFox browser.
Some linux audio drivers allow only one audio stream to be opened which might cause audio issues in some circumstances. Workaround: change audio driver from oss to alsa or inverse. Other workarounds: Change JVM (OpenJDK); Change browser.
Some chrome versions only use the default input for audio. If you have multiple audio devices and not the default have to be used changing on chrome, Advanced config, Privacity, Content and media section will fix the problem.
Why I see RTP warning in my server log
The webphone
will send a few (maximum 10) short UDP packets (\r\n) to open the
media path (also the NAT if any).
For this reason you might see the following or similar Asterisk log
entries: “WARNING[8860]: res_rtp_asterisk.c:2019 ast_rtp_read: RTP
Read too short” or “Unknown RTP Version 1”.
These packets are simply dropped by Asterisk which is the expected
behavior. This is not a webphone or Asterisk error and will not
have any negative impact for the calls. You can safely skip this
issue.
You might turn this off by the “natopenpackets” applet parameter (set to 0). You might also set the “keepaliveival” to 0 and modify the “keepaliveival” (all these might have an impact on the webphone NAT traversal capability)
For RTP
statistics increase the log level to at least 3 and then after each
call longer than 7 seconds you should see the following line in the
log:
EVENT, rtp stat: sent X rec X loss X
X%.
If you set the “loglevel” applet parameter to at least “5” than the
important rtp and media related events are also stored in the
logs.
In the SIP protocol the client
endpoints have to send their (correct) address in the SIP
signaling, however in many situations the client is not able to
detect it’s correct public IP (or even the correct private local
IP). This is a common problem in the SIP protocol which occurs with
clients behind NAT devices (behind routers). The clients have to
set its IP address in the following SIP headers: contact, via, SDP
connect (used for RTP media). A well written VoIP server should be
able to easily handle this situation, but a lot of widely used VoIP
server fails in correct NAT detection. RTP routing or offload
should be also determined based in this factor (servers should be
always route the media between 2 nat-ed endpoint and when at least
one endpoint is on public IP than the server should offload the
media routing). This is just a short description. The actual
implementation might be more complicated.
You may have
to change the webphone configuration according to your SIP server
if you have any problems with devices behind NAT (router,
firewall).
If your server has NAT support then set the use_fast_stun and
use_rport parameters to 0 and you should not have any problem with
the signaling and media for webphone behind NAT. If your server
doesn’t have NAT support then you should set these settings to 2.
In this case the webphone will always try to discover its external
network address.
Example
configurations:
If your server can work only with public IP sent in the
signaling:
-use_rport 2 or 3
-use_fast_stun: 1 or 2
If your server can work fine with private IP’s in signaling (but
not when a wrong public IP is sent in signaling):
-use_rport 9
-use_ fast_stun: 0
-optionally you can also set the “udpconnect” applet parameter to
1
Asterisk is well known about its bad default NAT handling. Instead
of detecting the client capabilities automatically it relies on
pre-configurations. You should set the "nat" option to "yes" for
all peers.
More details:
http://www.voip-info.org/wiki/view/NAT+and+VOIP
http://www.voip-info.org/wiki/view/Asterisk+sip+nat
http://www.asteriskguru.com/tutorials/sip_nat_oneway_or_no_audio_asterisk.html
Use the following settings if you have 2 voip servers:
· serveraddressfirst: the IP or domain name of the first server to try
· serveraddress: the IP or domain name of the next server
· autotransportdetect: true
· enablefallback: true
In this way the webphone will always send a register to the first server first and on no answer will use the second server (the “first” server is the “serveraddressfirst” at the beginning, but it can change to “serveraddress” on subsequent failures to speed up the initialization time)
Alternatively you can also use SRV records to implement failover or load balancing.
Call quality is influenced primarily by the followings:
· Codec used to carry the media
· Network conditions (check also your upload packet loss/delay/jittter)
· Hardware: enough CPU power and quality microphone/speaker (try a headset, try on another device)
· (Missing) AEC and denoise
If you have call quality issues then the followings should be
verified:
· whether you have good call quality using a third party softphone from the same location (try X-Lite for example). If not, than the problem should be with your server, termination gateway or bandwidth issues.
· make sure that the CPU load is not near 100% when you are doing the tests
· make sure that you have enough bandwidth/QoS for the codec that you are using
· change the codec (disable/enabled codec’s with the use_xxx applet parameters where xxx have to be replaced with the codec name)
· deploy the mediaench module (for AEC and denoise). (Or disable it if it is already deployed and you have bad call quality)
· webphone logs (check audio and RTP related log entries)
· wireshark log (check missing or duplicated packets)
The simplest
“applet” tag based deployment might not work properly under MAC but
most all the other examples do. Please consult the
“Popup.htm” or the “Toolkit.htm” source in the Examples directory.
Alternatively you can consider deploying by JNLP.
Self-signed certificates might also cause problems under MAC
(applet load time might take longer). You can find more about this
in the last FAQ section (“How can I replace the applet
certificate?”).
1. Set the “setfinalcodec” applet parameter to 0 (especially if you
are using Asterisk or OpenSIPS)
2. Set use_fast_stun and use_rport to 0 (especially if you are
using SIP aware routers). If these don’t help, set them to 2.
3. If you are using MizuVoIP server, set the RTP routing to
“always” for the user(s)
4. Make sure that you have enabled all codec’s.
5. Make a test call with only one codec enabled (this will solve
codec negotiation issues if any)
6. Try the changes from the next section (Audio device cannot be
opened)
7. If you still have one way audio, please make a test with any
other softphone from the same PC. If that works, then contact our
support with a detailed log (set the” loglevel” applet parameter to
5 for this)
If you can’t hear audio, and you can see audio related errors in
the logs (with the loglevel applet parameter set to 5), then make
sure that your system has a suitable audio device capable for full
duplex playback and recording with the following format:
PCM SIGNED 8000.0 Hz (8 kHz) 16 bit mono (2 bytes/frame) in
little-endian
You can verify this by using this applet: http://www.jsresources.org/apps/JSInfoApplet.html
If you have multiple sound drivers then make sure that the system default is workable or set the device explicitly from the webphone (with the “Audio” button from the default user interface or using the “API_AudioDevice” function call from java-script)
To make sure that it is a local PC related issue, please try the webphone also from some other PC.
You might also try to disable the wideband codec’s (set the use_speexwb and use_speexuwb applet parameters to 0 or 1).
Another source for this problem can be if your sound device doesn’t support full duplex audio (some wrong Linux drivers has this problem). In this case you might try to disable the ringtone (set the “playring” applet parameter to 0 and check if this will solve the problem).
If these doesn’t help, you might set the “cancloseaudioline” applet parameter to 3 and/or the "singleaudiostream” to 5.
Depending on your server configuration, you might not have ringback
tone or early media on call connect.
There is a few applet parameter that can be used in this
situation:
· set the “changesptoring” applet parameter to 3
· set the “natopenpackets” applet parameter to 10
· set the “earlymedia” applet parameter to 3
· change the use_fast_stun applet parameter (try with 0 or 2)
One of these should solve the problem.
No. The
webphone has a full featured, high quality built-in SIP and media
stack capable to work as a normal SIP endpoint (as any other
softphone, ip phone or device).
The quality will depend mostly on the following factors:
-the network link quality for on the webphone side and on your VoIP
server (bandwidth, delay, jitter)
-the audio codec used in your network (the webphone has all the
most popular high-quality codec built-in)
-the quality of the audio device and headset
Due to the browser/java stacks, the webphone has around 10
millisecond more delay compared to native application. This is not
noticeable by the users.
To solve the aec issues you need to set the “aec” applet parameter to 2. (for better quality also set the “denoise” applet parameter to 1). Make sure that the dll’s (shipped in the mediaench.zip folder) can be downloaded from your server (there are no warnings in the logs regarding aec initialization). You should store the mediaench.dll and mediaenchx64.dll near the webphone.jar file on your server and enable the dll mime type (or set the “mediaenchext” applet parameter to “jar” and rename the dlls to jar: mediaench.jar and mediaenchx64.jar). The AEC should eliminate more than 90% of the echo with around 92% success rate. (This is if a speaker is used. If the user will use a headset than echo is generated only if the headset is broken)
Current version should not be affected by this issue (only before
version 3.6).
For the Java Script API to work correctly it is important to let the webphone to send the first message to the server before you begin controlling it via the API. This can be done by using the AI_ServerInit function or one of the following applet parameters: register, call, capabilityrequest, natkeepalive. (If you already have the username/password information on startup, then you can set the “register” applet parameter to true and let the applet to register automatically. Otherwise the capabilityrequest or natkeepalive applet parameters should be used. This is a workaround for Java security restrictions which will restrict the applet as it would be unsigned when it is controlled externally from JavaScript.
Make sure that your softswitch has support for IM and it is
enabled. The webphone is using the MESSAGE protocol for this from
the SIP SIMPLE protocol suite as described in RFC
3428.
Most Asterisk installations might not have support for this by default. You might use Kamailio for this purpose or any other softswitch (most of them has support for RFC 3428).
Set the “separatechatdiag” applet parameter to 1.
To be able to receive calls, the webphone must be registered to
your server by clicking on the “Connect” button on the user
interface (or in case if you don’t display the webphone GUI than
you can use the “register” applet parameter with supplied username
and password)
Once the webphone is registered, the server should be able to send incoming calls to it.
The other reason can be if your server doesn’t handle NAT properly.
Please try to start the webphone with usestun parameter set to 0 and if still not works then try it with 2.
If the calls are still not coming, please send us a log from the webphone (set the applet loglevel parameter to 5) and also from the caller (your server or remote SIP client)
There is no such thing as the "best codec". All commonly used
codec's present in the webphone are well tested and suitable for IP
calls.
This depends mainly on the circumstances.
Usually we recommend G.729 since this provides both good quality and good compression ratio.
If G.729 is not available in your license plan, than the other codecs are also fine (GSM, speex, iLBC)
Otherwise the G711 codec is the best quality narrowband codec. So if bandwidth is not an issue in your network, than you might prefer PCMU or PCMA (both have the same quality)
Between
webphone users (or other IP to IP calls) you should prefer wideband
codec's (this is why you just always leave the speex wideband and
ultra wideband with the highest priority if you have calls between
your VoIP users. These will be picked for IP to IP calls and simply
omitted for IP to PSTN calls)
To calculate the bandwidth needed, you can use this
tool. You
might also check this blog entry:
Codec
misunderstandings
If you doesn't change the codec priorities with the applet
parameters, than the default codec order will be the following
(listed in priority order):
1. speex wideband (enabled low priority 2)
2. G.729 (enabled low priority 2)
3. PCMU (enabled low priority 2)
4. PCMA (disabled 1)
5. Opus all (disabled 1)
6. speex ultrawideband (disabled 1)
7. speex narrowband (disabled 1)
8. GSM (disabled 1)
9. iLBC (disabled -not activated 0)
This means that to
prefer a codec you just have to add one single line for the applet
parameter:
-use_myfaworitecodec=3
This will automatically
enable and put your selected codec as the highest priority one.
If you set all codec with the same priority, then the real priority
will be the following:
1. Speex ultrawideband (top priority)
2. Speex wideband
3. G729
4. G711
5. Gsm
6. Speex narrowband
7. Ilbc (lowest priority)
*Speex
wideband and ultra-wideband can be automatically disabled if your
sound card doesn't support the increased sample
rate.
*The other
endpoint usually will pick up the first codec, or the webphone will
pick-up the first in this list from the list of codec’s sent by the
other peer
* G.729, GSM and speex narrowband and ultra-wideband codec’s are
disabled by default. Set use_g729,use_gsm, use_speex, use_speexuwb
to 2 or 3 to enable them. (Make sure you have the proper
G.729 licenses)
Set its priority to 3 and set the priority for all other codes to
2. In this case you preferred codec will be used whenever the other
endpoint supports it and other codec’s are used only if otherwise
the call would fail.
For example the following parameters will set g.729 as the
preferred codec and will enable also pcmu and
gsm:
-use_g729=3
-use_pcmu=2
-use_pcma=1
-use_gsm=2
-use_speex=1
-use_speexwb =1
-usespeexuwb =1
-use_ilbc =0
Enable only one codec by applet parameters and disable all others.
In this case the call might fail if the other end doesn’t support
the selected codec.
For example the following parameters will force the softphone to
use only pcmu:
-use_pcmu=3
-use_pcma=1
-use_g729=1
-use_gsm=1
-use_speex=1
-use_speexwb =1
-use_speexuwb =1
-use_ilbc =1
For outgoing calls the Caller ID (CLI)/A number display is controlled by the server and the application at the peer side (be it a VoIP softphone or a pstn/mobile phone).
You can use the following applet parameters to influence the caller id display at the remote end:
-username
-authusername/sipusername
-displayname
Some VoIP server will suppress the CLI if you are calling to pstn and the number is not a valid DID number or the webphone account doesn’t have a valid DID number assigned (You can buy DID numbers from various providers).
The CLI is usually suppressed if you set the caller name to “Anonymous” (hide CLI).
For incoming calls the webphone will use the caller username, name or display name to display the Caller ID. (SIP From and Contact fields).
You can also use headers such as preferred-identity to control the Caller ID display.
Make sure that you are actually using the new version. Browsers can cache java applets so there is a change that you are still using the old version.
Refresh the browser cache by pressing F5 or Ctrl+F5.
In rare circumstance the JVM might also cache. For this close the webphone page, run the Java console and type 'x' to clear the JAR cache then restart all browsers instances and re-open the webphone page.
You might also clear your browser cache (delete the files) to be sure that the old version is deleted.
See also the “How to prevent browser caching” FAQ.
When multiple
webphone are used with different parameters, in some environments
the browser can cache the previous download and not to apply the
new parameters. This can be avoided by using different URL for the
applets with different parameters. To refresh the applet cache you
can set the “cache_option” parameter to “no”. To precache the
applet, set the “cache_archive_ex” parameter to the name of the jar
file.
Otherwise the applet cache can be disabled as described
here
and
here.
Click to call can be implemented using the Mizutech WebPhone without much work. You will just have to preset the serveraddress, username, password, register, autocall, callto applet parameters so when the user launch your webpage, the only thing need to be done is a simple click on the call button (or the call can be also launched automatically if the "call" applet parameter is set to true. This depends on your website logic).
For the skinning you have the following choices:
· Using the default java user interface. In this case you should set the "compact" applet parameter to "true" and also set the "applet_size_width" and "applet_size_height" parameters accordingly (So only the call button will remain and the space needed for the status display, such as "ringing", "in call" and others)
· Use the “click2callA” or “click2callB” skins as is or modify them after your needs (these can be found in the demo package)
· Build your own user interface in simple HTML/CSS or Java and use the webphone Java Script API (while running the webphone in the background)
The applet parameters can be set either manually or generated dynamically from your server side script (where you can use anything you wish: PHP, .NET, JSP, etc)
You can also implement click to call using one of our existing javascript files. See the "Click to call from via simple URL" and the "Turn all strings on your website which looks like a phone number to a clickable link" sections at the top of this document under the “Deployment/Simple examples” chapter.
The webphone can load its parameters also from the webpage URL. So you can create a html file as mentioned above with the webphone embedded in “applet” tag and then simply launch the page like this:
Note: you should use clear password only if the account is locked on your server (can’t call costly outside numbers). Otherwise you should pass it encrypted or use MD5 instead. These are explained in the “Applet parameter security” section.
The webphone can load its parameters also from the webpage URL. So you can create a html file as mentioned above with the webphone embedded in “applet” tag and then simply launch the page like this:
For this, just copy-paste the code below into your html:
<script type="text/JavaScript" src="http://www.mizu-voip.com/G/webphone/skins/wp_tel.js"></script>
<script type="text/javascript">
wp_tel.serveraddress = ''; // yoursipdomain.com your VoIP server IP address or domain name
wp_tel.username = '';
wp_tel.password = '';
wp_tel.md5 = ''; //use either password or md5 (leave it empty if you set the password)
wp_tel.skin = ' skin_click2callB'; // skin folder name
</script>
As you can seem this refers to Mizutech website. You can easily host the same on your webserver, just copy the webphone.jar, the wp_tel.js and the webphone.jar to your directory.
Please check the followings:
· make sure that your html and javascript are correct (valid, without errors): http://validator.w3.org/ http://getfirebug.com/
· make sure that webphonetojs is on the same DOM level as the applet (not in separate html tags, pages or screens). Use the “jsfunctionpath” if needed.
· test with the “Toolkit_with_JS.htm” example (this is included in the demo package)
The main purpose of the JS API is the followings:
· -create custom logic regarding your needs (for example auto login based on http session or different call scenarios, call recording, etc.)
· -create your custom skin
In this case,
you will have to run the webphone in the background (set its size
to 0 or 1) and control it via its Java Script API. Please refer to
this document for the Java Script API.
A fully working skin example can be found in the "iphone skin"
directory from the demo package.
This skinning can be done by any web developer using simple HTML,
CSS and Java Script.
If you don't have a web developer around, then please contact us
with your requirements at webphone@mizu-voip.com.
The price will be around $500 (also depending on your
needs)
There is no way to keep the webphone session alive between page loads. For this some different technique should be used, for example:
· run the webphone in an frame
· load your content dynamically (Ajax)
· run the webphone in a separate window/page
Please check the JSAPI.htm and the Popup.htm source in the Examples directory for a working demo.
Also make sure that jar and jnlp mime types are allowed in your webserver.
More help on interaction between java and javascript:
http://
download.oracle.com/javase/6/docs/technotes/guides/plugin/developer_guide/java_js.html
http://java.sun.com/products/plugin/1.3/docs/jsobject.html
http://download.oracle.com/javase/tutorial/deployment/applet/invokingJavaScriptFromApplet.html
http://download.oracle.com/javase/tutorial/deployment/applet/invokingAppletMethodsFromJavaScript.html
If the applet is not accessible you might get a java error (most probably: “'webphone.webphone.class' not found“ or “java.lang.ClassFormatError: Incompatible magic value 218774561 in class file webphone”) or the applet is not loading at all.
-Make sure
that java is installed and enabled in your browser
-Make sure that you copy the webphone.jar file to near the html as
is, without to unpack it
-Make sure that the “jar” mime type is enabled on your
webserver
-Make sure that you can download the applet jar with your browser
if you type its exact URL. For example when you type
http://myserver.com/webphoneapppath/webpone.jar,
the download dialog should appear in your browser. Otherwise it
means that you haven’t placed the webphone.jar in the right place
or your webserver/web-application is blocking it.
-Make sure to deploy the applet in a not restricted (public)
directory on your webserver. You might get errors if the directory
is protected for example with form based authentication. If your
application has to be protected, you should still deploy the jar
file in a public directory and refer to it with its absolute path.
For this you need to set the “archive” parameter correctly.
Example: archive:
‘http://www.mizu-voip.com/F/_EXTERN/demo/webphone.jar’
If you are running IIS/.NET then you might add this web.config in
the webphone folder:
<configuration>
<system.webServer>
<!--add this-->
<security>
<authorization>
<add accessType="Allow"
users="*"/>
</authorization>
</security>
</system.webServer>
</configuration>
This issue
can happen in some circumstances only if you launch the applet from
local file for testing (not from a web server).
Make sure that the file path is not too large for java. Copy the
example directory to the C:\ directory and try again.
Just output
the correct HTML as described in the “Deployment” section.
Applet parameters can be set dynamically at run-time after your
needs (for example you should set the username/password parameters
to match the logged-in user; Instead of the password you can also
use encrypted md5)
Make sure to
specify the correct codebase applet parameter.
http://www.oracle.com/technetwork/articles/javase/appletaspintegration-141915.html
With unattended transfer the transfer will be executed immediately once you call the API_Transfer function.
With attended transfer (transfertype 5) you can use the following call-flow (supposing that you are working at A side and wish to transfer B to C):
1. A call B (outgoing) or B call to A (incoming)
A speaking with B
2. Call API_Transfer(-1,C)
The call between A and B will be put on hold by A
A will call to C and connect (consultation call; if call fails, then the call between A and C will be un-hold automatically)
A speaking with C
3. The actual call transfer will be initiated when A disconnect the call (API_Hangup)
REFER message will be sent to B (which tells to B to call C. usually by automatically replacing the A-B call with A-C)
4. After transfer events:
-If transfer fails (B can’t call C) the call between A and B will be will be un-hold automatically (if server sends proper notifications)
-If the transfer succeeds (B called C) the call between A and B will be will be disconnected automatically (if server sends proper notifications)
-If the server doesn’t support NOTIFY, then the call can be un-hold or disconnected from the API (API_Hold(-2,false), API_Hangup(-1))
5.
B speaking with C at this point if
the transfer was successful
VoIP over TCP and HTTP is not a standardized protocol. This option can be used only with the Mizu VoIP server. To integrate it with your existing VoIP infrastructure you will have to use our VoIP tunneling server (no modification will be needed in your existing servers). We offer free trial install. More details can be found here: http://www.mizu-voip.com/Software/VoIPTunnel.aspx.
For http transport the “transport” applet parameter must be set to 3 (http tunneling) or 4 (first udp encryption, then automatic switch to http tunneling if needed). From version 3.6 the webphone can automatically detect the best transport protocol if the "autotransportdetect" applet parameter is set to "true" (no need to preset the "transport" parameter). You should also set the "useencryption" applet parameter to "true".
The webphone will use the browser capabilities to send/receive the html messages, thus bypassing corporate firewalls.
To turn off proxy authentication, insert this line in your jnlp: <property name="javaws.cfg.jauthenticator" value="none" />
To control where the traffic is forwarded from the server side, use the “upperserver” applet parameter.
To check also a direct route to the upper server, use the “directserveraddress” applet parameter.
Example:
function getMizuApplet()
{
if (theApplet == null) {
theApplet = document.getElementById('webphone');
}
// See if we're using the old Java Plug-In and the JNLPAppletLauncher
try {
theApplet = theApplet.getSubApplet();
} catch (e) {
// Using new-style applet -- ignore
}
return theApplet;
}
// Call API_XXX() via the getMizuApplet() method
getMizuApplet().API_XXX();
For more examples please
check the “JSAPI.htm” and the “Toolkit_with_JS.htm” files.
You can use the JNLP
deployment method with an icon parameter in the information
section:
Example:
<information>
<title>Mizu WebPhone demo</title>
<vendor>Mizutech</vendor>
<href>"http://www.mizu-voip.com/"</href>
<description>A VoIP client applet</description>
<description kind="short">VoIP client application to initiate phone calls over the internet.</description>
<icon href="http://www.mizu-voip.com/wicon.jpg"/>
<icon kind="splash" href="http://www.mizu-voip.com/wicon.jpg"/>
</information>
<icon>
Describes an icon/image that represents the application. Web Start uses the icons during startup in the download progress popup, for desktop shortcuts and in the Web Start application manager. 64x64 icons are shown in the download progress popup and 32x32 icons are used for desktop icons and in the Web Start app manager. Web Start automatically resizes icons with other dimensions.
Attributes:
href=url , required
Contains a URL to a web location containing an image or an icon. Only JPEG and GIF graphic formats are supported.
version=version , optional
Specifies the version of the image.
width=pixels , optional
Describes the width of the icon in pixels.
height=pixels , optional
Describes the height of the icon in pixels.
kind=default|selected|disabled|rollover, optional
Describes the use of the icon. Default value is default.
depth=number , optional
Describes the color depth of the image in bits-per-pixel. Common values are 8, 16, or 24.
size=bytes , optional
Specifies the size of the image in bytes.
Short answer:
just copy the dll’s near your webphone.jar
file.
Long answer:
This module is needed if you enable one of the following options: aec, denoise, silencesupress, agc. You should store the mediaench.dll and mediaenchx64.dll near the webphone.jar file on your server and enable the dll mime type (or set the “mediaenchext” applet parameter to “jar” and rename the dll file extension to jar). If the files cannot be found or loaded than the webphone will not use these features but should remain functional. You should test the dll availabilkity by directly accessing from the browser with the exact url (For example: www.mydomain.com/webphone/mediaench.dll). The browser should be able to download the dll, dylib or the jar.
The webphone will download one of these libraries only at the first usage and subsequent usage will be served from the local cache.
TMG cannot
handle streaming well. For this reason the webphone will
automatically switch off the streaming and will use packet by
packet mode when used with the Mizu VoIP
Tunneling.
However the firewall built into the TMG server might disable this
also after a long call. The best way for TMG users is to allow TCP
port 443 of configure VoIP access as described
below:
http://technet.microsoft.com/en-us/library/dd441021.aspx
http://technet.microsoft.com/en-us/library/ee690384.aspx
If you have any problem with the webphone, Mizutech support most probably will ask you to send a detailed description and logs about the problem.
You can create a log in the following way:
-set the "loglevel" applet parameter to 5
-open the webphone in a browser. a separate log window should appear
-once you reproduced the problem, send the content of the log window to webphone@mizu-voip.com
(You can copy the content with the Ctrl+A, Ctrl+C, Ctrl+V key combinations)
Note:
-If the problem is call related, then make sure to have only one call in the log. That one in which the problem was reproduced.
-Another method to extract logs is the java console (a java icon usually appears on the right-bottom corner of your desktop. From there you can activate the java console). For this you will have to enable java logs/debugging/console from control panel.
-In addition to the log file, Mizutech support might ask one or two SIP account valid on your server to be able to reproduce the problem
Desktop administrators might change java (JVM) permissions on desktops. This might be useful for large companies. Follow the following guide from Oracle: https://blogs.oracle.com/java-platform-group/entry/introducing_deployment_rule_sets
If the webphone is signed with a valid certificate (it is by default) and your LAN doesn’t have internet connection, the applet might start more slowly because it attempts to access the CA to validate the certificate. This can be resolved in one of the following ways:
· sign the applet with a self-signed certificate and allow it on your local LAN browsers to skip the warning
· whitelist the app: link link link link link link
· or allow the CA address on your firewall (currently signed by “digicert” with the following addresses so you just have to allow *.digicert.com on port 80 and 443 (especially 93.115.82.113, 93.184.220.29, ocsp.digicert.com, crl3.digicert.com, crl4.digicert.com)
A certificate is needed for java to suppress the warning message when the users start the applet. By default you will get the applet with a certificate from Mizutech, however this can be replaced with your own certificate if you need so.
Without a valid certificate a warning window with a red exclamation mark will appear at the first launch with an “always trust…” checkbox unchecked by default. With a valid certificate the red mark will turn to green and the “always trust…” checkbox will be checked by default which is more user friendly.
To use a certificate that is recognized by Java installations on the internet, you need to get a certificate from a certification authority that have their root certificates shipped and installed with the JDK/JRE. You can list the installed root certificates with the following command: keytool -list -keystore /usr/local/j2sdkXXX/jre/lib/security/cacerts (adapt the path to your installation, press ENTER when asked for a password)
We are providing the java applet with a selfsigned certificate. You can replace this certificate with yours that you can purchase from CA companies like VeriSign, Equifax Secure, Entrust, GTE Cyber Trust, Thawte, GeoTrust, digicert,Godaddy etc. The price varies from 20 to 800 USD.
You will need to request a "code signing digital certificate for java applet”.
You will have to use the following tools to work with certificates: keytool, jarsigner. These are (part of java SDK. More details here, here and here.
First you have to ask for a certificate from a CA. This can be done usually by first sending a CSR, which you can generate in the following way:
1. generate new keystore (this file will store everything): keytool -genkey -keysize 2048 -keyalg RSA -alias ALIASNAME -keystore KEYSTORENAME
2. generate a CSR (this is needed to ask for a new/renew certificate): keytool -certreq -keystore KEYSTORENAME -alias ALIASNAME -file CSRFILE.CSR
Now you can open the CSRFILE.CSR with a simple text editor and send its content for your CA.
To have your request validated you might have to send your company details and answer a few questions on phone. The process might take 1 – 20 days.
Then you should receive the certificate as a .p12 or .pfx file (if not, than export the file from the browser or try to convert it)
If you have a pfx file (This is a keystore which should already contain all the certificates. You need also the password for the file):
1. make sure to have jdk installed (so you have the keytool)
2. Find out the alias with this command: keytool -list -storetype pkcs12 -keystore FILENAME.PFX –v
(the alias is displayed in the line which begins with “Alias name:”. Once you have the alias, then you can move to the following step)
3. Sign your webphone applet with this command: jarsigner -storetype pkcs12 -keystore FILENAME.PFX -signedjar webphone.jar unsignedwebphone.jar ALIAS
With Thawte CA you will have to follow the following steps:
1. request code signing certificate from here: https://www.thawte.com/code-signing/index.html. The price is around $150.
2. install the java SDK on your PC: http://www.oracle.com/technetwork/java/javase/downloads/index.html
3. you might have to create a CSR first. For this, run the following commands:
keytool -genkey -keysize 2048 -keyalg RSA -alias ALIAS -keystore KETSTOREFILENAME
keytool -certreq -keystore KETSTOREFILENAME -alias ALIAS -file CSRFILENAME.CSR
4. you will need to upload or send some documents to identify yourself or your company. Thawte might also call you on your phone for verification
5. you will receive the certificate shortly and maybe also Cross Root CA and Signing Intermediate certificates. If received as a text file, rename the files from .txt to .cer
6. use the following commands from the command line:
7. create keystore with initial certificate: keytool -genkey -keysize 2048 -keyalg RSA -alias YOURCERTNAME -keystore KETSTOREFILENAME
8. import Intermediate certificate if you need: keytool -import -trustcacerts -alias intca -file intca.cer -keystore KETSTOREFILENAME
9.
import Cross Root CA: keytool -import -trustcacerts -alias crossca -file
crossca.cer -keystore KETSTOREFILENAME
import your certificate: keytool
-import -trustcacerts -keystore KETSTOREFILENAME -alias
YOURCERTNAME -file yourcertificate.cer
10. rename the webphone.jar that you have received from Mizutech to uwebphone.jar
11. sign the applet: jarsigner -keystore KETSTOREFILENAME -signedjar webphone.jar uwebphone.jar mizutech
If you purchased the certificate from GoDaddy: http://support.godaddy.com/help/article/4780/signing-java-code
If you purchased the certificate from DigiCert: http://www.digicert.com/code-signing/java-code-signing-guide.htm
Alternatively you can download a GUI for the jarsigner named KeyTool IUI
Companies can also deploy custom security policy for java applets
You can find more details about java applet deployment here: http://download.oracle.com/javase/6/docs/technotes/guides/jweb/index.html
Find more details about java parameters here.
Mizu WebPhone homepage : http://www.mizu-voip.com/Software/WebPhone.aspx
Demo package:
http://www.mizu-voip.com/Portals/0/Files/webphone_demo.zip
Example html: Example.htm (if you have received it with this
document. Otherwise it can be found in the downloadable demo
package)
For help, contact webphone@mizu-voip.com
Copyright © 2008-2015 Mizutech SRL